As a home inspector, I examine decks almost every day. Usually, I do this as part of a home inspection following the American Society of Home Inspectors’ Standard of Practice for Home Inspections (ASHI SoP). But as more inspectors become specifically trained in ASHI’s new Deck Inspection Standard of Practice, I expect to more frequently see deck inspections that are performed independently from a home inspection.
Most decks that I inspect have multiple defects, some of which present serious safety risks. This isn’t a surprise on an older deck, but I’ve also found serious problems on recently built decks. Because I’ve already examined deck stair defects in a previous article (see “Common Deck Stair Defects,” Nov/Dec 2016), I’ll focus here on deck framing and flashing defects.
Contrary to what some contractors may believe, home inspectors would rather not find defects during an inspection. Defects cause problems for everyone: the builder, who faces callbacks and the risk of being sued because of a deck failure; the homeowner, who has a potentially unsafe deck; and the inspector, who is faced with writing up a lengthy report.
I don’t consider a “defect” simply a failure to comply with the building code. Rather, I consider it a failure to follow current best practices as presented in the American Wood Council’s Prescriptive Residential Wood Deck Construction Guide, or DCA 6-15. Building codes are the minimum standard; they are not the standard for contractors who build quality decks. Remember, too, that the building official is not responsible for ensuring that a deck is safe, or even that it complies with local building code. You, the contractor, are fully responsible for both of these. A deck that passes local code inspection may still be unsafe; therefore, I consider DCA 6-15 to be the standard to which all decks should be built, regardless of what might be allowed by a code official.
Deck Ledger Attachment
Most of the decks I inspect are supported on one end by a ledger attached to the building. These ledgers are subject to vertical loads (gravity) that try to pull the deck down from the building, and horizontal—or lateral—loads that try to pull the deck away from the building. The requirement that the deck ledger be positively anchored to the building to resist both loads or that the deck be freestanding has been in the code for many years (R507.8 in the 2018 International Residential Code), but—based on what I’ve seen—this requirement is still not well understood, and it is still not widely enforced.
Older decks frequently have ledgers that have been nailed rather than screwed or bolted to the house.

Sometimes, the author finds this problem on recently built decks too.

Note the nailed double-ledger connection, which is in the process of separating.
For example, surprisingly, I still find ledgers that have been nailed to the framing, which is prohibited by both DCA 6-15 and the IRC. When I do, I complete my inspection, then explain the risks to my clients and advise them (and their real estate agent) not to walk on the deck until it is properly attached to the house. In my report, I highlight this defect in red ink to emphasize the importance of this finding and recommendation.
Reactions vary. A few people—usually the agents—believe I’m being overly cautious. On the other hand, most clients seem to appreciate my concern for their safety.
Ledgers shouldn’t be fastened to a cantilevered projection …

… or to brick veneer (especially with masonry screws).

Ledgers should not be attached to the web of an I-joist rim board …

… or to OSB sheathing.
Even when bolts or screws are used to attach the deck ledger to the building, many of these deck ledgers are improperly installed. I’ve seen plenty of creative—but incorrect—ways to attach a deck ledger to a building. I’ve discovered ledgers that have been bolted to masonry walls, to OSB sheathing, and even to the web of an I-joist rim board.
This ledger, on a year-old deck, was fastened to an I-joist rim board with carriage bolts; neither the fasteners nor the method are allowed by code, despite the blocking.
Another problem is ledgers that are attached to cantilevers. Because cantilevers aren’t typically designed to support the loads from a deck, both the IRC and DCA 6 require that the band joist supporting the deck ledger be fully bearing on the structure, effectively prohibiting attachment of a deck ledger to a cantilever.

Adding a washer to a carriage bolt doesn’t make the connection code compliant …
… but it’s better than forgetting the nut and washer. Also note that this bolt is too close to the edge of the rim joist and could cause it to split.
One of the key details I’m looking for during an inspection is that the deck ledger is solidly attached to a dimensional-lumber band joist or to a 1-inch-thick (or greater) engineered rim board. I also pay close attention to the fasteners, since the primary job of the bolts or screws is to resist the vertical loads imposed on the deck ledger. These fasteners should comply with the requirements in the IRC and meet DCA 6-15 guidelines.
While the bolt and screw rules in the IRC and DCA 6-15 are based on the use of 1⁄2-inch-diameter galvanized machine bolts or lag screws, builders sometimes use smaller-diameter fasteners, such as LedgerLoks or Simpson Strong-Tie SDWS and SDWH fasteners. These structural screws need to be installed according to the manufacturer’s instructions. You can’t simply substitute them one-for-one with the 1/2-inch-diameter fasteners spelled out in the code. And while larger-diameter fasteners may be used, the location details change (more distance is required from the edges of the ledger).
Whether or not bolts or screws will provide the necessary lateral load resistance requires a structural analysis of the specific deck. It’s a lot easier—and less expensive—to follow one of the prescriptive methods spelled out in the IRC and in DCA 6-15. At around $35 for a set of four SST DTT1Z (or similar) connectors and the necessary fasteners, easy-to-install tension ties are a low-cost way to help ensure full compliance with the lateral-load provisions in the IRC and conform with DCA 6-15.
Cantilevered Balconies
During a home inspection, I pay particular attention to cantilevered balconies and their flashing details, since failure to install proper flashing and ventilation where cantilevered balcony joists penetrate the building wall can contribute to catastrophic balcony failure. This is what caused a balcony to collapse on an apartment complex in Berkeley, Calif., in June 2015, resulting in the deaths of six students.
Cantilevered balconies are vulnerable to deterioration and failure, especially if they are covered on both the top and bottom. The framing that supports these top- and bottom-covered balconies can get wet and can stay wet. There is usually no ventilation of these balconies to help the framing dry. This constant wetness hastens deterioration. In addition, these balconies cannot be visually inspected without destructive measures. Deterioration can go on for years until failure occurs.
To head off these problems, I recommend that existing wood balconies that are enclosed be retrofitted with ventilation and inspection openings. These features should also be incorporated into new cantilevered balconies built with wood, along with some version of the flashing details developed by California architect Patrick Burger, which you can find in the PDB article “A Path to Safer Balconies” (Mar/Apr 2016).

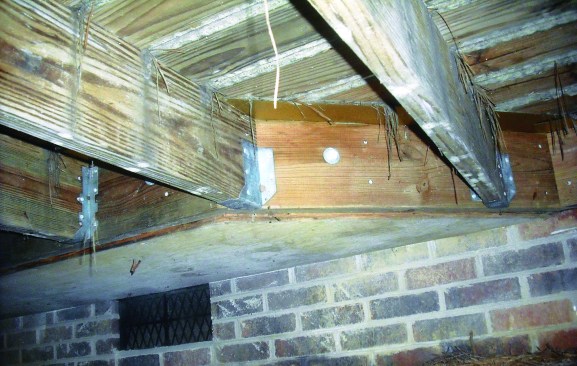
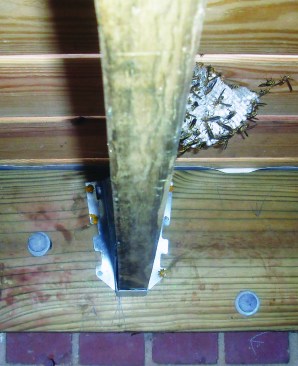
White rust is already forming on this joist hanger, which is only approved for interior use,
Joist Hangers and Fasteners
I often find problems with joist hangers and other metal hardware. Sometimes the deck builder has used hangers intended for interior use, when he or she should have used G185 (minimum) galvanized hangers, or even stainless steel hangers in coastal areas. One way to verify that a Simpson Strong-Tie joist hanger is suitable for use on a deck is to look for a Z (galvanized) or an SS (stainless steel) at the end of the model number.

Metal-roofing screws aren’t approved joist hanger fasteners …

… nor are roofing nails.
It’s not unusual to see joist hangers fastened to the framing with roofing nails or drywall screws. Hardware manufacturers typically specify the type and size of fasteners that must be used with their products; in general, screws—except those specifically allowed by the manufacturer—should not be installed, nor should you mix metals.
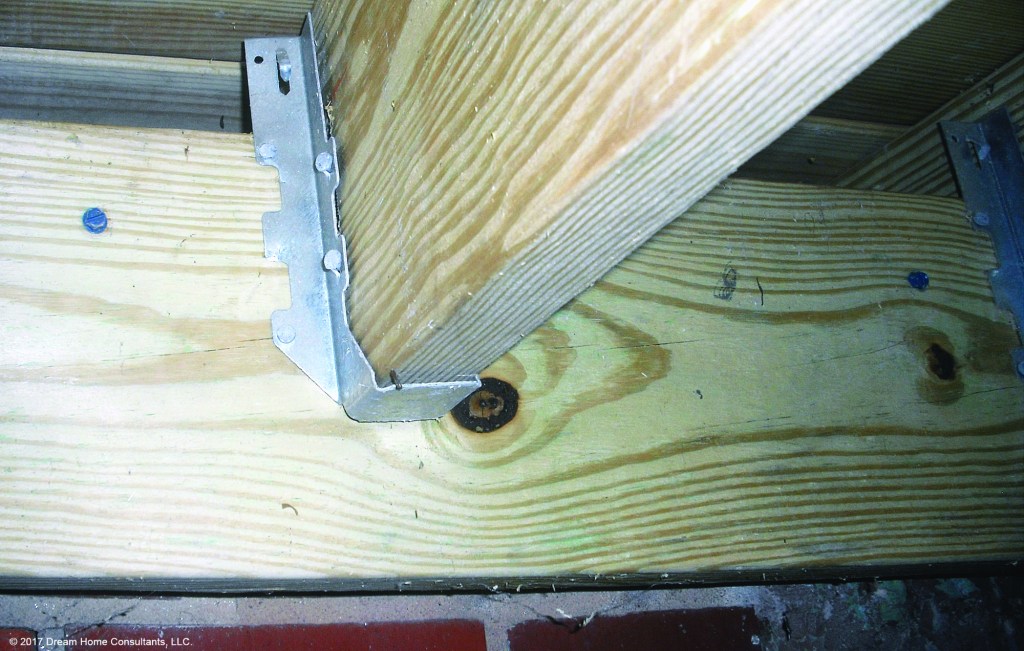
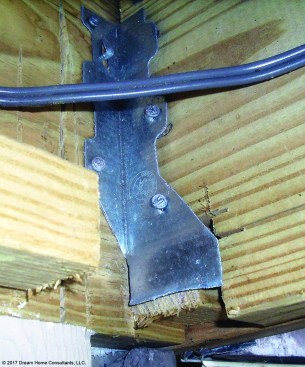
Curiously, I often find hangers installed with just two or three fasteners. In almost all cases, joist hangers should have a manufacturer-specified fastener in every round and oblong hole.
All of the holes in metal hardware should be filled with approved hanger nails or structural screws, and the hanger flanges should fit snugly against the joist.
Metal hardware shouldn’t be field-modified; with its seat removed, this hanger provides minimal joist support.
I often find field-modified hardware too, but in most cases, joist hangers and other hardware should not be bent unless the manufacturer allows bending. Even then, the hardware should be bent only once to the required position.

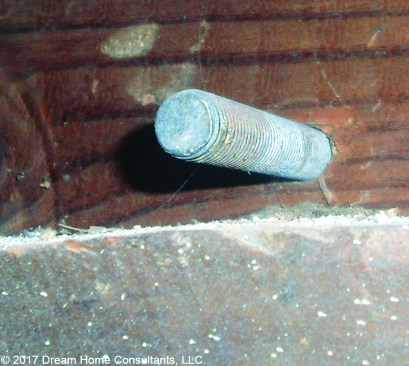
The white rust on this ledger bolt indicates that it is still safe but is nearing the end of its service life.

Bruce Barker

Water intrusion is causing wood rot and the red rust on this lag bolt; the connection is likely weakened.
One of the most important things I look for when inspecting a deck or balcony is white or red rust. White rust appears on metal hardware as white stains, indicating that the protective zinc coating (galvanization) is deteriorating. While white rust indicates that hardware is nearing the end of its service life and should be monitored regularly, significant red rust indicates that the component has reached the end of its service life and should be replaced.

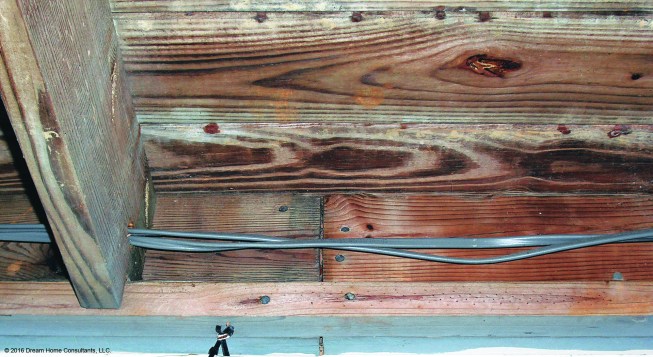
The sheathing and band joists on these homes are in rough shape, thanks to moisture intrusion from their decks.

They require replacement.
Deck Flashing
It won’t matter how well a deck ledger is attached to a building if the band joist or rim board it’s attached to is water-damaged. The bolts or screws may withdraw from water-damaged wood, and if this occurs, the deck will collapse. Even though flashing details are not spelled out in the IRC, properly installed deck flashing is essential for the long-term structural integrity of a deck.

Improperly installed ledger flashing on a one-year-old deck was the cause of this water damage.

Flashing is often improperly installed underneath door thresholds.
Properly installed flashing is also essential for the long-term performance of the building. Water damages building components and provides moisture that is necessary for fungal (mold) growth. Mold claims can be very costly to deal with. Properly installed deck flashing is, therefore, essential on several levels.

Another problem area is where ledgers intersect with other building components, such as a roof.

During a new-home inspection, the author discovered flashing that hadn’t been integrated with the water-resistive barrier underneath the home’s siding.
When I inspect a deck, I look for deck flashing that is integrated into the wall drainage system and into the flashing for wall penetrations, such as doors, that open on to the deck. The objective is to direct water away from vulnerable wood and away from entry points into the building, but builders often get the details wrong, with serious—and sometimes catastrophic—consequences. Seemingly minor flashing errors can admit a lot of water into a wall assembly.
Deck Inspections
If you’re not doing this already, you should recommend or offer an annual deck and balcony inspection to your clients. This is especially important if the home is near a large body of water or is a rental property. Regular inspections are important to spot visible indications of unsafe conditions and potential failure. A visual inspection is usually adequate for the annual inspection of newer residential decks and balconies. A comprehensive inspection based on the ASHI Auxiliary Standard of Professional Practice for Residential Deck Inspections is better for older decks and balconies, those near water, and those at a rental property.
Photos by Bruce Barker