In the world of residential design, brick walkways don’t get much respect. Most people see them as a way to keep their feet clean when walking from the car to the house. But as one of the first things visitors see, a paved walkway can significantly enhance the visual impact of a home’s exterior. Recently, I was hired to build two brick walkways leading to the entrances to a 1928 house just a block away from Duke University.
There are two very different approaches to brick paving: flexible and rigid. With flexible paving, bricks are set dry in a layer of stone dust over a compacted aggregate base. The joints between the bricks are small and are filled with dry sand after the bricks are installed.
For this project, I opted for rigid paving, in which the bricks are set in a bed of mortar on top of a concrete slab with fully mortared joints. Rigid paving is more durable, but it can be unforgiving to movement, with any deformation in the slab showing up as a crack in the finished brick surface. Grouting the joints can also turn into an unholy mess if you’re not careful and patient.
1
of 18
John Carroll
Prep work begins with installing a concrete slab to serve as a f…
Prep work begins with installing a concrete slab to serve as a foundation for the brick walkway. The author excavates down about 8 inches and compacts the subsoil before placing 4 inches of washed gravel. Next, he sets the forms for the concrete and compacts the gravel layer with a mechanical compactor.
John Carroll
Angled gussets reinforce the forms that create the flare to expa…
Angled gussets reinforce the forms that create the flare to expand the walkway to the width of the stairs.
Mike Moore
After the concrete is placed, a mag float smooths the surface of…
After the concrete is placed, a mag float smooths the surface of the slab. An absolutely smooth and flat slab is not necessary as a substrate for the bricks.
John Carroll
The morning after the concrete pour, the author uses a circular …
The morning after the concrete pour, the author uses a circular saw with a masonry blade to cut control joints in the concrete. These joints make it more likely that if the concrete cracks as it cures or settles in the future, it will do so in a straight line.
John Carroll
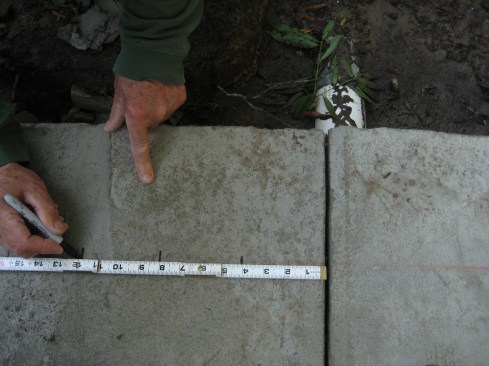
The first bricks to go in are along the edges of the walkway. La…
The first bricks to go in are along the edges of the walkway. Layout starts at a control joint to avoid having bricks span the joint and be subject to cracking. The gap between the bricks on either side of the control joint will be filled with flexible sealant, instead of mortar, to allow the bricks to move slightly without cracking the joint between them.
John Carroll
Mason’s twine stretches the length of the walkway to guide bri…
Mason’s twine stretches the length of the walkway to guide brick placement. To keep the bricks following a perfectly straight line, the author installs them at precisely measured and laid-out intervals along the edge.
John Carroll
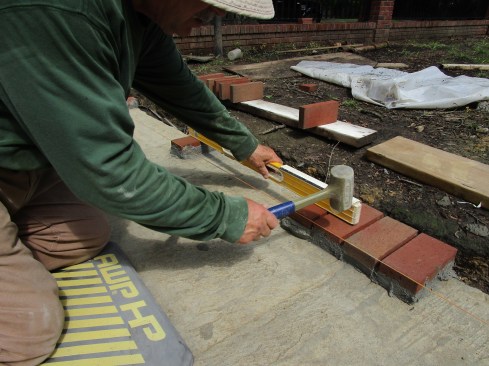
The author adds a brick next to his first group and taps it into…
The author adds a brick next to his first group and taps it into place, leveling over to the next brick in the sequence
John Carroll
The installation leapfrogs in the opposite direction with the au…
The installation leapfrogs in the opposite direction with the author adding a brick next to the one he just leveled to.
John Carroll
The authorcompletes the installation to the control joint and re…
The authorcompletes the installation to the control joint and repeats the process for the edge bricks from there.
John Carroll
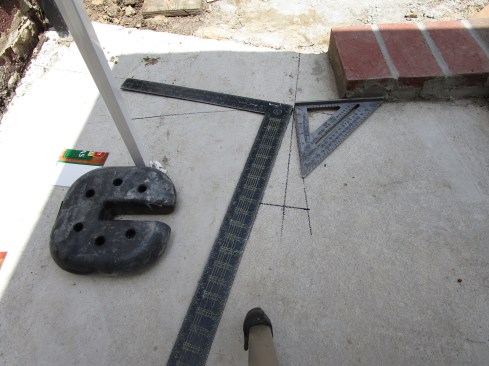
After running the border bricks to within one brick width of the…
After running the border bricks to within one brick width of the flare in the walkway, the author draws a layout line for the bricks along the flare’s border. Then he uses squares to lay out the angle of the bend, and he bisects this angle to define the cut angle for the bricks.
John Carroll
Next, the author places a brick-size cardboard template at the i…
Next, the author places a brick-size cardboard template at the intersection and uses a straightedge to transfer the angle onto the template.
John Carroll
The author cuts the template—minus half of the mortar joint—…
The author cuts the template—minus half of the mortar joint—along the cutline.
John Carroll
The template transfers the angle cuts to the bricks at the pivot…
The template transfers the angle cuts to the bricks at the pivot point of the flare, and the rest of the bricks can then be laid out along the edge of the flare.
John Carroll
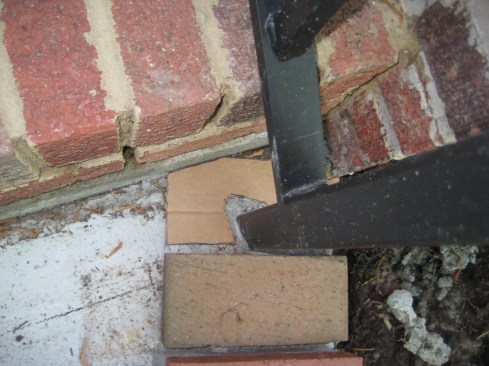
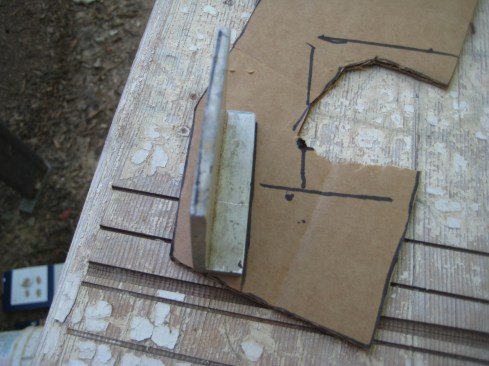
To fit odd-shaped areas such as the one around the railing post,…
To fit odd-shaped areas such as the one around the railing post, the author first rough-cuts a brick-shaped cardboard template to fit against the steps and looselyaround the post.
John Carroll
Using a small piece of aluminum angle against each of the flat s…
Using a small piece of aluminum angle against each of the flat surfaces of the post, the authortransfers the exact shape of the post to the template.
John Carroll
The template now bears the lines for tracing the shape of the po…
The template now bears the lines for tracing the shape of the post using the aluminum angle.
John Carroll
The author places the template on a brick, lining up the piece o…
The author places the template on a brick, lining up the piece of aluminum angle with the line drawn on the template and marking the other side of the angle to lay out the exact shape that needs to be cut out. A 4 1/2-inch grinder with a diamond blade makes fast work of odd-shaped cuts such as this one.
John Carroll
The cut brick then takes its place as the final piece in the fla…
The cut brick then takes its place as the final piece in the flare border. Other bricks receive straight angle cuts to square off the rest of the flared section to the field tile.
Layout for the Walkway
The walkways started at brick gate posts that were 78 1/2 inches apart and ended at steps 98 1/2 inches wide. Because neither dimension worked with a 4-inch brick layout, I opted to make the walk 80 inches wide, notched around the brick posts and flared out the last couple of feet in front of the steps. The 80-inch width meant that I wouldn’t have to cut bricks for every course on the walk.
Where the walkway met the stairs, the finished surface measured one riser height (about 7 inches) down from the first tread. At the other end, the walk had to be flush with the city sidewalk. Working down from the walk surface, I allowed 4 inches for the concrete slab and
4 inches for a layer of washed gravel. We excavated to that level and mechanically compacted the soil base. After setting up forms, we compacted the layer of gravel and were ready to pour the slab.
1
of 12
Brett Arnold
The recipe for brick-laying mortar is two-and-a-half parts mason…
The recipe for brick-laying mortar is two-and-a-half parts masonry sand to one part Type-S masonry cement plus water. After combining the sand and the water together in a mixing tub, the author mixes in the masonry cement, stirring the mortar with a mixing paddle on a heavy-duty drill. When it’s thoroughly mixed, he slowly adds water until the consistency is right.
Brett Arnold
Once the mortar has set up over night, the excess is scraped off…
Once the mortar has set up over night, the excess is scraped off the surface.
Brett Arnold
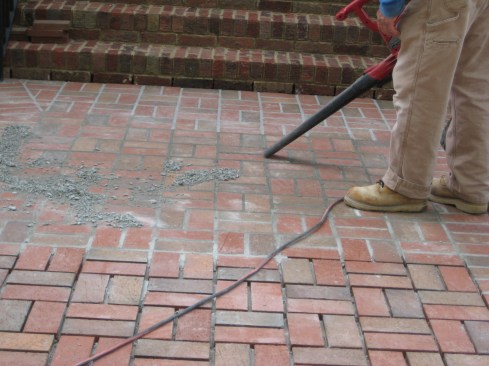
A leaf blower blows the dried mortar off the walkway. Using a br…
A leaf blower blows the dried mortar off the walkway. Using a broom that can smear the mortar into the surface of the bricks should be avoided.
John Carroll
After the mortar has cured overnight, a course scrub pad cleans …
After the mortar has cured overnight, a course scrub pad cleans off any residual mortar.
John Carroll
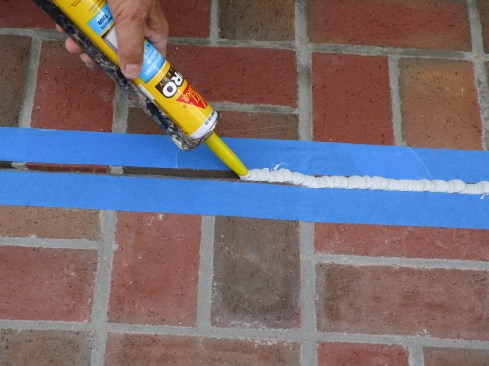
The final step is filling the brick joints over the control join…
The final step is filling the brick joints over the control joints in the concrete slab. The author tapes the edges of the bricks, pushes foam backer rod into the joint.
John Carroll
The author fills the control joint with a polyurethane-based cau…
The author fills the control joint with a polyurethane-based caulk made specifically for use with concrete and masonry.