Selecting Exterior Caulk
There are several general types of polymer used to manufacture most high-performance caulks: silicones, polyurethanes, latex-acrylics, and solvent-based “block copolymer” synthetic rubbers (which include butyl as well as some of the newer proprietary synthetic formulations).
The best type of caulk for the job depends largely on the materials to which the caulk must bond. For bonding dissimilar materials (for example, wood to masonry, look for sealant that can handle a lot of joint movement.
For the most part, polyurethane caulks provide the best all-around performance for exterior applications, but they are more expensive than most other caulks and can be difficult to clean up (below).
Joint Design
If the joint sealant is too shallow or deep, it will not expand and compress with the movement of the joint. Instead, it may split or rip away from one of the joint surfaces.
Shape
Ideally, caulk joints should be configured to span a gap that is half as deep as it is wide (below). The caulk should not bond to the back (three-sided bonding), but only to two sides, so it can flex as it expands and contracts.
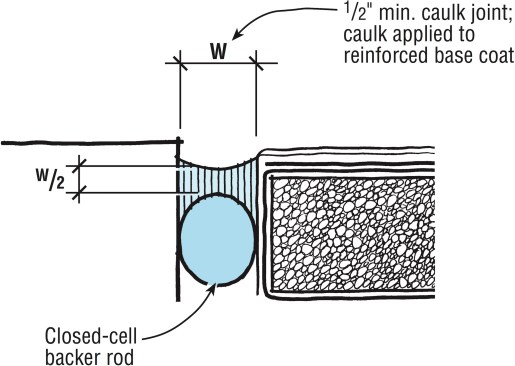
A good caulk joint should bond to only two sides, not to the back. Use backer rod to control the depth, which should be half the width of the joint.
Corner fillets do not move freely and generally peel off the two surfaces. If a joint depends on a caulk sealant, open it up slightly to allow caulk to fill the gap. If a corner is tight, don’t caulk it; the caulk will fail faster than any finish applied to it and will only complicate refinishing.
Backer Rod
Backer rod should be used to fill large gaps and control the depth (Proper Joint Design, above). Most backer rod today is made out of foam and comes in diameters from 1/4 in. to 2 in. and up. Choose a backer rod that’s just a little larger than the joint so it will stay in place and allow you to control the depth of the sealant.
Foam backer rod comes in open-cell and closed-cell form. Open-cell backer rod compresses more and is easier to work with, but it’s like a sponge and can absorb water. In critical areas that may absorb moisture from the substrate, use a closed-cell material.
Bond-breaker tape. The main purpose of backer rod is to keep sealant off the back of the joint, thus preventing three-sided bonding. If the joint is too shallow to fit backer rod, apply bond-breaker tape to the back of the joint.
Applying Caulk
The fine print on the label of most caulk tubes reads: “Apply to clean, dry surfaces. Application temperature: 40°F to 80°F.” However, construction sites are never clean, seldom dry, and work doesn’t stop when the temperature drops below 40°F. To promote good adhesion, prepare the surface using the following strategies:
- Scrape, chip, brush with a stiff-bristle brush, and dust the inside of the joint, or even blow it out with compressed air.
- Wipe the surface with a strong solvent, such as acetone or methyl ethyl ketone (available in hardware stores and contractor supply houses). These solvents evaporate water and dissolve greasy substances that can retard adhesion.
- Every caulk joint should be tooled. The best tool is a steel spatula (or sculptor’s tool) that is slightly smaller than the width of the joint. Try to achieve a smooth, even appearance without squeeze-out on the sides.
- Cut the nozzle of the tube at an angle slightly smaller than the size of the joint.
- In cold weather, keep the caulk warm. If necessary, use an electric heat chest to store tubes. Also, it may be necessary to heat the surface with a hair dryer or a heat gun (just be careful not to strip the paint or start a fire).