Installing Curved Exterior Trim – Continued
After calculating the actual amounts of curved trim, we ordered 6 extra feet to account for waste. The shop used a CNC router to cut out a template for the clamping station and then screwed L-shaped blocks to it for the glue-up. Once dry, the blanks were cut to width and sanded. The crown, band, and bed molding were profiled on a tilting-head shaper using custom-ground knives. By making repeated passes with the shaper while gradually bringing its head to a 45-degree angle (the spring angle of the crown), the shop avoided hogging out too much material at once.
It took the shop about a month to make the curved trim. When it arrived on the job, we primed it with two coats of A-100 oil-based primer by Sherwin-Williams (800/331-7979, www.sherwin-williams.com). Our painting contractor had it tinted gray to better match the dark-green top coat.
Curved Fascia and Crown
We cut the fascia and the other curving trim with a dual-bevel sliding miter saw equipped with an 80-tooth carbide-tipped blade. It’s not always easy getting the correct miter and bevel settings when you’re working with curved material, so when we found settings that worked, we recorded them for future cuts. We also used the same cut man
for the entire trimming process. As you might imagine, this custom-made trim isn’t cheap (the crown was $80 per foot and the curved fascia $35 per foot), so we always erred on the side of caution, thinking it better to be conservative and make a recut or two than waste material.
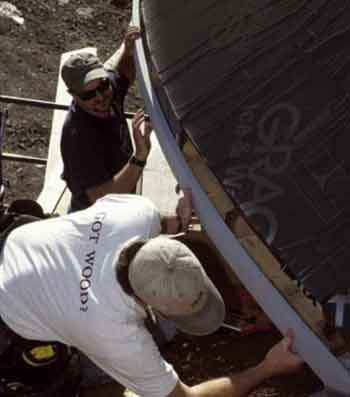
The first piece of trim to go up was the curving fascia that butts into the main roof. We made an initial cut by approximating the roof pitch and then we made a more accurate cut by scribing the trim in place. We fastened the first piece of fascia and then worked our way around the tower.
We have found that a cordless nail gun saves setup time and makes high work like this easier. But before we nailed anything off, we ran in a couple of screws. The screws allowed us to make adjustments if necessary and ensured that the trim was pulled tight to the framing. A pair of cordless drills is a good idea, too, because they eliminate the need to constantly swap drilling and driving bits. We sanded the joints and spot-primed where needed as we went along. Spot-priming is important because it keeps the wood from weathering, which could prevent good adhesion of the top coat.
Next, we installed the curved crown. Without the roofing or drip edge in place, we positioned the crown by holding it against a pair of squares simulating the position of the shingles. Before fastening, we pulled the crown tight to the fascia with bar clamps, ran in some screws, and then finished it off with a cordless framing nailer. We like to use scarf joints instead of butt joints at seams, because scarf joints are less likely to open up with seasonal movement.
Installing the Frieze
With the crown in place, we turned our attention to the frieze board. The frieze finishes off the top of the tower and gives some visual interest to this area. It’s composed of three pieces: the frieze, a bed molding at the top, and a small band molding near the bottom.
The frieze covers the window’s curving head jamb with a slight reveal; because it has a bed molding at the top, we left a gap to save material. For the frieze board, we started where the tower roof ties into the main roof. As with the curved fascia, we made a rough approximation of the angle by using the roof pitch as a guide; then we scribed the frieze in place for a more accurate cut. Because we had solid framing behind the frieze, we didn’t need screws or clamps to draw it tight; we just used the cordless framing nailer.
With the frieze circling the entire top of the tower, we installed the bed and band molding. The bed hides the gap at the top of the frieze. It was installed — like the crown molding — on the fascia. Similarly, a decorative band molding was installed near the bottom of the frieze.
Before taking down the scaffold, we had our painter fill all the nail holes with auto-body filler and paint the trim with two coats of acrylic-latex SuperPaint from Sherwin-Williams. Then the roofer installed a custom copper drip edge fabricated by Coastal Copper and Slate in Rockland, Maine, to support the overhanging cedar shingles and to finish off the crown detail.
Once we had all of the parts from the mill shop, trimming out the towers went smoothly. With three carpenters, installing the windows and exterior trim took just over a week to complete.
We estimated the labor for this home based on labor costs for past projects and then increased the amount by 25 percent to account for the home’s added complexity.
Chris Caseis a foreman with Boothbay Home Builders in Boothbay, Maine.