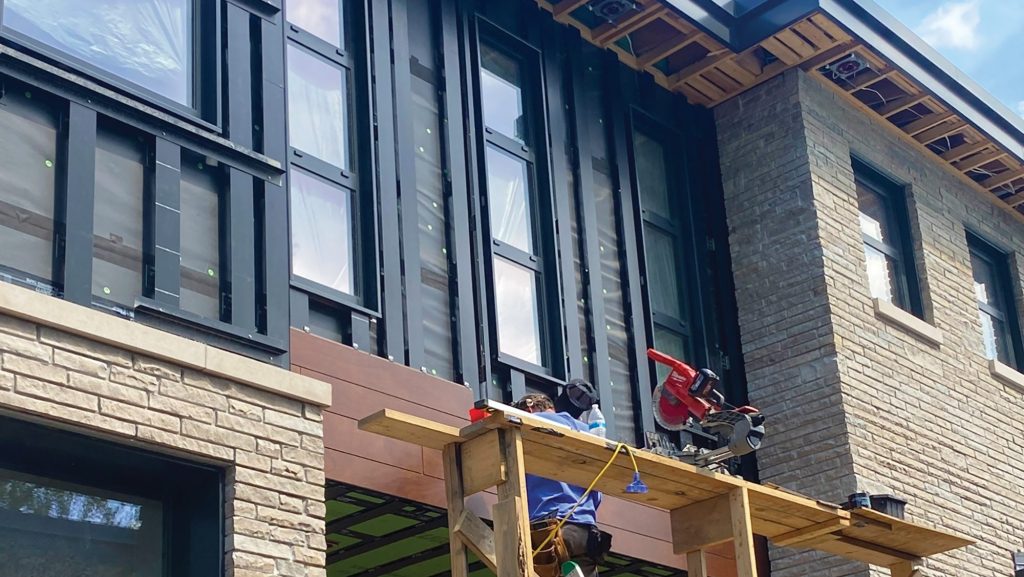
A recent, large-scale project challenged us with several unique claddings that also needed to intersect cleanly at numerous offsets and elevations, not to mention integrate with an all-metal standing-seam roof. This project pushed us in different ways to become creative with how we managed different trades installing different products on different timelines. In some cases, we needed to jump these trades from one area of the house to another; for instance, when a particular task needed to be done before another trade could do its work or to prevent one trade from having to work over another trade’s finished product.
For most subcontractors, the name of the game is getting the job done and moving on to the next project. But because of the size and overall complexity of this project, we had to explain to our trade partners that they wouldn’t be able to come in and just crank through the work. There would be times when they would have to stop and wait for another trade to complete a certain aspect of its scope of work before they could continue.
As an example of the scale and technicality of installation that was required, it took almost one year from start to finish for the contractor that handled the siding and soffit cladding to complete its entire scope of work.
As this project got underway, we had already been working on mock-ups to become familiar with the materials and how to handle transitions, trim pieces, flashing, and so on. We use mock-ups on all our projects; we’ve found that they can be beneficial to us as construction managers, as well as to our trade partners who will be installing the materials. They can help clarify details about how materials can or need to work together to provide a clean, well-planned, finished result. (See “Practice Makes Perfect,” Feb/20.)
Rick Mills
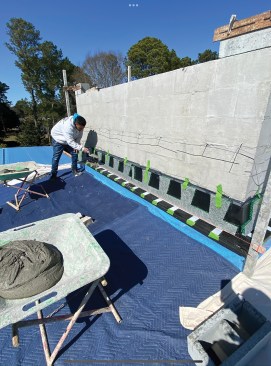
On a mock-up, the author experimented with Benjamin Obdyke Invis…
Parklex Siding
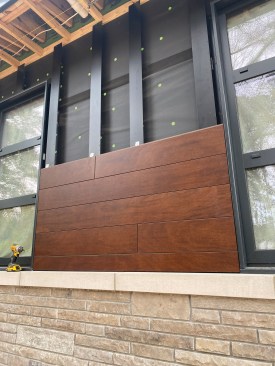
For this build, the client was interested in an exterior material that looked like wood but didn’t require the maintenance—the unicorn of exterior construction materials. We talked through several highly durable natural wood products, but they all would eventually either need maintenance or lose that rich look of freshly cut or stained wood. After some searching, the architects selected a unique and durable product made in Spain called Parklex Naturclad-W (parklexprodema.com/usa). It’s created by layering a real wood veneer onto a high-pressure laminate core. During the manufacturing process, the veneer is fused to the laminate, which, according to Parklex, prevents delamination or peeling.
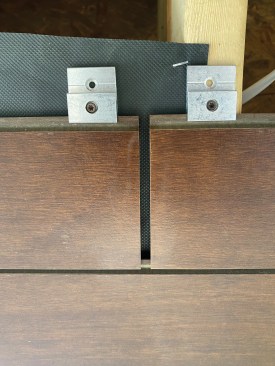
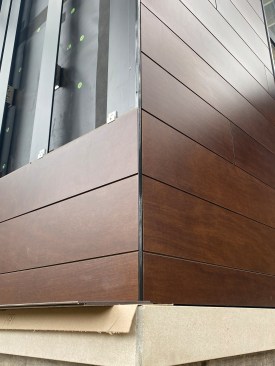
The Parklex siding was the dominant cladding on the house. It mounted on a metal track system that consisted of aluminum “clips” attached to the wall every 20 inches or so, with ¼-inch stainless lag screws at stud locations. These clips hold either L- (at corners) or T-shaped (in the field) aluminum extrusions that create a drainage space (or rainscreen) behind the horizontal siding boards and provide support for it. The boards attach to these extrusions with aluminum clips that have grooves to accept the tongue on the top and bottom of each board. Once in place, the boards are self-spacing, leaving a ⅛-inch gap between boards. All these elements together projected off the house 3 inches.
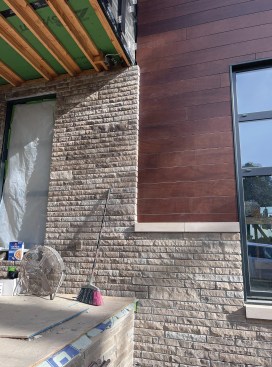
It’s worth noting that this siding system can be installed over a traditional rainscreen made with 1-by wood battens. However, we opted for the larger projection created by the aluminum track system to mesh better with the already large 6-inch projection created by the stone cladding on the house. This left us with only a 3-inch change in dimension between those cladding surfaces, as opposed to the 5-inch difference we would have had if we ran the siding boards over wood battens. (Everyone agreed this was architecturally more pleasing to the eye.) The other net benefit to this system is that we were able to straighten the siding using a string line when installing the track system. This gave us more flexibility in the end.

Rick Mills
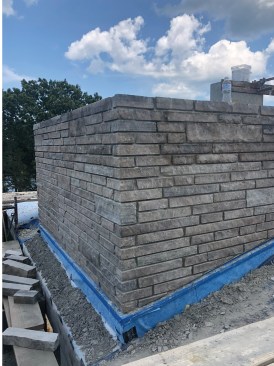
To create a clean joint between tile pavers and stone cladding, …
Stonework
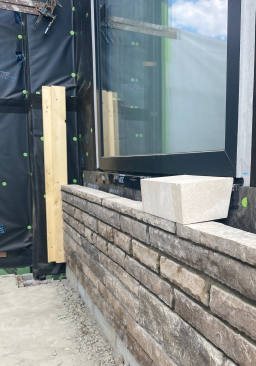
Though a secondary material, the stone cladding had an equally substantial presence on this house. It had been quarried in northern Canada and had a rugged but, at the same time, contemporary look, as it came in large, linear pieces. Installed like brick, the building stone required a 1-inch air gap behind it and was attached to the framing with wall ties. Anywhere the stone stopped at a certain elevation, it was capped with a 4-inch-thick, square-cut piece of Indiana limestone. The team felt like this bridged the gap from the rough-cut stone to the modern, horizontal cladding. As mentioned above, the building stone projected off the sheathing 5 inches and the limestone had an additional 1-inch overhang, creating a 3-inch offset from the face of the siding.
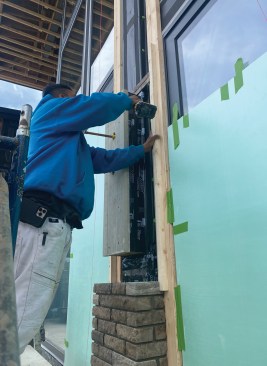
After working through a few different window options with the client and architect, we decided to use a European window from Schuco sourced through European Architectural Supply (EAS) out of Boston. We knew we needed some type of exterior “casing” that could integrate with the 3-inch projection of the siding. After talking with EAS, it informed us that Schuco could create an aluminum extrusion to case the windows. We mocked this up for the clients to see (along with the siding and stone), and they gave us the go-ahead to move forward with this detail.

Rick Mills
Prior to the installation of the metal roofing and before instal…
Order of Process
Once we moved through the mock-up process, it was easy to determine which trades should do their installations first and which trades should delay the start of their portion of the project. We call this “order of process.”
Because the building stone would wrap the circumference of the building, the stone masons would be the first trade on site. Once underway, they had a few months to install some larger sections before we released the siding crew (the same carpentry team that framed the house and handled all our block-out work; they were involved in approving the original mock-ups, so they were already in tune with the project).
Having a crew that was already familiar with the project was extremely helpful. As the masons were progressing, we were able to foresee which areas would need some “prep” for the stone to cleanly install the siding and the soffits. Sometimes, this prep work was as simple popping a chalk line where there would be a transition. In this way, the siding team acted as a check for the masons, helping to verify that what was on the plans was accurately transferred to the house. In a lot of places, this prep work included installing what we called “simulators”—blocking or continuous 2-by material that mimicked the 3-inch siding projection and created a pocket in the stonework that would allow the siding crew to run their siding behind the stone at intersections. This detail meant they could forego scribing boards to the stone surface.
What we found worked well for these simulators was to screw two 2-bys to the house; one 2×6 attached to the house with screws toward an edge where they wouldn’t be covered by stone, followed by a 2×4 that got covered by stone. This made for easy removal and reuse.
Similarly, we used CMU block set at the elevation of the finished tile as a temporary fill beneath the stonework surrounding the deck. This allowed the tile pavers to slide in beneath the stonework later in the project.
Our thought behind our order of process was two-fold: First, on a house of this scale, there should be no need to have two trades working in the same area at the same time.
Second, and of great importance for keeping the project on schedule and on budget, we tried whenever possible to arrange the work schedule so we wouldn’t have to spend a lot of extra time protecting installed materials. Since we knew up front that stonework would be extremely messy (lots of mortar droppings are always expected), we opted whenever possible to install that first. There were, of course, some things, such as the windows, that would still need to be protected.
We worked hard to avoid installing stone up against finished Parklex and over metal roofing. There is no simple repair process for metal roofing, especially. If a panel gets damaged, it typically needs to be replaced, which means removing all the panels in front of that panel (think of a tongue-and-groove style installation process). Damage to metal roofing can be inflicted by just about any trade working over or around it, including painters setting up ladders, electricians installing flood lights, and so forth.
Installation Details
After the stone crew had gotten about halfway around the house, we had the siding guys get started with the siding installation. Even though we had done some mock-ups, it was a bit of a slow start. Tackling larger walls, ensuring the siding was running cleanly around the window trim (the clients requested window casings flush with the siding), and ironing out the details for finishing outside corners all needed to be refined. After the crew had the first few walls under their belts, they were off and running and tying into areas that they had previously prepped for the masons. Once we saw the results of pre-planning coming together, everyone was floored by the ultra-clean transitions at elevations, corners, and ceilings.
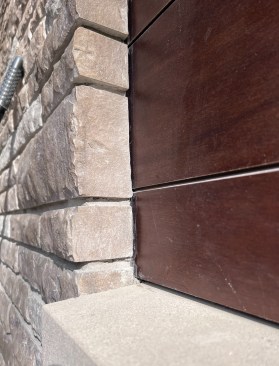
This house had many different offsets and elevations, which created lots of unique situations. For example, on the front of the house, we had one “flat transition” from siding to stone occurring in the plane of the wall. In most of the previous locations, the transition from stone to Parklex happened at an inside corner. In this spot, however, the stone skirt stepped up in height in a flat wall area, and the track system would have prevented the horizontal boards from slipping into a pocket created by our double-2‑by simulators. After some discussions with both crews, we came up with a plan of running the siding first, a little long so it went behind the stone, and having the stone crew notch their last piece (essentially a vertical corner because the stone is thicker than the siding). Once complete, the stone and siding blended seamlessly together.


Rick Mills
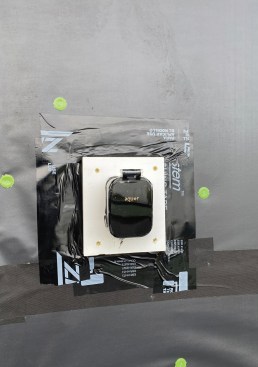
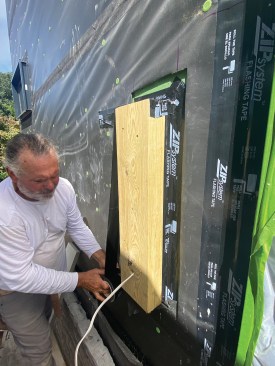
The siding crew used solid PVC blocking sealed with Zip tape for…
While it’s often possible to hold off on the roofing installation, we also had to make sure that we had installed preflashing (such as at roof-wall intersections where one leg of the flashing had to be installed under the siding). If the roofing contractor is already on site working in other areas, the roofers will most likely be tracking this and can pop over to install the preflashing. Sometimes, however, we needed to request the roofers to come out for the preflashing install.
On this job, two large chimneys came up through the metal roof, so we made sure to get the masons in early and out of the way before the metal panels started to go in. For this to happen, we had some “curbs” built to support the stone, which in turn did need that preflash metal installed first. This would have been a huge mess if we had forgotten to have the roofers out before the masons. I’ve found that the best way to avoid missing details is to keep all your trades informed about what is happening and confirm that the planned order of process makes sense to them.
Another area that’s critically important to dial in is the cladding finish details around exterior lights, receptacle boxes, hose bibs, bath fans, and the like. Knowing the specific products used on the exterior and planning for these before installing the finished surfaces can save a lot of headaches. I’ve seen many projects over the years where the client didn’t know what light fixture they wanted to install, and we couldn’t plan an intentional detail for how it would be mounted. Also, making sure the trades have completed the rough-in portion of all the exterior penetrations seems like an obvious one, but it can slip through the cracks when scheduling delays occur. On this project, we did have all those details ironed out with the clients ahead of time. Included were some cool gas lanterns, which were new for us, but we had plenty of time to devise built-up mounting blocks for these.
I like figuring these decisions out; it’s like putting together a puzzle and determining which pieces fit best and in which order. Some items on a job are obvious and always go in a certain order, but others require meticulous planning and coordination of all the trades involved.
Control the Process
It’s important to not let trade partners run the project or dictate how they want things to happen. As the project manager, I can see the entire scope of the project and create a schedule for the order of trades that makes the most sense given all the factors at hand. Learning the reasons that go into all the decisions that need to be made over the course of the entire project takes time and experience and is largely based on working with different materials over numerous projects.
It’s also important, however, to talk to the trades and ask them what their preferences are. My favorite question to ask trade partners is “what do you find on other projects?” This could be things they like or things they don’t like that they would prefer the GC to do differently. I’ve found this can be one of the biggest ways to learn how to keep trade partners happy. We can’t always accommodate all their preferences, but making an effort to help them out where you can and listening to their concerns can go a long way toward creating a successful finished product.
Keep the conversation going—sign up to our newsletter for exclusive content and updates. Sign up for free