Sealant joints in prefinished cladding can be trickier than in primed cladding. A coat of paint can disguise some sealant errors with primed cladding, but pre-finished colored cladding such as fiber cement or engineered wood demands greater attention to detail. Successful application of sealant over prefinished joints requires an understanding of substrate reliability, dependable joint construction, correct sealant choice and skillful application.
Substrate Reliability
Sealants adhere to a clean cladding surface and may not adhere well over surface contaminants. Contaminants can include:
- Dust and dirt can create a thin residue that can compromise sealant performance. This even includes the dust created by cutting the cladding itself.
- Oils and other residues, including the adhesive backing on protective films, can also create sealant performance problems.. These can often be removed with a 25/75 mix of soap and water mix, followed by a good rinse. If you use a degreaser, follow it with a 50/50 mix of isopropyl alcohol and water.
Dependable Joint Construction
When sealant doesn’t adhere as it is supposed to, it may have to do with one of the following:
- Cladding movement. All cladding is designed to move. If cladding movement exceeds its design limitations, it can impact sealant performance.
- Joint design. The joint gap is determined by the movement of the materials that form the joint. If there is an error in joint design, it can affect sealant performance.
- Fastening. Cladding should always be fastened directly to the structural framing or wall systems. This secures it and prevents it from moving more than it should.
Sealant Choice and Application
For a sealant to perform well and hold up aesthetically, it’s important to:
Choose the correct sealant for pre-finished colored claddings. Proper selection is essential for a dependable and long-lasting finish. The sealant must provide reliable performance in three areas.
- Adhesion strength
- Movement capability
- Precise Color Match Characteristics and Durability
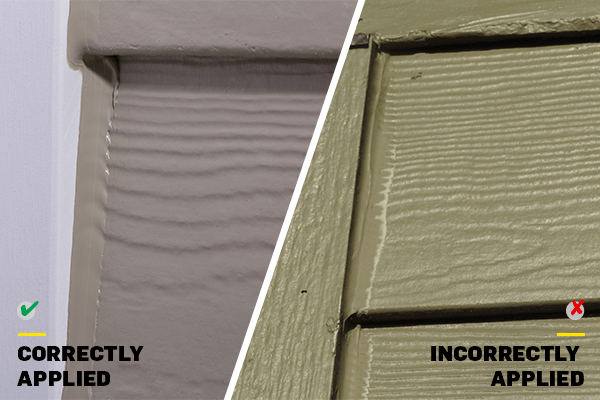
Apply sealant to pre-finished colored cladding joints accurately and skillfully.
- Cut the angle on the spout (nozzle) at 3/8 inch and position the gun so that you finish the bead smoothly. It’s important to maintain balance as you draw the bead out to avoid marring the finished bead.
- Maintain balanced pressure and speed with the caulk gun to ensure consistent contact to both substrates while dispensing a smooth sealant bead.
- Do not tool or smear the bead. Tooling or smearing will reduce any ability the sealant has to withstand UV exposure and joint movement, causing premature joint failure and color fading. Be sure to maintain an adequate depth of sealant in the joint; if you don’t leave enough sealant in the joint, it will fail.
Learn more details on how you can protect your work from OSI.