Sizing Rules of Thumb


The author developed an interest in rainwater collection when wo…
In our area, potable systems can legally be installed only in buildings that are not connected to municipal water. That requirement stems from concern by regulators that improperly purified rainwater could be drawn into the municipal system and contaminate it. Although safeguards like backflow preventers and separate color-coded pipes for rainwater can prevent that, the plumbing codes have not caught up with technology in this area.
As a result, the potable systems we install — primarily on rural or suburban lots with plenty of room — have between 10,000 and 40,000 gallons of storage. That’s a lot of water, but a large amount is necessary because the homeowner doesn’t have the luxury of switching back to the municipal water supply if the tank runs dry. The idea is to begin the summer with the tanks full and make it through to the rainy winter months without ever hitting empty. In an emergency, the homeowner can have a water-hauling company send a 2,000-gallon tanker truck to the site — which costs about $200 around here — but with a properly designed system, such deliveries may never be necessary.
Calculating storage needs. A quick rule of thumb for our area is 5,000 gallons of storage per occupant. That’s enough to provide 50 to 55 gallons per day per person during June, July, and August — the driest months of the year. People who are serious about conserving can get by on 30 gallons per person per day.
The more precise way to size systems is by performing a water balance calculation, which compares the expected monthly inflows and outflows to estimate how much water will be in the tank during any given time of year. The inflow figure is determined by the size of the collecting surface and the amount of rainfall, minus an allowance for water lost to absorption and roof cleaning.
For example, weather records tell us that Austin averages 4.78 inches of rain in May. Each inch of rain deposits 0.62 gallon of water on a one-square-foot horizontal area, so a 2,000-square-foot house that collects 85 percent of the water that lands on its roof — a conservative rule of thumb — can be expected to collect 5,038 gallons in the course of the month (2,000 square feet x 4.78 inches per month x 0.62 inch per square foot x .85).
When we design a system, we use an adapted spreadsheet from the Texas Rainwater Development Board, which combines the average local monthly rainfall with various combinations of consumption, roof area, and storage to provide a water-balance estimate. The spreadsheet can be adapted to other areas by altering the rainfall data and is available as a free download at www.twdb.state.tx.us/iwt/rainwater/resources.asp.
Sizing nonpotable systems. We install nonpotable collection for homeowners who are on municipal water but prefer to irrigate with rainwater, either to reduce their environmental footprint or because the utility restricts irrigation usage. When we first meet with them, new customers usually tell us they want a system large enough to cover all of their irrigation needs. In most cases, though, that’s not an option. Few city lots have space for more than 2,000 to 5,000 gallons of above-ground storage, which is not enough to cover irrigation during the driest months of the year. While it’s possible to bury larger tanks, the cost is often prohibitive. Homeowners with very small yards and drought-tolerant plantings can sometimes get by with stored rainwater alone, but most others will have to supplement their irrigation with municipal water.
Fortunately, size is not critical on nonpotable systems, because the owner can switch to municipal water if the tank runs dry. Nonpotable systems are also simpler and cheaper to install; any roof surface will do as a collector and there’s no need to filter or disinfect the stored water. And as long as none of the pipes go into the house, nonpotable systems are exempt from the plumbing code. Just the same, it’s a good idea to check with the local water utility, because some municipalities require a backflow preventer at the meter whenever rainwater collection is present on the site, even if it isn’t used for domestic water.
Collection and Prefiltration
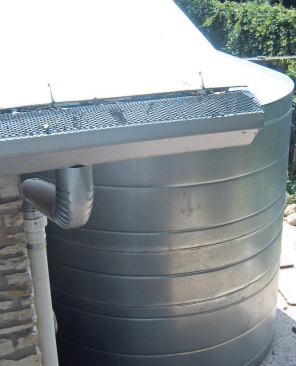
Rainwater is most efficiently collected from a smooth, impervious surface that drains quickly. Our first choice for collecting potable water is a standing-seam galvanized steel or aluminum roof with a factory-applied finish, such as Kynar. Copper and raw galvanized steel should not be used in potable systems because they can release heavy metals into the water. Clay and concrete tile roofs are acceptable for potable systems, but less desirable than metal because they tend to hold dirt and absorb water. Asphalt shingles should not be used in potable systems, because they can leach hydrocarbons.
Any common roofing material is okay for collecting nonpotable water.
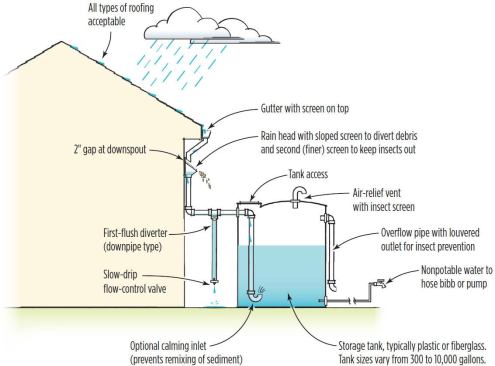
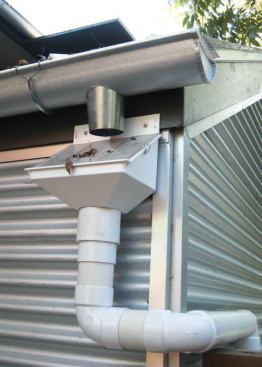
The water that comes off the roof receives an initial filtering to keep things like leaves, acorns, and the occasional dead bird from getting into the system. This can be done either by screening the tops of the gutters or by installing a rain head in the downspout. We like the Leaf Eater rain head, which we get from an Australian company called Rain Harvesting (rainharvesting.com/content/default.asp). The Rain Eater incorporates a sloped screen that ejects debris into the yard; a finer screen below prevents mosquitoes and other insects from entering the tank.
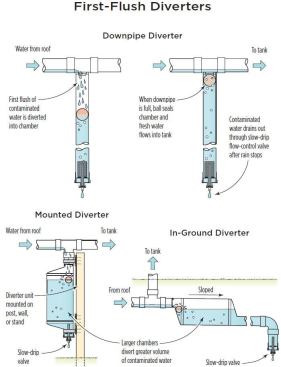
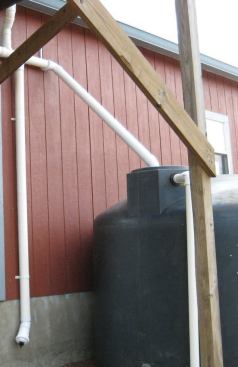
that flows off a roof after a dry spell carries a heavy load of dissolved solids from dirt and bird droppings. To keep this contaminated water out of the tank, we divert it to the ground. (Not until the roof has been washed clean does the system begin saving the water it collects.) This requires a device called a first-flush diverter, which is installed between the gutters and tank. It consists of a plumbing tee with a large capped pipe, called a diversion chamber, at the bottom. When dirty water flowing from the roof has filled the chamber, a ball float seals it off from the tee and allows the clean water that comes after to flow directly to the tank. A slow-drip flow-control valve in the bottom of the diversion chamber slowly releases the diverted water onto the ground, leaving the system ready for the next rainfall. The flow-control valve comes with a set of interchangeable bushings that can provide different drip rates; typically, the diverter will empty out within a day after a rain event. We get our flush diverters from Rain Harvesting, which offers kits for both large and small diverters, as well as a diverter designed for use underground. Diverter sizing. In a properly designed system, the volume of water diverted is proportional to the roof area — it’s up to the installer to fabricate a diversion chamber of adequate capacity. But this isn’t a particularly exact science. I’ve seen a number of academic studies on the subject, each of which came up with a different diversion rate. In potable systems, we rely on a rule of thumb that calls for diverting between .05 and 0.1 gallon per square foot of roof area, or 100 to 200 gallons for a 2,000-square-foot house.
Like most rules of thumb, this one is somewhat flexible. If the house is next to a gravel road and there are trees and birds overhead, for example, we lean toward diverting more. While they’re an essential part of a potable water system, flush diverters are sometimes omitted from nonpotable systems because they reduce the amount of water collected.