The buildup crew is also responsible for holddown assemblies. Posts for holddowns are cut to length and marked with the bolt pattern for the scheduled hardware. The posts are then run through a two-step process on our drill press. First, we drill an oversized hole on the back side of the post to allow the nut and washer to be countersunk into the column, so as to not interfere with wall sheathing. Then the hole for the bolt is drilled through the post at 1/16 inch larger than the required fastener. Using a drill press ensures that the holes are straight and true. In many cases we will go ahead and bolt the holddown onto the column. This assembly can be installed in the wall once concrete-embedded bolt locations are verified.
Framing with Pre-Cut Components Continued
Any stud material that is not straight and true is moved to the cut station, where it is used for cripples, blocking, or plates for small walls. Lumber will always move. Crowns become more pronounced. Twists and cups develop. We make sure that all the studs that go into our packages at least start out straight.
Final Assembly
As the wall plates and components are completed, they move to the final assembly station. Yard foreman Dave Gonzales oversees this critical step as the triple check in our quality-control process. He begins assembling each package with the third copy of the wall and component lists. He verifies that the plate crew has provided every wall required and that the buildup crew has delivered the correct type and quantity of component assemblies. Dave is a real perfectionist. It’s not uncommon to see him breaking out his power planer to smooth blocks in a channel that don’t flush up just right. Anything that doesn’t look good to Dave is rejected. He knows that we count on him to catch any errors that might have slipped by the rest of us. We do not hurry him. If he is not 100% sure that a package is correct he knows that he won’t catch any grief from us if he tears the whole thing down and starts over. When it leaves our yard it has to be right. Holding platforms. We developed a set of small platforms to hold the stickers or support boards under the package. Each platform is designed to hold a double 2×4 sticker that is 48 inches long. The platforms provide a space so that banding material can slide through beneath the double 2×4. The 4-foot-long double 2×4 stickers come from materials that I deem to be “terminally crooked” at the cut station. Even the most unruly board will find a home and a useful life in our shop. Once the banding is in place, the sticker is secured to the package. This gives us a full 3-inch clearance for the forks on the lift. Providing ample clearance below the package enables the forklift operator to unload and stack unit packages unassisted. He never has to get off the lift because each package has adequate blocking below it to allow his forks to clear. Furthermore, the stickers are laid out on a standardized grid, six to a package. This enables us to stack each package atop another without any additional blocking. Wrapping the package. All of our packages are wrapped to protect them from moisture and ultraviolet light. We order all our materials wrapped to help keep them in the best possible condition. We recycle all of our lumber wraps as covers for the completed product. When we run short of recyclable wrapping, we use a 6-mil black plastic cover.
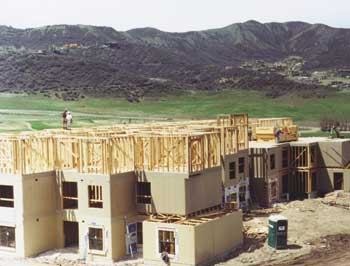
Figure 6. Carpenters assemble pre-cut wall panels on site (top). Wall plates are stacked at the far end of the table, headers, sills, cripples, and tees are stacked to the left, with finished walls to the right. Everything required is in the package. The compact lumber packages will result in an enormous pile of wall panels. Two short walls at the bottom of the pallet are used to create clearance for the forklift (middle). Carpenters can spread and erect wall panels very quickly. Notice how clean the area is (bottom). |
On Site
The walls are assembled in a prefab area on site (Figure 6 above), stacked, and the plastic cover reused to protect the finished walls until they can be installed (often this is the third useful life for these covers). In this way, fabrication can start well before the concrete slab is completed. By the time the slab is ready, all the walls for that building are framed and ready to be stood up. Getting a head start on the walls can greatly reduce the time required for framing, thereby accelerating the overall project schedule. However, we feel that the greatest benefit from the system is realized by placing a framing table directly on the slab and assembling the walls near where they are to be used. Another small crew can then erect the walls once the unit is completed. This eliminates the need for stacking, banding, and moving the packages of finished walls, which is in itself a time-consuming process.
Figure 7. This is all of the framing waste from a 60,000-square-foot project, plus somebody else’s trash — barely a small pickup load. |
No waste
. When we started on our current project, we had a large dumpster delivered to the yard for all the scrap that we expected to generate. After three weeks of operation we don’t have enough waste to fill the back of a pickup truck (Figure 7). I look at it this way: You pay for lumber, you pay to have it delivered, you pay to have it cut up, and if you throw it away, you pay to have it hauled off. So to me, careful use of materials and recycling is just good business. Whether you want to save the world or save a buck, you end up doing many of the same things. Most importantly, the guys in the field love our packages because they are right. Not sort of, not really close, but right on the money! Michael Davis is the owner of MDI in Albuquerque, N.M., which offers hybrid prefab services to contractors on Colorado’s Western Slope.