Selecting Dimensional Lumber
Dimensional lumber is differentiated by several species groups. The main species groups in the U.S. are Spruce-Pine-Fir (Canadian), Douglas Fir-Larch, Hem-Fir, and Southern Pine (typically pressure-treated). Each species group is available in a number of grades, but unless otherwise specified, most framing lumber is #2. Lower grades may be allowed for studs (Stud-Grade) and top plates (Utility-Grade).
Strength values for these and other North American species and species groups are shown in the table below. If a species or group is not listed in the charts, use the spans for a species or group with the same or higher Fb value.
Shrinkage
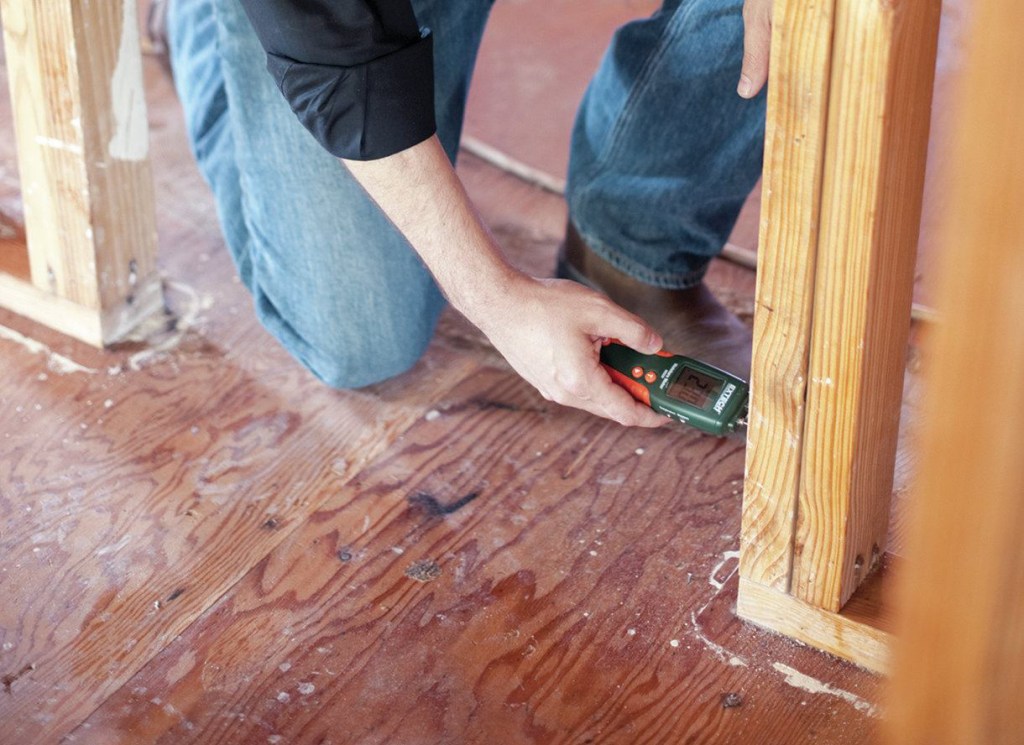
Kiln-dried lumber is stamped K-D (kiln-dried) or S-Dry (surface dry), and is shipped with a moisture content of about 19%. Anything larger than a 6×6 is generally not available K-D.
In a completed building, framing eventually dries to an average of 6% to 11% moisture content, depending on climate. This drying causes the lumber to shrink across the grain; shrinkage along the grain is negligible. The table below shows the degree of shrinkage in flat-sawn framing lumber.
Shrinkage in large carrying beams can cause one part of a house to settle more than others, causing drywall cracks and other problems (below).
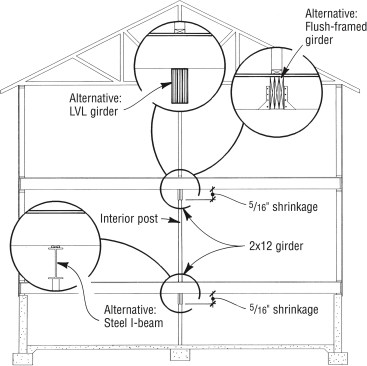
The two 2×12 girders in this building will shrink enough to cause a 1/2-in. drop in the second-floor level — enough to cause nail pops and cracks in the finishes. Use steel, engineered lumber, or flush framing to eliminate the problem.
However, using flush beams with hangers, or engineered lumber or steel, can reduce the potential for shrinkage problems. If dimensional lumber is hung flush from a beam made of steel or engineered lumber, the result can be a bulge at the beam (below).
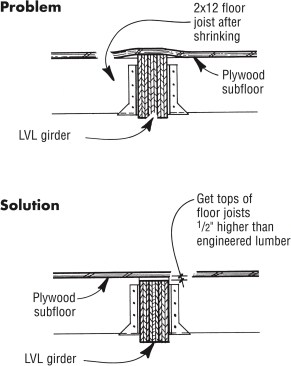
When installing dimensional-lumber floor joists flush with the top of engineered or steel beams, install the joists 1/2 in. higher than the girder to accommodate shrinkage.
Converting Linear Feet to Board-Feet
Formula method. To find board-feet, multiply the total length (in ft.) by the nominal lumber thickness by the width (in in.), and then divide the total by 12. For example: Ten 8-ft. 2x4s = (80 × 2 × 4) ÷12 = 53.3 board-feet
(L × T × W) ÷ 12
Factor method. Alternatively, use the conversion factors in the table below.
Figure: Linear Feet to Board-Feet Conversion
| Nominal Lumber Size | Conversion Factor |
|---|---|
| 1X4 | .33333 |
| 1X6 | .50000 |
| 1X8 | .66667 |
| 1X10 | .833333 |
| 1X12 | 1.00000 |
| 2X3 | .50000 |
| 2X4 | .666667 |
| 2X6 | 1.00000 |
| 2X8 | 1.33333 |
| 2X10 | 1.66667 |
| 4X4 | 1.33333 |
| 4X6 | 2.00000 |
| 6X6 | 3.00000 |
Estimating Floor and Ceiling Framing
To calculate the number of joists, use the formulas shown in the figure below for the appropriate on-center spacing.
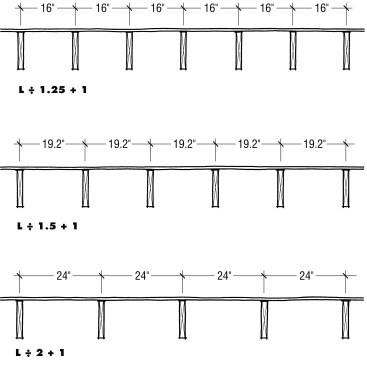
To calculate the number of joists needed: 1) Measure the width of the room (ft.);2) divide by the appropriate o.c. spacing (ft.); 3) add one to start.
Estimating Rim Joists
Remember to include rim stock in the total joist count. Rim joist stock is calculated as follows:
Building Length (ft.) × 2 ÷ Lumber Length
Lumber lengths should be multiples of the o.c. spacing. For example, use 12s, 16s, 20s, etc., for 16-in. o.c. joist spacing. Depending on the length of the building, it may be more efficient to count these individually, mixing lumber lengths that break evenly on the joists.
Estimating Subflooring
The most accurate method of estimating subflooring is to graph scaled lines over the floor plans in 4×8-ft. increments. For a quick alternative, calculate as follows:
- For each section of subfloor, square off any jogs or cantilevers from the outside perimeter on the plans to form one large perimeter rectangle.
- For each section, multiply the length by the width of the perimeter rectangle.
- Divide by 32 (for 4×8 panels).
Floor Area = Length × Width
Sheathing (4×8 panels) = Floor Area ÷ 32
Remember to add a couple of sheets to the total panel count to accommodate cutting error and waste, especially if there are jogs in the floor plan.
Estimating Wall Framing
Estimating Plate Stock
Order wall plates in a quantity that’s at least four times the total length of the walls. On walls that run in the same direction as the trusses or joists, an additional plate is needed for drywall backing at the ceiling. More will be needed to cover waste, miscellaneous backing, and continuous fire blocking for walls over 8 ft. high.
Estimating Studs
For a small house (less than 2,000 sq. ft.) with 16-in. o.c. framing, order 1 stud for each lin. ft. of wall framing — both interior and exterior. For a larger house framed 16 in. o.c., order 1.25 studs for each lin. ft. of wall framing.
Estimating Headers
In a house with windows under 36 in. wide, use the following shortcuts:
For solid-sawn headers:
- Count the number of windows and doors; count French doors or sliders as 2;
- Divide by 3 and order that many 10-footers.
For doubled-2x headers:
- Count the number of windows and doors; count French doors or sliders as 2;
- Multiply by 2;
- Divide by 3 and order that many 10-footers.
For extra large or extra narrow windows, calculate headers individually.
Estimating Wall Sheathing
For rectangular wall areas:
Wall Area = Total Wall Length × Wall Height
Sheathing (4×8 panels) = Wall Area ÷ 32
- Multiply the total length of exterior walls by the wall height to get total wall area;
- Subtract the areas of major openings such as sliders or large windows;
- Divide by 32 (for 4×8 panels).
Remember to account for gable-end walls.
For regular gables (same pitch both sides of ridge):
Multiply span by total rise. This gives you the total for two gable-ends.
For irregular gables or single gable-end walls:
- Multiply total run by total rise for each gable end;
- Divide by 32.
Estimating Roof Framing
Estimating Rafter Length
To find the full rafter length, multiply the correct line length ratio in Rafter Line Length Ratios, below, by the horizontal run of the rafter. This gives the net rafter length, or line length, from top plate to ridge. Then add for the plumb cut at the ridge and overhang to find the full rafter length. {{ fn |Note that the rafter run typically used to define rafter length is not necessarily the same a what building codes or structural engineers call “rafter span.” Code measures rafter span to the center of bearing – e.g. to the center of the exterior wall plate. If you’re measuring to the outside of the wall plate to define the rafter run, and matching this length to the code’s allowable span, you will be a little more conservative than code. }}
Estimating Number of Common Rafters
To calculate the number of common rafters, use the formulas provided in Estimating Joists and Rafters, above for the appropriate on-center spacing.
Remember to include ridge stock.
Estimating Hip and Valley Rafter Lengths
To calculate the length of each hip rafter, use the Hip/Valley LL ratio shown in Rafter Line Length Ratios, above.
Estimating Jack Rafters
For a simple hip or valley, each pair of jack rafters is equal in length to one common (one long jack + one short jack = one common).
Estimating Roof Sheathing
Roof Area = Perimeter Wall Lengths (incl. overhangs) × Rafter Line Length
Sheathing (4×8 panels) = Roof Area ÷ 32
- Add overhang distance to exterior wall lengths;
- Multiply the total length of the perimeter (wall length + overhang) by the rafter line length (Rafter Line Length Ratios, above) to get total roof area (on gable roofs, don’t include the gable-end wall in the total length);
- Divide by 32 (for 4×8 panels).
Calculate roofs of different pitches individually.
Remember to add a couple of sheets to the total to account for error and waste.