The demo work was pretty simple; the wall contained some electrical wiring but no plumbing or ducts. We rerouted the electrical and removed the existing studs by cutting them off at the elevation of the new header. The last step — removing the subflooring from the areas where the panels would sit — gave us the access we needed to drill holes for anchor bolts and to install new joist blocking.
Installing the Header
The header was to run the full length of the wall and rest on jack studs at either end. The shear panels would sit directly on the floor framing and be blocked tight to the header above.
Our first task was to lift the 6×12 header into position. To avoid wrenching our backs, we hung a block and tackle from an eyebolt we’d put in the wall and used it to hoist the header most of the way. When the header got close, we used our shoulders to lift one end onto a jack stud. We lifted the other end the same way, but because cripple studs were now bearing down on the new header from above, we had to angle the jack stud under the header and persuade it into position with a sledgehammer. This brought the header tight to the bottom of the cripple studs, where we secured it with nails.
At this point, the header was carrying the vertical load, but the wall still lacked the necessary lateral stability.
New Anchor Bolts
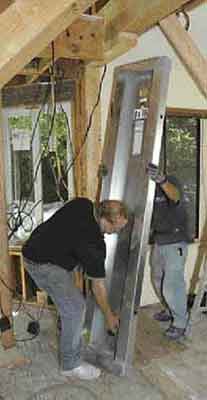
Shear panels come in a variety of sizes. The ones we used were 18 inches wide by 92 inches tall and 3 1/2 inches thick; other brands come in both 3 1/2- and 5 1/2-inch thicknesses.
The design called for two hold-down bolts (7/8-inch threaded rod) per panel to be embedded 18 inches into the foundation stem wall and glued in place with epoxy. With the supplied template, we marked the location of the bolts and used a rotary hammer to drill the required 1-inch holes.
Partway in, we hit rebar. In other circumstances, we might have shifted the holes, but the bolts for a shear panel must be in precise locations. So, to get through the rebar, we used one of the special rebar-cutting bits sold by Simpson.
Stronger blocking. Before drilling holes in the stem wall, we had removed the existing 2×8 joist blocking from under the areas where the panels would go. This was necessary for a couple of reasons: The blocking would interfere with drilling, and the blocks would not be strong enough to resist the crushing force of the panels when the bolts were tightened.
Once the holes were drilled, we replaced the 2×8 blocks with stronger pieces of 6×8 Parallam. The blocks, too, were drilled so that the anchor rod could fit through.
Special inspection. In new construction, anchor bolts are positioned before the foundation is poured, so the inspector can see if they are properly installed. In retrofits, however, the anchors are epoxied into drilled holes, which makes it hard to know how strong the connection actually is.
Our local building department requires a special inspection to verify that new anchor bolts are securely attached. One option is to hire an inspection company to perform pull tests on bolts after they are installed. Instead, we verified the installation by having the engineer — McCleary — come to the site to watch us do the work.
First, he measured the holes to make sure they were the right depth. After that, we used a Simpson hole-cleaning brush (basically a wire bottlebrush) to knock loose material from the sides of the holes. Then we used a copper pipe connected to a shop vac to vacuum out the debris. We finished by blowing out the holes with a second pipe connected to a compressed air hose.
Gluing in the rods. Next, we used a special mechanical “caulking” gun to pump a two-part Simpson adhesive (Epoxy-Tie Set) into the holes. At McCleary’s request, we inserted the rods and jiggled them up and down to clear air bubbles. We also twisted them in the holes make sure they were completely coated with epoxy. In a couple of cases, we temporarily removed the rods and pumped in more adhesive.
Once the adhesive was ready, we simply inserted the rods — all the way to the bottom of the holes — and left them alone until the epoxy set. McCleary provided us with a document for the building department stating that the anchors were installed as designed and in accordance with the epoxy manufacturer’s specifications.
Attaching the Panels
The following day, we installed the panels. We began by dropping a thick steel bearing plate over each pair of rods. The bearing plates (supplied by the manufacturer) are necessary when you install Hardy’s panels over raised floor systems. Each plate extends a few inches beyond the left and right sides of the panel and has holes through which you are required run a specified number of 1/4-inch-diameter wood screws. The screws prevent the wall from sliding horizontally, and the anchor bolts resist overturning.
Once the plates were installed, we stood the panels up over the bolts; as expected, the panels stopped a few inches short of the header.
We could have eliminated this gap by ordering taller, custom-sized panels, but that would have delayed the job. Instead, we used stock panels and packed the space above with 2-by blocking before screwing through to the header from inside the panels. This is permissible within specified limits, which vary by brand and model. McCleary told us to use Simpson’s self-drilling SDS screws — 6-inch screws in the header above and 41/2-inch screws in the joists and blocking below.
The epoxy set a few hours after we pumped it in place, but it needed 24 hours to fully cure before we could apply pressure to the bolts. A couple of days later, we placed washers and 11/4-inch nuts on the bolts and tightened them against the bottom of the panels. After making the mistake of thinking we could find a 11/4-inch deep-well socket at an auto-parts store, we ended up having to go back to the shear-panel supplier to get one.
Once we had tightened the bolts, finishing the wall was simply a matter of studding in around the panels and replacing any plywood missing from the kitchen side. With the drywall on, it looked like any other wall in the house — when in fact it will be one of the main structural elements holding up the building if an earthquake occurs.
Rick McCamydesigns and manages residential remodels in Walnut Creek, Calif.
Shear-Panel ManufacturersHardy Frames 800/754-3030 R.H. Tamlyn & Sons 800/334-1676 Shear Transfer Systems 877/743-2762 Simpson Strong-Tie Co. 800/999-5099 Trus Joist 800/338-0515 |