Standing Trusses
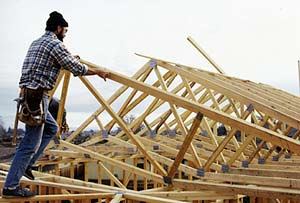
With the first end truss up, I like to spread the trusses if they aren’t too big (Figure 3).

Figure 3. Unless trusses are too big to handle twice, spreading out trusses along the top plate makes it easy to roll them up into position later.
Spread them so that they end up leaning on top of one another in the same order you want to follow when you stand them up later on. Work in pairs, keeping an eye on your partner at all times. It’s easy to knock one another off the building if your movements aren’t coordinated. After the trusses are all spread out, prepare and raise the other end truss.
Inside trusses. With the end trusses up, raise the first inside truss and adjust it into place. Sometimes the intersection of the bottom chord and the tail overhang of the top chord is not easily determined because the very tip of the bottom chord is broken or cut short. To be absolutely sure, I run a straightedge to mark the intersection on each truss. This way, when you are standing the trusses, a quick glance will tell you when you’re on the money. This prevents you from ending up with a wavy roof line.
After the first interior truss is aligned and nailed down to the exterior walls with two 16-penny nails at each end, finish installing the outriggers to tie these two trusses together. Then, before tipping up more trusses, start a piece of temporary bracing on top of these first two trusses as close to the peak as you can reach. Use 8-penny nails and highnail them slightly so that they can be easily removed during the sheathing phase. On tall trusses, you’ll need braces on both sides to reduce the risk of cascading trusses.
From this point on, stand and space each truss using ridge and eaves blocks at top and bottom, and the bracing layout marks along the top chord (Figure 4).
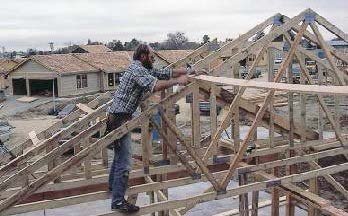
Figure 4. A carpenter nails off the top chord brace at the premarked layout line, automatically spacing the trusses. Note in the background how the outriggers have been installed in preparation for the barge rafters.
Installing the sway brace. On a typical roof, I’ll install three regular trusses, then install a sway brace to rack the whole assembly plumb. (If I wait too long, there will be too many trusses and the roof will be hard to rack.) First I pull up the drywall backing that was precut for the gable end wall and nail that down to the top plate. Then I nail the 45-degree end of the sway brace on top of the backing and rest its other end on a nail placed in the side of the last ridge block I installed, the one between the second and third trusses. Finally I rack the end truss plumb and nail the sway brace to the ridge block.
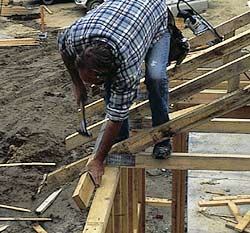
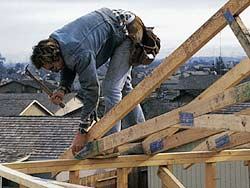
Figure 5. With the efficiency that comes from good preparation, an eaves block is installed (above), then the next truss is rolled up and nailed off (below).
At this point, I like to change gears and install the barge rafters. After the barges are hung, I continue standing the remaining trusses (Figure 5).
In a production situation, it is important to establish a rhythm and a steady pace: Stand and align a truss, nail it to the top 1×4, pull up and nail in the eaves block as well as the ceiling drywall backing, pull up another 1×4 for the next set of trusses, install an eaves vent every fourth bay. With all the trusses raised, plumb and brace the remaining end truss and install the barge rafters on that side.
Standing Trusses
With the first end truss up, I like to spread the trusses if they aren’t too big (Figure 3).
Spread them so that they end up leaning on top of one another in the same order you want to follow when you stand them up later on. Work in pairs, keeping an eye on your partner at all times. It’s easy to knock one another off the building if your movements aren’t coordinated. After the trusses are all spread out, prepare and raise the other end truss.
Inside trusses. With the end trusses up, raise the first inside truss and adjust it into place. Sometimes the intersection of the bottom chord and the tail overhang of the top chord is not easily determined because the very tip of the bottom chord is broken or cut short. To be absolutely sure, I run a straightedge to mark the intersection on each truss. This way, when you are standing the trusses, a quick glance will tell you when you’re on the money. This prevents you from ending up with a wavy roof line.
After the first interior truss is aligned and nailed down to the exterior walls with two 16-penny nails at each end, finish installing the outriggers to tie these two trusses together. Then, before tipping up more trusses, start a piece of temporary bracing on top of these first two trusses as close to the peak as you can reach. Use 8-penny nails and highnail them slightly so that they can be easily removed during the sheathing phase. On tall trusses, you’ll need braces on both sides to reduce the risk of cascading trusses.
From this point on, stand and space each truss using ridge and eaves blocks at top and bottom, and the bracing layout marks along the top chord (Figure 4).
Installing the sway brace. On a typical roof, I’ll install three regular trusses, then install a sway brace to rack the whole assembly plumb. (If I wait too long, there will be too many trusses and the roof will be hard to rack.) First I pull up the drywall backing that was precut for the gable end wall and nail that down to the top plate. Then I nail the 45-degree end of the sway brace on top of the backing and rest its other end on a nail placed in the side of the last ridge block I installed, the one between the second and third trusses. Finally I rack the end truss plumb and nail the sway brace to the ridge block.
At this point, I like to change gears and install the barge rafters. After the barges are hung, I continue standing the remaining trusses (Figure 5).
In a production situation, it is important to establish a rhythm and a steady pace: Stand and align a truss, nail it to the top 1×4, pull up and nail in the eaves block as well as the ceiling drywall backing, pull up another 1×4 for the next set of trusses, install an eaves vent every fourth bay. With all the trusses raised, plumb and brace the remaining end truss and install the barge rafters on that side.
No recommended contents to display.