A zone damper system is a set of mechanized dampers added to a ducted HVAC system to direct all the air to only some areas of the house while shutting off the rest. This improves control and comfort, as each zone has its own thermostat telling the system when it needs heating or cooling, instead of being on a ride with one thermostat for the entire house.
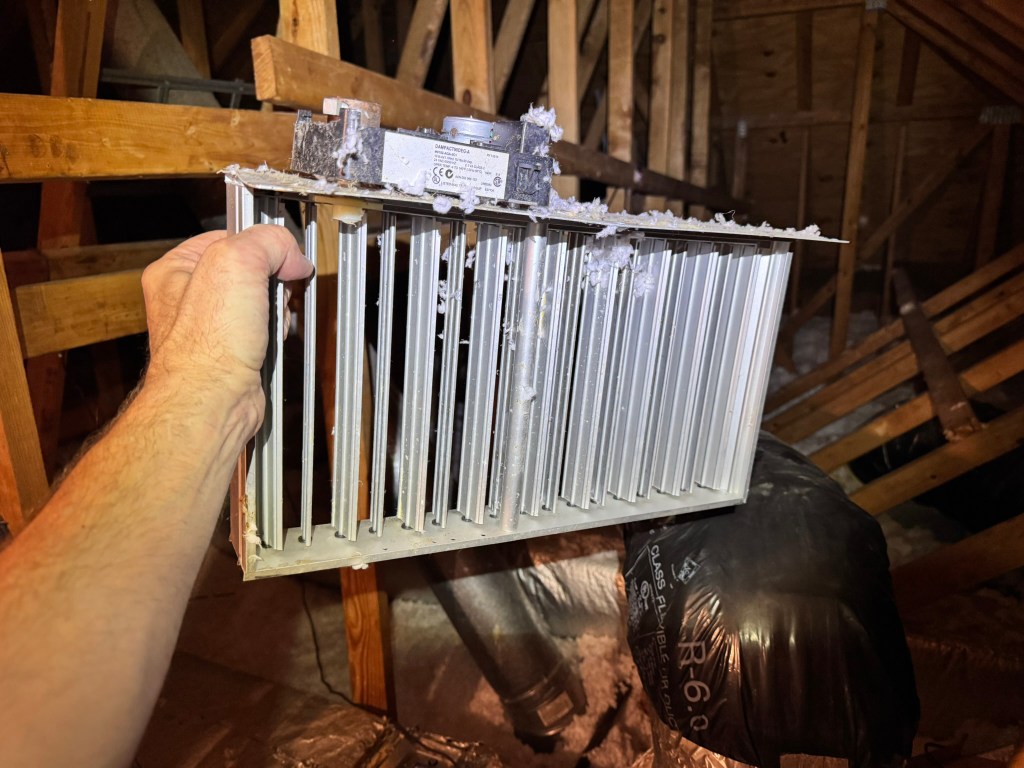
Marketing by companies that sell controls can make it seem like you can deliver perfect comfort to a dozen rooms, but, in my experience, that is overselling. We have found zoned systems particularly helpful where one or two reasonably large areas, such as a south-facing great room with lots of glass or a first-floor vs. second-floor area, behave differently from the rest of a house. Setups with two to four zones, new ductwork, and thorough “commissioning” (checking that everything is working at the end of install) can improve on single-zone setups. However, it’s unlikely you can deliver significantly different temperatures in different zones, and when you have more than a few zones, operational problems tend to occur. We’ve also found that these complex systems are susceptible to problems on installation, not to mention the numerous new electronic and mechanical parts, each of which can fail. After a decade or two, several broken dampers like the one in the photo above are usually lying around the attics of houses with zone damper systems.
In this article, I’ll cover some issues our company has had with zone damper systems, and I’ll offer some general recommendations based on our experience installing several dozen systems over the years.
Anatomy of a Zone Damper System
The main parts of a zone damper system are a main control panel with its own little computer and connections for all the other parts, motorized dampers in each branch duct, and individual thermostats (or sensors) for each zone.
Some systems have additional pieces, such as a “bypass duct” whose damper allows air to blow directly from the supply ductwork back to the return ducts (so system airflow stays high enough even with some zones closed off) or a “supply air sensor,” which signals the system if the air is getting too hot or too cold (which can happen when enough dampers close and airflow is restricted).
The best damper systems can communicate with the HVAC system control and ramp fan speed and compressor settings up or down as needed to meet different zone demands.
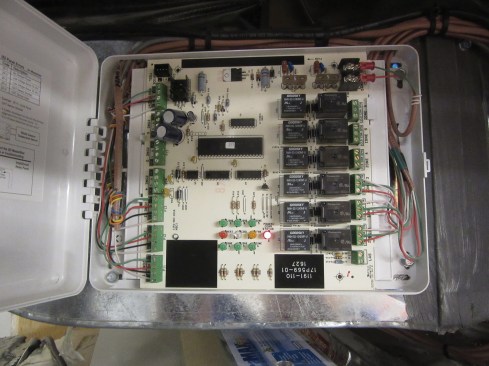
Each thermostat is wired to its own connector on the main zone control board (zone 1, 2, 3, etc.), and the corresponding zone damper is wired to its respective damper connector. The main computer reads each thermostat and sends heating or cooling to the appropriate zones. Different zone damper controls have various setups to help manage this. Simple controls just send air out when triggered by the thermostat; more sophisticated ones can interface with variable-speed systems to ramp down the airflow based on how many zones are open, or run the system fan to move cool or warm air around the zones without wasting energy using the furnace or A/C compressor.

Illustration: Ola Kwiatkowska
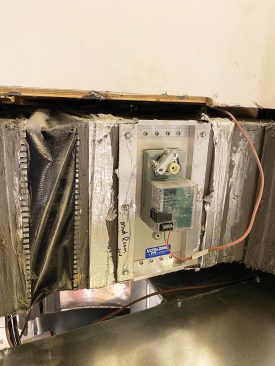
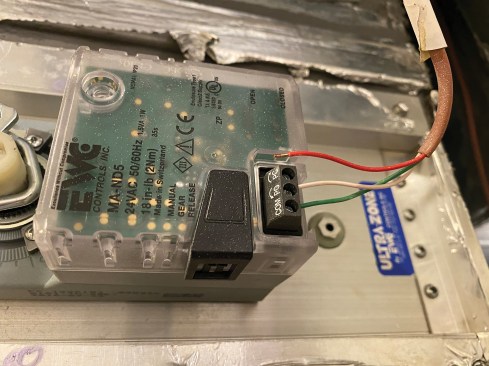
Bypass Duct Dilemma: When one or more zone dampers close, static pressure can build up in the remaining supply trunk, increasing the velocity of air in any open branch ducts. This can create noticeable noise, strain fan motors, and lower the system’s efficiency. Many HVAC installers add a bypass duct to reduce these problems. A damper in the duct—operated by a pressure sensor in the supply trunk or via a counterbalance mechanism that responds to difference in pressure (on a barometric damper, as shown in the bypass duct, above)—opens when static pressure increases, providing an escape route for air back to the return plenum. While common, this practice reduces the system’s efficiency because it sends conditioned air back into the system to be reconditioned rather than delivering it to rooms. This recirculation lowers the evaporator coil temperature, which reduces the unit’s capacity and efficiency. For these reasons, some building codes limit use of bypass ducts, forcing system designers to use variable-speed blowers and better duct sizing to control pressure variations instead. We prefer more efficient HVAC designs. But we also contend with existing systems, and converting one to a functional system without bypass sometimes exceeds the budget, so we have to make the existing system work with the bypass duct included. —D.H.
Case of an Ineffective Pressure Switch
The first system with zone dampers I worked on had problems the client’s HVAC contractor seemed unable to fix. These included noise and repeated coil freeze-ups. This was a while back and the system was a simple one made by a third-party company and bolted on to a regular heat pump system.
I downloaded the manual and headed into the attic. The system was straightforward, with two dampers on the two main supply trunks. Since this third-party brand couldn’t talk to the machine and turn down the system airflow when only one zone was calling, a large bypass duct had been installed.
As I sat in the hot attic, I heard loud airflow noise. Then, the bypass damper opened, and the noise quieted down as the air had a place to go. When the damper opened up completely, a switch clicked, and the damper started closing again. The noise would then ramp back up, the switch would click again, the damper would start to open, and so on.
The manual revealed that this bypass was controlled by a pressure switch that opened the damper when pressure in the ducts was high and closed it when pressure was low. On this system, the bypass damper was cycling back and forth, leaving the system starved for air much of the time and leading to coil freeze-ups on hot days and a lot of unnecessary noise. The main zone controller did not have a direct connection to the damper or sensor, so the system couldn’t manage the cycle. Ultimately, we replaced the motorized damper with a “barometric” damper, which is a free-swinging damper with an arm sticking out with an adjustable weight on it; the higher the air pressure, the more the damper is pushed open, with some adjustability based on where the weight is installed on the arm.
While that type of damper locks in inefficiency with some level of air always recirculating, at least it didn’t cause problems with cycling like the original switched one did. These days, we avoid bypass setups altogether when possible. We favor sophisticated zone controllers that ramp down multispeed machines to adapt to the number of open zones (see “Bypass Duct Dilemma” on the facing page). When we have to install a bypass damper, we use barometric ones, rather than relying on pressure sensors.

Doug Horgan
In one case of a miswired damper, the basement AC was running at…
Cases of Miswired Dampers
On a different system another contractor had installed, the problem was that a basement area was freezing cold all summer while some areas upstairs were not as cool as desired.
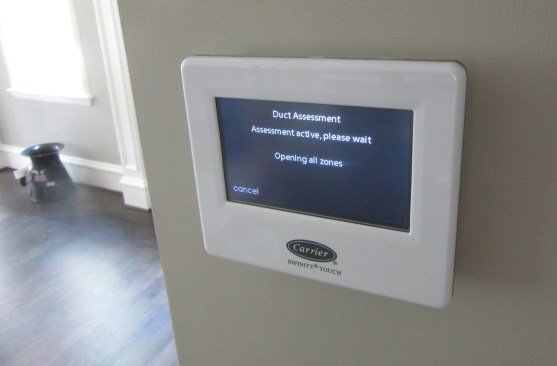
This HVAC setup used a Carrier zone damper system that has some useful features, including a diagnostic mode with system tests. We first ran a zone test, in which each zone was opened in turn, and we could see whether the “zone one” damper was wired to the “zone one” connectors.
None of the zones were opening correctly per the numbering on the thermostats. It turned out that all the dampers were wired backward: They opened when directed to close and closed when they were supposed to open. When the basement system called for heat or air conditioning, the basement damper would close, and the air would go upstairs; when the upstairs areas needed cooling or heating, the air would go only to the basement. Once summer rolled around, when the system tried to cool upstairs, it froze out the basement instead. This was a simple and quick fix. We just switched the “open” and “close” wires on each damper.
Another house where one zone was always too cold and another too warm seemed to have a similar problem. Diagnostics revealed that zone 2 would start blowing when zone 3 called for cooling, and vice versa. When the sunny side of the house, zone 3, asked for cold air, it would all blow into zone 2. Zone 2 was always cold from all this air conditioning mistakenly blowing into it, so its thermostat never called for cooling, which prevented zone 3 from getting any air conditioning. Again, we simply swapped the damper wiring to fix the problem.
Wiring has been at the root of the majority of zone-damper problems I’ve been involved with. It’s understandable when you think about the installation process. Techs run wires from the control panel to each thermostat location and to each zone damper, all off the same spools of thermostat wire typical of smart thermostats and standard dampers. Then they wire up each thermostat and damper. Last, they connect all the thermostat and damper wires to the correct locations on the board.
Usually, a minimum of six, and as many as 12, identical wires stick out of the wall, and it’s surprising if no mistakes are made. Taking another hour or two to fully check these systems is important.

Doug Horgan
The author used a set of data loggers to record temperatures at short, two-minute intervals all around the system—at the main air handler, in the ducts in several zones, and at select thermostats.
When Blow-by Airflow
Triggers Heating
In one case, the house had temperature problems during moderately hot days but was better on hotter days. The zone damper system was made by a zoning company, not the HVAC system company, and as this was a while ago, it did not feature any logging or recording ability. The photos the client sent showing crazy thermostat readings left little doubt there was a problem. We used a set of data loggers to record temperatures at short, two-minute intervals all around the system—at the main air handler, in the ducts in several zones and at select thermostats. The results and a close read of the installation manual revealed the problem.
The 27 incandescent recessed lights in the clients’ large kitchen were on all day, while an employee cooked (very delicious-smelling food) for most of the day, so the kitchen thermostat was almost always calling for air conditioning. Typical dampers on residential systems block most airflow, but not quite all, when closed. So, when the system ran cold air for hours on end on moderate days, it ended up cooling the other zones in the house even though their dampers were shut. Exacerbating matters, the clients had set their thermostats to automatically switch from cool to heat, with the heating set point only 3°F below the cooling set point.
The temperature data we reviewed showed the system switching to heating when a zone or two outside the kitchen dropped below the heating set point because they were overcooled by damper blow-by on moderate days. This brand of board had a three-minute purge cycle (that is, running the fan to clear out cooled air) between switching from cool to heat, a 20-minute-minimum cycle of heating (or cooling), and a three-minute purge cycle before switching back to cooling, so the air conditioning was turning off for nearly half an hour in the middle of peak cooling time, leaving the kitchen hot.
In this case, the damper blow-by and control timers could not be changed. We convinced the clients to lower the heating set point for the summer to create a wider “deadband” (the temperature range in which the system calls for neither heating nor cooling), change out the incandescent bulbs for LEDs, and fix the broken range hood to lower the heat load in the kitchen. These steps were enough to bring the system under much better control.

Doug Horgan
When clients set their thermostats to automatically switch from cool to heat, a heating set point of only 3°F below the cooling set point can exacerbate problems.
Disparate Zone Sizing
On a different job, we added a zone for a 500-square-foot newly finished basement exercise room, tied into a large system serving the main level and the rest of the basement, about 2,000 square feet. The system was very noisy in the exercise room and repeatedly shut itself down with lockout errors, especially on colder days.
We tried running the system with one zone calling at a time and found the exercise room registers blasting air and the furnace clicking off on overheat after a few minutes of operation. When we clicked through the many setup screens on the sophisticated zone thermostat, we learned that it required manual setup of zone sizes so the system would know how much air to send to each zone. In this case, the default 50%/50% had never been updated.
Once we changed the percentages to 20%/80%, the system behaved well.
Dehumidifier Discharge and Air-Starved Zones
In one large house, there were several temperature complaints: The gym was too hot, the theater room was stuffy, and the primary bedroom and closets were too warm and humid. The house was large and complex with multiple machines, each with zone dampers, and it had 32 thermostats when we started working.
In this case, the thermostats were able to log system state. When I plugged a USB thumb drive into the thermostat and set logging to “on,” every five seconds, the thermostat recorded 60(!) parameters, including thermostat settings, temperature and humidity at each thermostat, damper settings, and system operation settings and temperatures.
In the theater and gym area, the clients had set the gym set point at 65°F, which was much lower than in the rest of the house. This zone often called for cool air. The sophisticated zone system would run the geothermal air handler at a low speed to satisfy this one zone when it was the only one calling.
We inadvertently created a problem by adding a ducted dehumidifier with its outlet duct connected to the supply-side ductwork for the system, which is the recommended installation setup for a dehumidifier. But on this zone-damper system, blowing 75 cfm of hot dehumidifier discharge air into the ductwork while running low-speed air conditioning in only one zone warmed up the gym zone when it called for cooling. This led to the gym calling for more cooling but heating up considerably from the hot dehumidifier air! We fixed that by moving the dehumidifier outlet duct.
Meanwhile, the theater room, which was tied into the same system, got warm and stuffy when the family had movie night. We adjusted the humidity control on the thermostat and used the thermostat setup software to correctly set the zone size (some zone systems require manual setup of zone size so they run fans and compressors at the correct speeds for the ductwork and load in each zone). These adjustments both helped, as did some client education about engaging the “fan on” setting when using the theater room.
However, the job wasn’t finished. We noticed other potential issues with cooling the space. It had only three supply registers and one small return; also, an adjacent A/V equipment closet always felt warm despite its one A/C outlet.
We used a Retrotec Acin FlowFinder MK2 flow hood to measure the airflow in the theater and discovered that decisions made during construction to minimize obtrusive ductwork had choked off airflow to the space.
We solved the comfort issues by adding outlets on the existing ductwork to maximize available airflow; combining an adjacent zone with the theater and connecting the ducts to bring more air into the theater; adding a return to the hot equipment closet to take away much of the heat so it no longer affected the theater room; and boosting the “fan on” fan speed setting in the system software.
Further adjustments. In the primary suite, our monitoring revealed that a thermostat in a closet was calling for cooling but the temperature didn’t change no matter what the setting was. We could measure very low airflow from the registers and crawled around the attic looking for any obvious issues with the ductwork. When we climbed over the main trunk lines into a smaller attic space, we found an easy-to-fix problem: On the same zone, a second damper that was needed for the convoluted duct system had never been wired up, so it stayed closed. Fixing that solved the temperature issues.
Doug Horgan
When this zone damper closed, a low whistle sounded. The problem was solved by adjusting the stop on the damper motor to keep it open a little, and then monitoring temperatures to be sure that solution didn’t cause a new problem.
A physical adjustment to one damper solved the final problem. When this zone closed, a low whistle would sound. We adjusted the stop on the damper motor to keep it open a little rather than shutting all the way, then monitored temperatures in the area to be sure we hadn’t caused a new problem.
Problematic Systems
After installing several dozen zoned systems and encountering problems like the case studies described above, we’ve come to some general conclusions about what works and what doesn’t.
To begin with, we’ve learned to be wary of the following problematic system types:
Single-speed units and third-party
controls. When zone controls are installed on a single-speed HVAC system, they are always susceptible to restricting the airflow enough to cause the system to work harder, potentially overheat, and cause premature wear on electronic fan controls. As mentioned, bypass ducts relieve the pressure buildup that causes the airflow restrictions, but the recirculation of freshly heated or cooled air back into the return causes temperatures at the furnace or A/C to run much hotter or colder, again making the system work harder or even experience premature problems. While in theory, larger ducts could minimize these issues, in many cases, the zone system is added to existing ductwork where that isn’t an option, and in others, the clients object to the space needed for large ducts (objections are common on standard-size ducts, let alone oversized ones).
Variable or multispeed HVAC systems, in theory, can operate at lower air volumes and should be better under part-load conditions that happen most of the time when some zone dampers are closed. However, when zone controls can’t talk to the HVAC machine, that doesn’t happen. For the most part, third-party zone controls don’t reach into the speed controls for variable-speed furnaces or heat pumps. For this reason, we much prefer same-brand damper systems, despite their steep prices.
Complex systems. It’s fair to budget significant time to start up and verify these systems. The complexity invariably leads to problems (such as miswired zones or forgotten dampers), and installers are often unfamiliar with setup steps such as setting zone-size percentages based on Manual J Btu loads or typing in the clients’ preferred labels for each zone so they easily understand what’s happening. We’ve found that many HVAC contractors, even well-above-average ones, need extra help with verification. Not to mention that when problems are revealed, it’s often during the first heat wave or cold snap when no HVAC contractor has an extra four hours for complicated troubleshooting, so it can be helpful for GCs to be familiar with diagnostic steps.
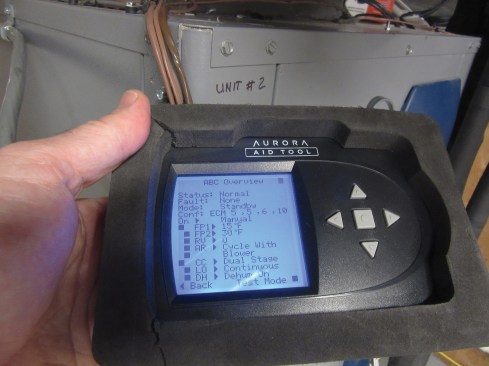
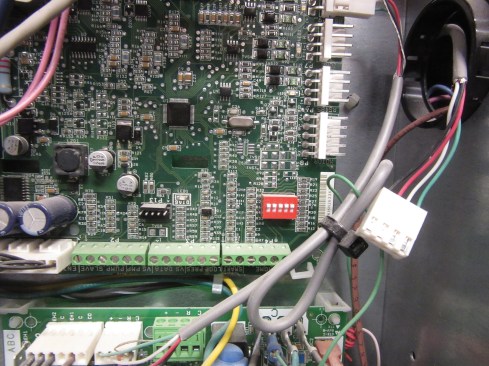
Let’s not forget that modern HVAC machines themselves are already complicated. The many options and parameters we can set allow maximum flexibility in installation and sophisticated comfort, but they take longer to set up as well as troubleshoot. On the house with 32 zones, we had to acquire a special tool to talk to the machines, and we spent hours reviewing DIP switch settings, programming zone sizes, and calling tech support.
In addition, the same ordinary problems happen with these systems—wires mysteriously not being connected, digital thermostats reading a few degrees off (or over 10% off relative humidity), and so on—but the number of problems is multiplied by the number of connections and devices.

Doug Horgan
For a complex system with 32 zones, the author’s company bough…
Final Recommendations
Use as few zones as possible. One of my HVAC friends says never puts in more than four, and he prefers two. Another says three or four is the right number, that two aren’t enough and five are too many.
If you can, avoid setting thermostats to switch from heat to cool automatically. This can lead systems to overcool some zones and trip them into heat mode. Then you get no cooling for like 25 minutes as it switches over and then back to cooling.
Proprietary systems that can modulate heating/cooling based on demand usually work much better than the ones with a bypass damper, which are noisy and inefficient and can cause overheating or overcooling.
We’ve found the systems that work with variable speed equipment work best and are quiet and efficient. There are even more advanced systems with dampers that don’t just fully open or fully close; they have steps between as well, and their sophisticated controls attempt to send the right amount of air to each zone to keep the temperatures even all the time. We haven’t had the opportunity to work with these, but the idea is intriguing.
Read the manual. It usually wants ductwork oversized (beyond what you need to condition the spaces) and the smallest zone to be of a certain size, sometimes as big as 25% or more of total system airflow, which would be way more air than a single room would normally need. Follow all the setup steps, and manually run through all the zones to be sure they’re hooked up correctly.
Almost all the serious problems I’ve been involved with were caused by miswired zone dampers; that is, the Zone X thermostat is tied into the Zone Y damper and vice versa, resulting in air continually blowing into Zone Y because the Zone X thermostat is never satisfied. Or one of two dampers on one zone wasn’t hooked up, or the dampers were all wired backward.
I’ve been impressed with Carrier and WaterFurnace units when wired correctly. EWC and Honeywell are a mixed bag. There’s less room for error if the zone board can’t turn down the system when demand is low.
Most systems seem to struggle with managing significantly different set points. If clients want the gym at 65°F and the rest of the house at 75°F, the gym should have its own system. Just like the number of zones, this becomes much harder to manage after the fact. For this reason, it’s now part of our normal client discussions during planning.
Keep the conversation going—sign up to our newsletter for exclusive content and updates. Sign up for free