The company I work for, Airtight Services, is a full-service home-performance contractor in upstate New York (airtightservicesinc.com). We do energy auditing, home-performance contracting, insulation, and third-party verification. Last month in this space, I described how we use a blower door in combination with an infrared camera to identify and fix air leaks in old, existing homes. This month, I want to take a look at new construction.
In our market, builders face a big new challenge this year: New York has just begun to implement the 2015 International Energy Conservation Code (IECC), which requires blower-door testing of all new homes. To pass, a house has to meet a standard of 3 air changes per hour at 50 pascals of negative pressure (3 ACH50).
This requirement is so new here that we haven’t even tested any new homes for compliance yet. But we know it’s going to be tough sledding at first. For years, we’ve done third-party verification for Energy Star and Green Building incentive programs and helped builders achieve the required airtightness. The challenge of meeting the new code is sure to involve the same typical trouble spots.
Blower-door diagnostics. For existing homes, as I explained last month, an inspection using a blower door coupled with an infrared camera is a great way to identify leaks. For a new house under construction, however, the infrared camera is almost irrelevant. In order for the infrared camera to work, you need a big temperature difference between the indoors and the outdoors. If the house isn’t conditioned to be either warmer or colder than the outdoors, you’re not going to see much. So with a new house, quality control is really about identifying what your air barrier is before you start to build, and then implementing that air barrier effectively in the field.
To verify compliance with the code (and also to identify and fix air leaks), we need to be able to depressurize the house to -50 pascals. In typical new construction, that’s only possible very late in the game. It would be good to test the house after insulation, but before drywall. But in our market, the ceiling air barrier is the drywall. Before the drywall is up, there’s no air barrier and we can’t depressurize the house. So in practice, we get only one chance to test the house, and it comes after many leaks are buried. So builders are going to need a good game plan right from the start.
The “red line exercise.” One of our services for builders is a print review. We sit down with them, look at their plans, and identify potential air-leakage problem areas. The point we like to stress is, “Sure, you can build a tight basement, you can build a tight wall, and you can build a tight ceiling—but how do you connect all those tight things to each other? That’s tying the air barrier together.”
So we try to focus on the transitions between all those elements. A builder should be able to put a red pen down on his blueprint and draw a line around the entire house without lifting the pen, to identify the air barrier. This “red line exercise” isn’t required—but it’s very helpful for achieving the required airtightness. It helps our clients envision a workable strategy.
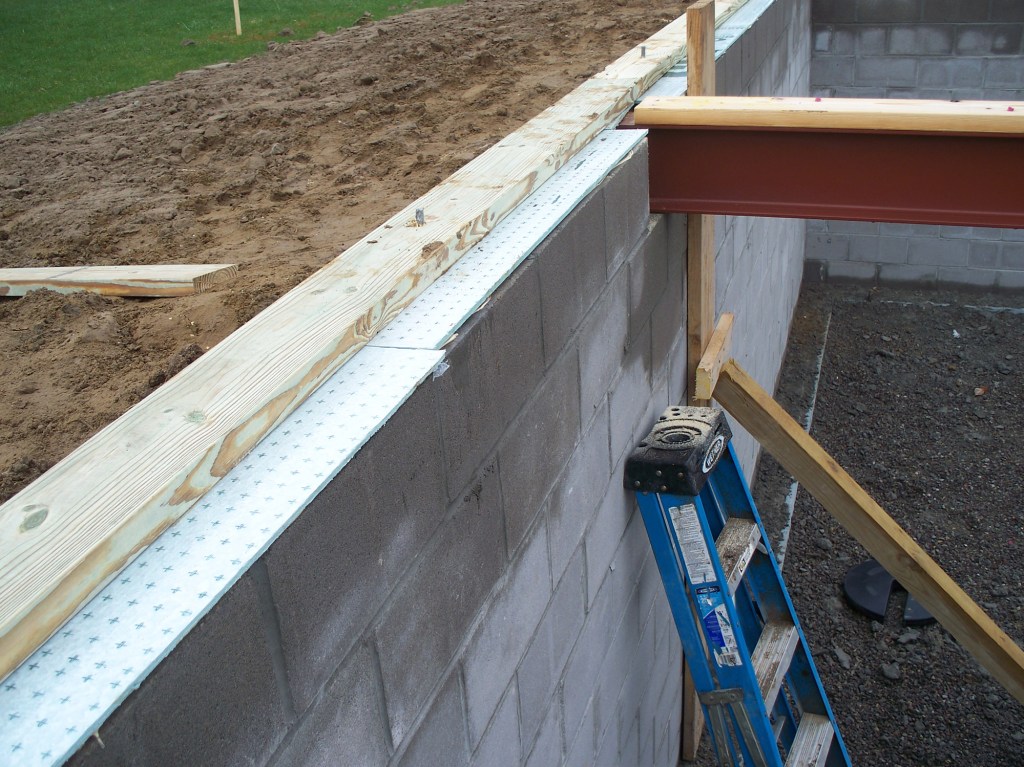
Basements and floor systems. Starting at the bottom, the first miss for many builders is that they don’t connect the poly vapor barrier under their slab with the foundation wall (a good idea, even though that’s not usually a huge air infiltration point). Leaks at the rim joist, also a common miss, can be more significant. Here, builders will need to achieve a good seal: sill sealer under the treated-wood mud sill, as well as careful attention to the rim joist area itself.
Spray-applied foam works well for the rim joist. You only need about an inch for a good seal; after that, you can install batt insulation for additional R-value.
My company is a damp-spray-cellulose-insulation installer, but not a spray-foam installer. So at the rim joist, our preferred method is to cut squares of 2-inch rigid foam to fit in between the joists, and to seal those pieces in place using low-volume two-part foam—the kind that comes in canister tanks with a gun applicator. If a builder wanted to do this job himself, his crew could easily cut and fit the rigid foam, and seal it in place with off-the-shelf gun foam.
Most foundations in our market are made with concrete masonry block, and the cores in the block are a major pathway into the building for soil gases. So we seal those cores with foam: We stuff fiberglass into the cores, and then spray foam over that.
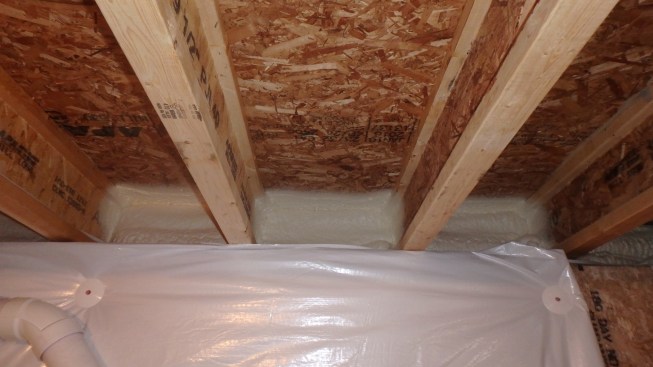
The author recommends spray foam on the band joist or, alternatively, rigid foam cut and fit to the band joist and installed with a compatible foam sealant.
Walls. When I sit down with builders to define the air barrier, most builders choose the exterior sheathing (with taped housewrap) as their red line, rather than the drywall plane. They don’t want to deal with airtight electrical boxes and other details that go along with the airtight drywall approach.
The main penetrations in the wall are the windows and doors. A lot of builders in our market are still stuffing the gaps between the windows and the rough openings with fiberglass. That’s not good enough anymore: We’re recommending that the insulators foam those gaps with gun foam.

In typical production building in the author’s market, the most practical way to air-seal around windows is with gun foam.
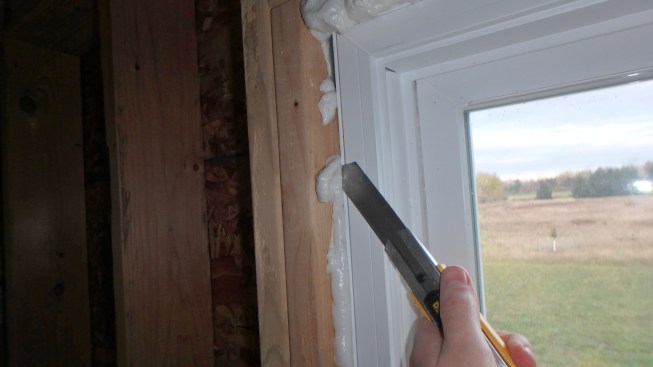
To achieve a good seal at the outer skin of the building, it’s helpful if the builder leaves a sufficient gap between the window and the rough opening for the gun’s applicator tip to reach all the way into the crack.
When a window has a factory-applied extension jamb, the joint between the window frame and the extension jamb can be a leak point. I emphasize to our builders that they should leave us a half-inch gap between the window and the rough opening, so we can get all the way into the crack and seal the main body of the window right to the sheathing, keeping that extension-jamb crack inboard of the air barrier.
Fire doors between the house and the garage are often missed—probably because the drywall on the garage may not be up when the insulators come through. We often catch that on a final blower-door test.
Wall-to-ceiling junctures. Builders who can build an airtight lid and an airtight wall don’t always think about how to connect the two—even though that joint can be leaky. Fortunately, common practice isn’t too bad in our market. Builders tape the housewrap at the top of the wall to seal that edge. Drywall is usually glued to studs and nailers. So on the gable end on the inside, the drywall will be glued to a nailer on the top plate, forming a seal there. On the bearing walls, there’s no nailer; but the wall drywall is glued to the plate, and the taped drywall joint at the top of the wall is a decent seal.
It helps, though, to flop a piece of housewrap across the top plate before setting the trusses. That can be taped on the outside, and stapled up to the truss undersides on the inside, and the ceiling drywall can be caulked to it for a better seal.
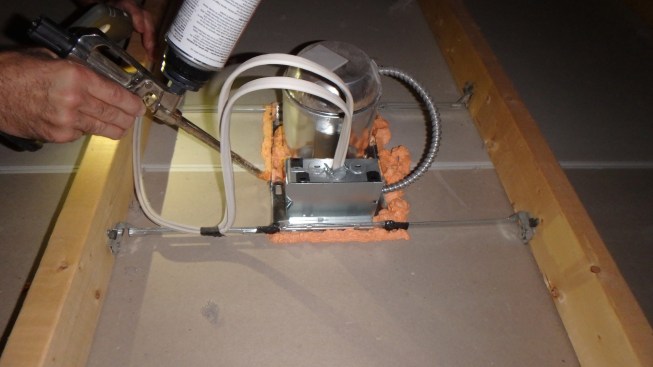
Can lights and bath fans should be sealed before insulation.
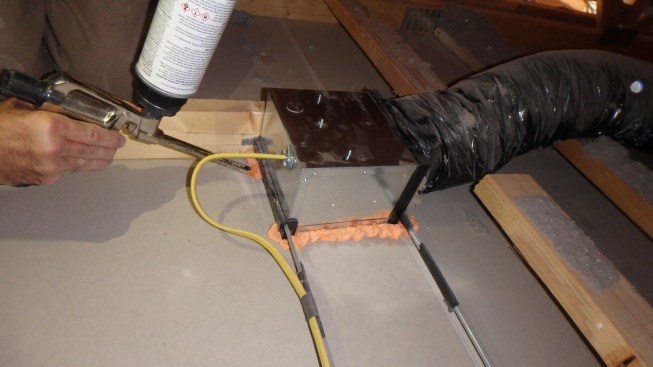
This step is often missed because of the local construction sequence: Insulators typically side-staple batts to trusses from below, sandwiching these components between drywall and insulation without sealing them.
Ceiling penetrations. The insulators usually seal up any holes for wiring and plumbing in wall-framing top plates, using foam in a can. But in our area—where insulators usually install ceiling batts (side-stapled) before drywall is hung, then come back later to blow the attic—can lights and bath fans are typically missed. My company often has to come back after a failed test, pull back insulation, and seal those boxes with gun foam.