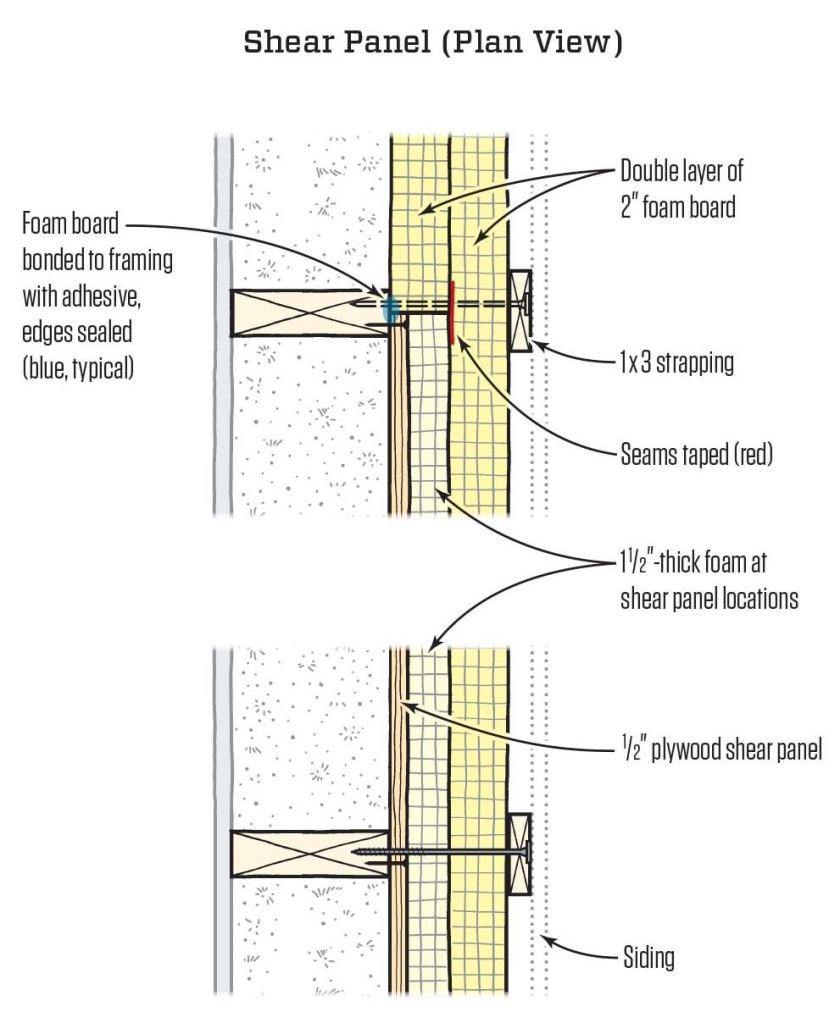
Fastening Foam
FastenMaster’s Headlok screw (fastenmaster.com) seems to be the fastener of choice for securing thick foam. Available in lengths from 2 7/8 inches to 18 inches, the screws can accommodate a lot of foam. They should penetrate the framing at least 2 inches.
The waffle head on Headlok screws provides a fairly wide surface where it contacts the foam, but driving heads flush requires slowing down to seat the screw. It’s easy to over-drive, creating a divot that can hold water. To avoid this, use insulation washers, or secure the foam with the rainscreen battens. Massachusetts builder David Joyce does it with the battens, speeding installation by securing each foil-faced panel with a single screw, then taping off all the seams to hold things in place. Once both layers have been installed, he fastens everything down with Headlok screws through the battens.
If you use this method, install Headlok screws every 24 inches along battens when supporting fiber-cement siding over 4 inches of foam; or every 36 inches over 2 inches of foam. With lighter wood or with vinyl siding, you can back off the fastener schedule to every 36 inches over 4 inches of foam, or every 60 inches over 2 inches of foam. In high-wind and seismic zones, these fastening schedules should be increased.
Window and Door Details
These details are often cited as “problematic” with exterior insulation. But in practice they turn out to be pretty straightforward. To terminate and seal the foam board around window openings in new construction, most builders line the rough openings with 1/2-inch plywood bucks that project beyond the framing by the thickness of the foam. A window buck gives you the option of installing the windows recessed to the inside or flush to the outside. When installed toward the outside, however, strap ties may be needed to secure the window to solid framing (Window Jamb).
Tape the outside edge of the buck to the first layer of foam before the window is installed (see photo, below). Also tape the nailing fins to the foam—first at the jambs, then at the head—but leave the bottom fin untaped for drainage (Window Sill). With the windows sealed to the foil-faced sheathing, any water that gets past the trim and siding will drain to the outside.
Exterior doors typically swing inward, so the door unit needs to be installed to the interior. A two-step jamb extension will often work to trim out a standard exterior door in a thick wall (Door Jamb and Threshold). Best practice calls for using cellular PVC for the jamb extensions and other exterior trimwork.
Retrofit Details
Retrofit foam applications usually preclude a window buck. When replacement windows are installed, the work is typically done from outside, and the interior trim is left intact, requiring exterior jamb extensions instead.
Historical retrofits often require preserving the windows. Typically, windows are removed for restoration, then reinstalled flush to the exterior to retain the original building characteristics. In this case, interior jamb extensions will be required (Retrofit Window Details).
How much Foam is Enough?
During winter in cold climates, warm, moist air from the interior can leak into wall cavities. When this air hits a surface below dew point, that moisture condenses and can cause moisture problems if the condensation doesn’t readily dry. In cold climates, the cold surface in question is typically the back of the exterior sheathing. But with enough exterior insulation, the interior surface of the sheathing stays above the dew point temperature for the indoor air and keeps condensation problems at bay.
How much insulation is enough? In the Building Science Digest “Controlling Cold-Weather Condensation Using Insulation” (search BSD-163 at buildingscience.com), John Straube explains:
Condensation can be avoided by ensuring the temperature at the back of the sheathing is warmer than the interior air dew point temperature. If one assumes that interior finishes and exterior cladding have little thermal resistance (almost always a reasonable assumption) then the back of the sheathing temperature can be found using the equation:
T sheathing = T indoor – (T indoor – T outside) x R batt/R total
To “solve” this equation, we want the result (the temperature of the back of the sheathing) to be greater than the dew point temperature for the indoor air. This dew point is a function of both the indoor air temperature and the indoor relative humidity. You can get this easily using the dew point calculator at dpcalc.org. A good ballpark for wintertime indoor relative humidity in a cold-climate city is 35%. At this level, indoor temperature at 70°F gives a dew point “target” of 41°F. In warmer climates, it’s best to assume a higher wintertime indoor relative humidity. For the outdoor temperature, Dr. Straube recommends a three-month wintertime average, which is readily available by state. (One source is currentresults.com; choose “Average Weather,” then “United States.”)
Note that in Dr. Straube’s equation we are multiplying by a ratio of the cavity insulation (R batt) to total insulation (R total). As you add cavity insulation to the wall, you effectively cool down the back of the sheathing, so we are looking for a suitable balance of the two insulations. The “perfect wall,” according to building scientist Joe Lstiburek, has all the insulation on the exterior, so the cavities see the same conditions that the building occupants do.
Knowing average weather conditions and your cavity insulation values, you can use the equation to back out a minimum exterior insulation thickness. We have done this in a chart (making wild assumptions about the indoor relative humidity and outdoor conditions), which you can see at JLConline.com. For these minimums, we assumed cavity insulation values at R-6 for a 2×4 wall and R-10 for a 2×6 wall. If you trust your insulator, you can use R-11 and R-15, respectively.
Details in this article were adapted from articles in theJLC archive. Special thanks to David Joyce who, while working on high-performance homes for the principals of Building Science Corp., pioneered many exterior insulation details that work.