Fixing the Holes Where the Air Gets In, continued Frozen pipes. Infrared photography can reveal some surprises. The leakiest areas of a building may not be the exterior walls but interior partitions that conceal hidden air pathways to the attic. Ceiling drywall, an otherwise effective air barrier, typically stops short at either side of an interior partition, leaving the top plate exposed to the attic space. Loose-fitting and air-permeable attic insulation can allow cold attic air to flow past the plate into the wall cavity through continuous narrow gaps between the drywall and the framing.
A convective air loop results, with cold incoming attic air replacing warm indoor air drawn through electrical outlets and other drywall gaps. More than once, I’ve responded to seemingly freakish complaints of frozen pipes within an interior partition in a brand-new “well-insulated” home. In new construction, we make sure that all interior and exterior partitions are sealed at the top and bottom plates, using either drywall adhesive or a continuous rubber gasket along both sides. To correct an existing problem wall, we expose the top of the partition in the attic and seal the plate with a layer of expanding foam.
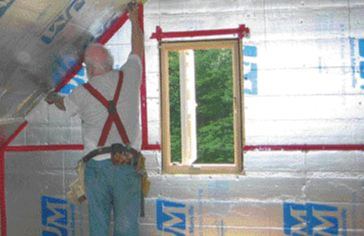
Rafter chutes. In a sloped ceiling design, soffit-to-ridge ventilation is critically important to ensure continuous removal of moisture-laden air that finds its way through the ceiling insulation. We use cardboard “chutes,” purchased from insulation wholesalers, rather than the ubiquitous polystyrene insulation baffles, which don’t fully cover the underside of a rafter bay or prevent soffit air from moving under and through ceiling insulation.
The chute has a smooth, flat face and prekerfed stapling flanges that automatically space the panel an inch away from the sheathing as it’s installed. The cardboard is vapor-permeable but durable enough to be permanent. Installation begins at the top plate as a soffit blocker, then transitions to follow the slope of the roof to the ridge vent. I’ve recently acquired a rapid-firing pneumatic stapler (Kihlberg, www.kihlberg.se) that makes chute installation a breeze.
Dry-Blown Cellulose
Fiberglass batts are widely regarded as the most cost-effective insulation. But it’s difficult to properly detail batts around obstacles like wires, plumbing, and electrical boxes and in irregular framing configurations. Chemical smoke testing also shows that fiberglass provides little resistance to air movement. Expanding polyurethane or icynene foams provide good solutions to these problems, but are way more expensive. For us, the answer is cellulose; we’ve had good results dry-blowing cellulose in both new and retrofit work. Blown-in cellulose effectively fills very small voids and hard-to-access areas at a competitive cost per square foot. Its R-value is 3.5 per inch, and when installed at the proper density of 3.5 pounds per cubic foot, it is highly effective at reducing air infiltration. The fact that cellulose is a recycled product (newspaper) makes it even more appealing to my clients.
Settling not a problem. Complaints that cellulose is prone to settle after installation are based on a common misconception. Voids found in an existing cellulose job are invariably due to faulty installation. If the wall bay isn’t filled at the minimum density, or is incompletely filled, voids will occur, regardless of the insulating material. Blown at a minimum density of 3.5 pcf, cellulose is installed at a density greater than its own natural settled density, which eliminates future voids.
Walls First
The best way to blow cellulose in a new home or addition is to treat walls and ceiling separately, at different stages. Flat ceilings are best blown after the drywall has been hung. Drywall provides containment, a built-in air barrier, and unyielding support for a 16-inch-deep layer of cellulose.
For walls, we use a reinforced plastic membrane for containment. In an ordinary wall installation, I use par/PAC (par/PAC, 877/937-3257, www.parpac.com) reinforced poly membrane. The membrane is tacked up, then stretched taut over the edges of each stud and stapled to its inner face. Stapling the membrane like this prevents the cellulose from “migrating” across the stud face when blown, trapping lumps that interfere with drywall installation.
Proper density. The difference between good and poor cellulose installation is about 15 seconds per stud bay and some basic technique. To ensure complete, void-free filling, I use a rigid PVC wand tubing at the end of the feeder hose. By inserting the wand through a slit in the middle of each stud bay, I first fill from the bottom, withdrawing the wand as the cellulose fills to slit level. I then reverse direction and fill from the top of the bay down.
To blow the cellulose into narrow and hard-to-reach areas, I switch to a smaller-diameter, flexible adapter, made from a length of vinyl tubing. The membrane is designed literally to take a beating. As the bay fills, I vigorously slap the membrane to help condense the cellulose and flatten the face, which otherwise bulges from the fill. With experience, you develop an accurate feel for the proper fill density.
Upgraded wall system. My preference, where the budget allows, is to sheathe the interior wall, using 3/4- or 1-inch-thick foil-faced foam board, after filling the cavity with cellulose. The foam board provides a thermal break over the studs, reducing convective heat loss through the framing. This application virtually guarantees that there are no “cold spots” on the wall where moisture might condense and support mold growth. The foil facing, with all seams and fastener penetrations taped and sealed, creates an effective air barrier that also retards the convective movement of moisture into the wall cavity.
To retain the cellulose, I use a less costly, vapor-permeable membrane such as 100% polypropylene InsulWeb (Hanes Industries, 828/464-4673, www.hanesindustries.com) or MemBrain (CertainTeed, 800/233-8990, www.certainteed.com), a polyamide film whose permeability changes with ambient humidity conditions. Both products claim to avoid the potential moisture-trapping problems of conventional vapor retarders.
Ceiling Insulation
On sloped ceilings, we nail up 1-inch-thick foil-faced foam board but leave a narrow “window” near the middle of each slope for blowing access .
Before installing the board, we cover the window area with a strip of containment membrane; elsewhere, the board holds the cellulose in place. After we blow the rafter cavities, the window is closed with foam board. All the seams and fastener penetrations are then sealed with housewrap tape.
Intricate or hard-to-reach framing transitions like tray ceiling perimeters, floors behind cathedral knee walls, and cantilevered rim joists are difficult to properly seal and insulate. We’ve had good success using a two-component polyurethane foam marketed as Zerodraft (Canam, 877/272-2626, www.zerodraft.com), especially in remedial applications where initial air sealing was never properly done. The two-component pressurized system is a rapid-high-expansion foam, packaged with a 30-foot hose and applicator, with a 600-board-foot coverage capacity. The foam cures in 45 seconds and makes it simple to seal otherwise challenging configurations in short order. At around $400 per pack, it’s too expensive to use as the primary insulation, but it’s unbeatable for tricky areas and sealing leaks. I typically get about four average houses out of a pack.
Mechanical Ventilation
Tight houses require ventilation to avoid problems with indoor air quality, condensation, and mold. Quantifying how much fresh air is neededis a nearly impossible as well as somewhat subjective task. The ASHRAE (American Society of Heating, Refrigerating and Air-Conditioning Engineers) standard recommends .35 ACH, or a complete replacement of indoor air every three hours. Another standard states that for each occupant, you need 15 cubic feet of air change per hour. This provides a decent working rule of thumb for determining exhaust ventilation rates. But because natural ventilation rates vary widely with wind pressure and differences between outdoor and indoor temperatures, mechanically assisted ventilation is essential to ensure a continuous rate of ventilation under all conditions. And, because the number of occupants and their activities also vary, the ventilation system itself should be variable. But that doesn’t mean it has to be complicated.
I always install quiet high-efficiency fans in the bathrooms or a remote-mount inline fan to provide whole-house exhaust ventilation.
There are many such fans available from a number of manufacturers, including Aldes, Fantech, and Panasonic. I typically install an Airetrak microprocessor control system (Tamarack Technologies, 800/222-5932, www.tamtech.com) to operate the fan. The programmable control operates the fan at a constant low speed, moving the air at, say, 75 cfm for a family of five (5 x 15 cfm = 75 cfm). But if one of the occupants takes a shower or wants a momentary higher rate of ventilation, pressing a “boost” button runs the fan at higher velocity for a preset interval of 20 minutes or a longer programmable period. As an option for clients who want a more hands-off system, I’ll install Tamarack’s Humitrak control in the bathroom. This automatically boosts the fan speed as the humidity level rises. The manual boost option is still available. Finally, to make sure the fan is performing at its intended capacity, I verify its operation with a flow meter.
When I have a client who places a high priority on ventilation control and energy efficiency, we’ll install a heat recovery ventilation (HRV) system.
Bruce Torreyis a building contractor and consultant on energy-related building problems in Sandwich, Mass.