Building the Stringers
At this point the story pole and floor layout contain all the information I need to build the stairs. First I cut and fit an MDF skirtboard for the short straight stair section. Then I frame a pair of stepped curved walls to support the stair treads; these walls — which also provide a form for the curved stair stringers — are glued up from three layers of 5/16-inch-thick bending plywood and a finish layer of 1/4-inch birch plywood.
Skirtboard. This stairway follows a straight wall at the top, and has three straight and three pie-shaped treads that fit into the skirtboard. I use the story pole and a level to lay out the tread locations directly on the wall, and then I tack the skirtboard in place and mark it. I dado the stair treads into the skirtboard with a router and a 1 1/8-inch pattern bit. In addition to fitting tightly into the dado, each tread is supported by 2×2 cleats glued and screwed to the skirtboard.
Framed walls. Taking the dimensions from the story pole, I cut the studs and plates for each tread. I cut the top and bottom plates at a slight angle — taken from the layout on the floor — so that the support wall follows the stair’s radius. I assemble the walls from the bottom up, checking for plumb as I go and adding temporary bracing as needed.
The stringers are laminated from 16-inch-wide rips of 5/16-inch-thick bending plywood (the type that rolls up into a 4-foot-tall — not 8-foot-tall — cylinder). Even though most of the stair’s strength comes from the framed walls, I glue and staple each of the three layers together and stagger the joints by at least 2 feet.
A fourth layer of 1/4-inch birch plywood gives the stringers a smooth surface that’s ready for paint. When fastening it in place, I keep the staples close to the bottom edge and near the stair cutouts so they’ll be covered by moldings.
I cut out the stair-tread openings with a flush trim router bit, a process that takes only a few minutes but makes a real mess. The last few inches at the top and bottom — where the router base bumps up against a floor or wall — have to be trimmed with a handsaw.
Bending the Rail
Bending rail looks like an ordinary handrail that’s been sliced up into several indexed laminations. When glued back together and sanded smooth, the laminations usually disappear, and the rail holds the shape it’s been formed into.
On a straight stairway, I typically assemble the railing right on top of the treads; if everything fits there, it will fit when I lift the railing up into place. I glue up curved railings the same way. To make sure the handrails match the curve of the stairs, I form the bending rail right on the stringers.
Rail glue-up. Besides taking a lot of manpower, gluing up a long handrail usually takes about all the clamps I own; I use a combination of metal L brackets cut from angle iron and special clamps from R&R Clamp (920/863-2987, www.rrclamp.com), which I like because they tighten quickly with an impact wrench.
Once we’ve spread the glue and wrapped the laminations together with packing tape, we wrestle the rail into place. We start in the middle — one person bending, the other two adjusting the clamps — and work toward each end, using damp rags to wipe off as much of the glue squeeze-out as possible.
Because a laminated rail will spring back slightly when the clamps come off, I actually overbend it in the middle by about 1/2 inch. Bending rail tends to twist a little on each end, so I tweak the ends a bit beyond square with pipe clamps; it’s hard to attach a handrail fitting to a twisted rail.
Glued-up rails need to stay clamped for at least 12 hours. Before unclamping, I make some indexing marks so that later I can put the rails in exactly the same place. It always takes a little work with a sharp chisel, block plane, and sandpaper to clean up the rails and prepare them for fittings.
Treads
Making the stair treads takes about as much time as building the walls and stringers, and requires at least six heavy-duty clamps and a 13-inch-wide planer.
I glue up 5/4-inch-thick stock for 1-inch-thick finished treads, making the glue-up wide enough to cut two treads at once and adding several inches of length to cover any snipe from the planer. The exact size of the blank and angle of cut comes from the tread template I made during the layout stage, with enough added for the treads with mitered returns.
Since the stringers are curved, each end of the tread has a slight angle — determined, again, by the full-scale layout. I add a 2-inch-wide bullnose edging to each tread with pocket screws and glue. The miter cuts for the bullnose returns are slightly less than 90 degrees at the inside radius and slightly more than 90 degrees at the outside radius. When applying the edge nosings, I’m careful to locate the pocket screws so that they will be out of the way of the dowel screws for the balusters.
We use trim-head screws and lots of construction adhesive to attach treads, and make shims out of poplar to level them. Starting from the top and working from the inside, I use pocket screws and yellow glue to join each riser to the tread above it. This makes a really strong tread and eliminates another possible squeak.
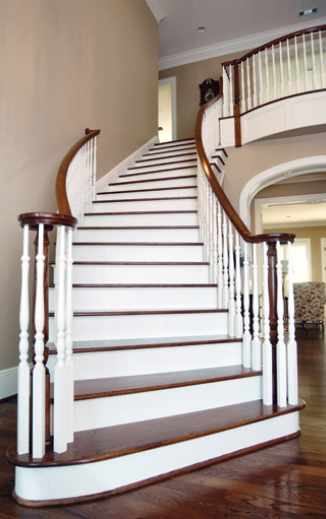
Starting step. The radiused starting step is wide enough to accommodate the starting newels and their volutes and balusters. I use a 3/4-inch-thick subtread on the starting step to provide a form for the curved riser. A matching nailer on the floor serves as a form for the bottom of the riser and also helps anchor the starting newels.
Balustrade Assembly
To make sure that lengths and angles are right, I measure, cut, and dry-fit the stair parts with the curved rails sitting on top of the treads. I use two pitch blocks for the angles — one for the inner radius and one for the outer radius — and a laser to align the rails with the starting newel-post locations.
This stair has a pair of starting volutes; in order for them to be level with one another at the bottom step, the rail height along the inside radius — which has the steeper pitch — needs to be about 4 inches lower than that along the outside radius. To my eye, this solution looks better than out-of-level volutes, and the rail heights still meet code.
Once I’m satisfied the assembled handrails are accurately positioned on the treads, I lay out the balusters — two per tread along the inside radius and three per tread along the outside radius. After we’ve installed the newel posts and raised the handrails into position (with a couple of temporary supports to keep the centers of long rails at the right height), I use the laser to transfer the baluster layout to the bottom of the handrails.
We use an adjustable jig called a Bore Buster (L.J. Smith Stair Systems, 740/269-2221, www.ljsmith.net) to hold the drill at the correct angle when we bore the baluster holes in the bottom of the handrail. To get a really strong balustrade, we fasten the balusters to the treads with special double-threaded dowel screws (also available from L.J. Smith, along with a special driver bit for installing them).
Labor and Cost
The first time we built a curved stair, framing and finishing it took two men two full weeks. With our second job, we were about two days faster. Today, building a curved staircase takes us about 40 hours longer than building a comparable straight one.
Two days are spent just gluing up and building the custom treads (on a straight run of stairs, we use manufactured tread stock); for this project, we used about 160 board feet of 5/4-inch-thick red oak lumber. We also used a lot of plywood, including three sheets of bending plywood, two sheets of 1/4-inch birch plywood, and three sheets of 3/4-inch thick birch plywood (for the risers).
At $14 per lineal foot and up, bending rail isn’t cheap — though it’s not as expensive as it once was. Sometimes you can find a manufacturer who supplies it in 8-foot lengths, but on this project we used two 16-foot-long sections. We also went through plenty of glue, including a gallon or two of Titebond and eight to 10 tubes of construction adhesive.
Gary Striegleris a builder in Springdale, Ark.