Routing the Floor Mosaic Outline
According to Mike, the carpenter on the job, the secret to this painstaking task was to use a powerful router and brand-new bits and work up to the finish cut in steps, never trying to rout to the line on the first pass or hog off too much material. He started with a 1/2-inch bit, then moved to 1/4-inch and 1/8-inch bits for the tighter spots. After routing, Mike sanded a slight bevel on the plank edges, vacuumed away the dust, and applied two coats of sealer to the newly exposed wood edges. When he was finished, there was a smooth, uniform gap around the edge of the tiles.
Installing the Sheet Membrane
Normally, this is a simple task, requiring a few straight cuts — but not on this floor. The membrane, NobleSeal TS, comes in 5-foot rolls, and two pieces were required to cover the width of the tiled area. After stapling the membrane to the floor to prevent it from moving, I cut it with a utility knife to within 1/16 inch of the flooring. Then I removed the staples and prepared to adhere the membrane to the subfloor using NobleBond 21, which is a contact adhesive, so it grabs quickly and makes it difficult to reposition the sheet. To avoid misalignment, I positioned the larger sheet of membrane carefully, then folded half of it back on itself before spreading the adhesive with a 1/8-inch V-notch trowel.
After waiting about 20 minutes for the adhesive to become tacky, I lowered the membrane and used a hand roller and a small trowel to laminate it to the subfloor. I repeated the process with the other half of that sheet, then installed the second sheet in the same way. Finally I glued the 2-inch overlap between the sheets with NobleSealant 150, which makes a watertight seam when NobleSeal TS is used as a waterproofing membrane.
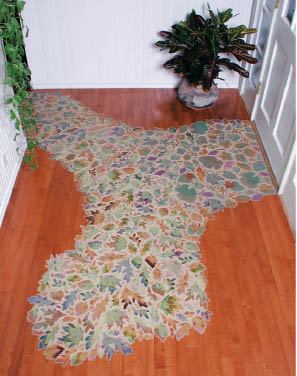
Setting the Tile
Again using the manufacturer’s layout map, I repositioned the tiles. They were now locked into place by the routed wooden edge, but it was still important to dry-fit all the sheets and make sure there were no loose seams. Next, working a few sheets at a time, I spread the thinset with a 1/4-by-3/8-by-1/4-inch square-notch trowel and also used a 1/2-inch-wide tuck pointer to work the mortar into the recesses around the perimeter.
After carefully placing each section of tile, I adjusted the position of individual tiles as needed before the thinset hardened, then wiped the mortar residue from the surface of the tile and the wood floor with a clean sponge. As the thinset firmed up, I also cleaned up excess mortar that might get in the way of the grout, being careful not to puncture the membrane. I took special care cleaning the perimeter, where the movement joint would be installed. When cutting away excess thinset, it’s best to leave the damp crumbs to harden completely — which takes a day or so — then vacuum them up. If you try to clean them up while the thinset is still wet, you risk nudging some of the tiles out of position. However, it’s important to clean up the tiles and the joints while the mortar is still green; you risk damaging the tiles if you wait until the excess thinset is hard.
Grouting
Because the tiles were installed over an impermeable membrane, I had to allow extra time — about 72 hours at 70°F — for the thinset mortar to dry completely and the tiles to harden off before I could get back on the floor for grouting.
Grouting hand-molded tiles requires patience and a soft touch; as with grouting any kind of tile, timing is everything. For this job, the temperature was in the mid 70s with no discernible breeze — ideal conditions. I spread grout over the entire floor, working the rubber grout trowel back and forth and side to side to completely fill the joints and eliminate voids. I then waited 20 minutes or so before I began wet cleaning. I use this term loosely, because I try hard not to drip any water on the freshly grouted tiles and use only a tightly wrung-out sponge when it is time to remove the grout residue. With practice and experience, a lot of the residue can be removed with the edge of the grout trowel after packing — but there will always be excess on the tiles, and the grout in the joints will need to be smoothed and finished.
When its pores are open, a sponge can be a gentle finishing tool; when its pores are clogged with sand and cement particles, it quickly morphs into an aggressive gouging tool. At first, I work the sponge in a circular motion and don’t wait for it to fill with cement before I flush, rinse, and wring it out in a bucket of water. For any tile, grout removal is a gradual process, with varying amounts of excess material removed at each step: As the tiles become cleaner and cleaner, less material needs to be removed.
After several circular passes with no sand or cement particles or residue visible, I rinse the sponge and make parallel passes, using very light pressure and a fresh sponge face each time. On this job, I used the technique on both the tiles and the wood flooring.
I tried to avoid getting grout in the perimeter joint, and removed any that did get in with a 1/4-inch tuck pointer once the grout had begun to set up after wet cleaning — about two hours after I first mixed the grout. On a hotter day, this would have happened sooner.
Filling the Movement Joint
With straight floor edges, it’s relatively simple to hide perimeter joints under baseboard or other trim — which means that most joints are never seen. On this floor, though, the movement joint would be highly visible, and if done poorly would attract attention. And it not only had to look great — it also had to perform well as a walking surface. Therefore, I used backer rod to help form the sealant into its most effective cross-sectional shape: concave on the bottom and on the surface. The bow-tie-like cross section allows the cured sealant to stretch and compress without shearing off the sides where it adheres — in this case, to the tiles on one side and the wood on the other.
I pushed 1/4-inch-diameter backer rod into the gap with the head of a large finishing nail, leaving the joint ready to be filled with sealant within a few minutes.
The one-component acrylic sealant was colored and textured to match the grout. I don’t try to be Michelangelo when using the caulking gun, but prefer to pile up the sealant over the joint. Then, rather than tooling the sealant with a margin trowel or even my finger, I use a damp sponge to gently remove the excess.
One-component sealants tend to shrink as they cure, so I try to keep the material as high in the joint as possible, and begin wet-cleaning as soon as I can. On this floor, I shot about 10 feet of joint at a time and cleaned all that length before filling more of the empty joint. The trick is to keep the surface moist, not wet. I begin as I do when grouting, with soft, circular strokes focused primarily on the surfaces to either side of the joint itself. This helps prevent gouging. After several passes with a freshly rinsed and barely damp sponge, I gently apply the sponge to the joint area and begin smoothing it.
Finishing the sealant is an exacting task, but with patience you can mimic the profile of the grout and make the movement joint seem to disappear.
JLC contributing editor Michael Byrne is a tile-setter and consultant in Los Olivos, Calif., a longtime member of the JLC Live demonstration crew, and the moderator of the JLC Online tile forum.