Installing an Over-the-Post Handrail – Part One – Continued
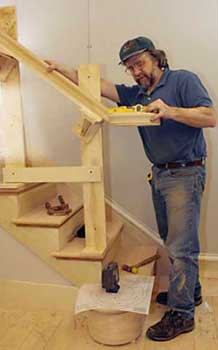
Then I set one stand on the second tread up from the bottom, and one on the top tread, with one or two intermediate stands on a long stair. I screw a 1×4 platform across the stand brackets and adjust them so that the railing, when sitting on the 1×4, will be 34 inches above the nosings, per code, and at the same pitch as the stair. To set the pitch, I use either a digital level or place a torpedo level on my pitch block.
I clamp a rough length of straight rail onto the 1×4 and check its location with a laser plumb bob, making sure the centerline of the rail bottom is plumb over the baluster centers. If an adjustment is necessary, I shim the stands to correct the alignment. The handrail must remain snug against the vertical face of the stand. Finally, I connect the rail stands with horizontal braces for stability.
Fitting the Volute
The up-easing on a manufactured flat volute has to be cut to the pitch angle of the stair. To do so, I set the volute on a flat surface and slide the pitch block under the easing, with the run edge of the pitch block horizontal, then make a mark on its bottom exactly where the pitch block touches it. This is the tangent point, where the line of rise intersects the easing’s radial curve. Use a strong backlight to make it easier to see the exact point of contact.
Next, I flip the pitch block 90 degrees to mark the cut line across the up-ease through the tangent point. To make the cut, I temporarily hot-glue the pitch block to the bottom of the volute for support and make the cut with the blade set plumb and square on the chop saw.
After cutting, I connect the volute to the straight rail section, clamp it to the stands, and check it for level. If the cut needs correcting, it’s a lot easier and safer to do it on the straight rail section. I just loosen the rail bolt enough to raise or lower the volute to level, then mark the correction on the straight rail. But I never glue the connections until I’ve totally dry-fit the entire railing assembly.
Locating the Volute Newel
Typically, there’s a paper pattern in the box the volute comes in. I scissor a notch in the pattern so that it fits on the bottom bullnose tread. The notch wraps the corner where the second tread’s riser and face skirt miter; the volute’s centerline aligns with the baluster layout line. I move the pattern forward and back until I like the way the volute falls on the bullnose tread, at which point I punch a reference hole through the newel-post center mark into the tread.
I remove the template and set my laser plumb bob over the mark, then move the rail assembly up or down until the laser dot hits the center of the volute’s dowel hole. Then I clamp the railing tight to the stand. Now I’ve got my volute and straight rail exactly where they’ll be permanently fixed — both in plan and elevation — on the finished stair.
Before removing them to fit the gooseneck at the upper landing, I measure between the bottom of the volute and the bullnose tread to find the length of the volute newel. I pencil witness marks between the rail-stand platform and the railing so that I can later return the assembly to the exact same spot to fit the gooseneck.
Jed Dixon is a master stair carpenter in Foster, R.I., and a regular presenter at JLC Live.