Framing a Barrel-Vault, continued
Dormer Rafters
To locate the line of the curved header on the plane of the main roof, we temporarily screwed 5/8-inch plywood over the roof sheathing, then used a laser pen to transfer the arc. One carpenter moved the laser pen along the header, using a simple site-built jig to keep it level, while another carpenter transferred the marks onto the 5/8-inch plywood. We then removed the plywood and cut out a curved plate to form a bearing surface for the dormer rafters.
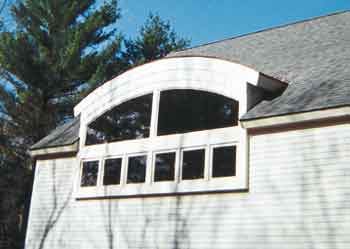
LVL trimmers and header frame the dormer’s rectangular opening (top). Short cheek walls at each end support the curved window header (bottom), which was laminated on site from five layers of plywood. |
Each 2×10 dormer rafter was individually measured and cut to length. We installed the rafters level, with one end resting on top of the window header and the other end, cut at an acute angle, resting on the main roof. The dormer ended up with two small cheeks, which we closed in with 2×4 stub walls. The subfascia was made from 3/4-inch plywood. First we installed the curved subfascia on the face of the dormer, and then installed the fascia returns back to the main roof. On each side of the dormer, the fascia return was attached to a pair of 2×10 ladder rafters supported by the cheek walls. Later, the subfascia pieces were covered with finger-jointed 1×12 cedar trim.
To define the ceiling curve, the author installed a pair of angled 2x10s in the upper corners of the rectangular opening (top). The doubled 2x10s were cut to follow the curve of the header, then skinned on the inside with plywood to make a perfectly radiused nail base for the ends of the 2×6 ceiling joists (bottom). |
Since 5/8-inch plywood wouldn’t easily bend to the roof’s curve, we sheathed the roof with three layers of 3/8-inch plywood. We protected the roof sheathing with rubberized-asphalt eaves membrane; eventually, the roofing contractor arrived to install a flat-seamed soldered copper roof.
Framing the Curved Ceiling
We drew an arc on the window header 4 inches up from the top of the window heads to mark the bottom of the ceiling joists. We then installed a pair of diagonal 2 x 10s in each corner of the rectangular rough opening and transferred the arc on the header onto the 2x10s, again using the laser pen. We cut the curve with a jigsaw and then installed three layers of 1/4-inch plywood to create a smooth arc. The 2×6 ceiling joists were toe-nailed to this curved piece of plywood, defining the crisp edge I was looking for.
To define the ceiling curve, the author installed a pair of angled 2x10s in the upper corners of the rectangular opening (top). The doubled 2x10s were cut to follow the curve of the header, then skinned on the inside with plywood to make a perfectly radiused nail base for the ends of the 2×6 ceiling joists (bottom). |
Finishing
We insulated the dormer, then strapped the ceiling with strips of 1/2-inch plywood installed 12 inches on-center. Two layers of 3/8-inch blueboard conformed easily to the curve, without the need for moistening. Flexible corner bead installed at the transition between the main sloping ceiling and the curved ceiling established a near perfect curve.