
Sealants are rarely used on barn roofs because the roof slopes are typically steep enough that rain and snow drain off in true watershed fashion. But house roofs, with dormers, hips, valleys, chimneys, skylights, and plumbing vent penetrations, put more demands on metal roofs. On houses, building a “watertight” roof by sealing all joints, side seams, and endlaps in a metal roof is critical for preventing leaks.
Tape vs. Gun-Grade Sealants
Thermal movement, freeze-thaw cycling, and exposure to ultraviolet light will degrade even the best quality sealants.
There are two types of sealants used for metal roofs – tapes and gun-grade. Tapes are preferred to gun-grade sealants because they have a high solids content (about 97%) and don’t shrink. Most tapes for metal panels are butyl polymers, which will last 30 years or more if protected from exposure to ultraviolet light. The gun-grade types are usually about 70% solids, which means that when the 30% solvents evaporate, the sealant shrinks.
No sealant should ever be applied to the outside of a seam. But when external sealant applications are unavoidable, do not use silicone. Many silicone sealants contain acids, which can damage metallic coatings. Silicone also has poor adhesive strength on metal. Urethanes are generally much better. Still, any external sealant requires maintenance even under the best of circumstances. The best option by far is to rethink the detail and try to find a way to use a hidden butyl sealant.
Sealing Side Seams and Endlaps
Butyl tape is available in a variety of sizes. I recommend using a minimum tape width of 1/2 inch. The tape typically comes in a roll, and should be cut to length with a sharp knife, rather than torn, so that the bead maintains its intended dimension and is not stretched.
To seal the seams between adjacent panels, apply the tape to the top shoulder of the panel rib, making sure that the majority of the sealant winds up on the weather side of any sidelap fasteners (see Figure 1 below). Don’t peel away the release paper until you’re ready to install the overlapping panel. Take care to ensure the exact alignment of the panel before it contacts the sealant. Once a panel touches the tape, even a small adjustment is extremely difficult.
Side seam fasteners should pierce through the sealant or be placed on the “dry” side from the sealant. The ideal fastener for sheet-to-sheet joining is a 3/4-inch 1/4×14 hex-head galvanized screw with a #1 drill point.
Seal the laps between panel ends with tape sealant, as shown in Figure 2. Make sure the upslope panel always overlaps the downslope panel, and the sealant is on the weather side of the endlap fasteners.
Sealing Roof Penetrations
There are a number of ways to handle penetrations, depending on the type of penetration. First, some basic things not to do:
- Do not dam or impede the flow of water on the upslope side of roof penetrations. Standing water and metal panels do not agree, and panel corrosion will certainly result.
- Do not use lead or copper flashings, which will corrode the panels from galvanic action.
- Do not under any circumstance smear black goo anywhere on a metal roof. It is an ineffective and unsightly remedy, and it will require repeated maintenance.
Plumbing vents and furnace flues. Round penetrations of almost any size are easily flashed with special rubber boot jacks that have a moldable aluminum compression ring, such as ITW Buildex’s Dektite and Aztec Washer’s Masterflash. The ring can be formed on site to custom-fit almost any panel rib profile (Figure 3 below).
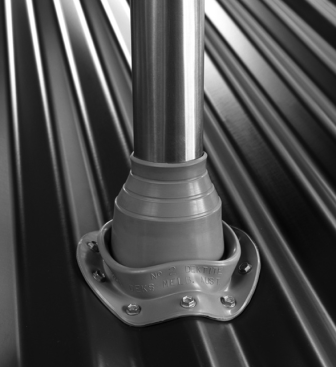
Figure 3. To seal round penetrations, use a special rubber boot jack with a moldable aluminum compression ring, like this one from ITW Buildex. The ring can be formed to fit almost any panel rib profile.
These boot jacks are available in various sizes and colors, and some are made to withstand high temperatures. Most boot jacks slip over the top of the stack, but some versions can be wrapped around the pipes. This is especially useful for sealing an electric service mast, for example, when you can’t easily disconnect the power.
Skylights, chimneys, and roof hatches. Rectangular penetrations can be handled with sheet metal flashings in some cases, and with “preformed” curb flashings in others. To accommodate differential movement between the roof penetrations and panels, use a two-piece flashing, as shown in Figure 4.
The base flashing is rigidly connected to the roof panel with washered screws. Apply tape sealant between the roof panel and the flashing, and be sure the screw pierces the sealant or is placed on the dry side of the tape, not on the weather side. Use tape sealant between the base flashing and the counterflashing, but do not rigidly connect these with screws. The upslope side of a rectangular penetration is a bit more difficult. The panel itself must end a sufficient distance from the penetration to allow room for a cricket, or diverter, to direct the flow of water around the penetration. This cricket flashing must be inserted beneath the upslope panel and sealed to it with butyl tape.
The voids at the cut edges of the roof panel are sealed with rubber closure strips. Most panel suppliers sell closures to mate with their panel profile. The closures are usually available in both male and female (inside and outside) configurations. To make the transition between a cricket and the side flashings watertight, as well as attractive, is a true art that is best learned from an experienced installer. To simplify flashing rectangular penetrations, use preformed curbs. These curbs are one-piece designs of all-welded construction that include a built-in diverter. The curb slides under the roof panel above and overlaps the panel below. It is sealed with one or several beads of butyl tape, and screwed down. The fabricator must know exactly what panel type is being used so that he can match the curb flanges to the rib spacing and the profile of the panel. However, these curbs cannot be color-matched to your roof. If this is a problem, fashion a sheet metal shroud from flat roofing stock to cover the curb.
Rake and headwall flashing. A two-piece sheet metal flashing should be used at rakes. To seal along a headwall above a shed roof, add rubber closures to seal the void at the end of each rib. Make sure the bottom leg of the two-piece flashing extends well over the rubber closure to protect it from sunlight.
Ridge, Rake, and Eaves
Most panel suppliers offer standard ridge components for use with their panels. These come in two varieties. One type has a formed flange to nest with the panels. While this type is easier to seal, the installer must keep the panel ribs perfectly aligned on both sides of the ridge. The other type has a flat flange that overlays the panels, and a closure strip is added. With both ridge types, use a sealant tape to seal the joint between roof panel and ridge cap. When using long panels that are subject to substantial thermal movement, make sure the ridge cap and the panels are fastened separately to the deck.
Rake flashing. Prefabricated rake flashings are also available from the panel supplier. However, these are usually too large and “boxy” to use on a residence. Instead, ask the panel supplier to furnish flat sheet stock with a matching finish. You can then take the flat material to a local sheet metal shop, and have it bent into a simple L-flashing, as shown in Figure 5 below.
Ideally, this flashing should attach to the roof at a high rib with sealant, even if this means extending the horizontal leg a few extra inches. Fasten the rake flashing to the fascia. This is best done using a metal cleat that matches the angle of the drip leg. Or, you can fasten through the face of the flashing with a washered screw.
Eaves flashing. Bend a simple drip edge for the eaves, as shown in Figure 6. This drip flashing should be nailed down just enough to hold it in place prior to installing the roof panels. When the roof panels are installed, the screws should pierce the panel, drip flashing, and deck. Use eaves closures to prevent snow, rain, and vermin from entering the panel voids. Again, use tape sealants in conjunction with the closures, especially in severe climates.
If gutters are used, take extra care when installing tape sealants and eaves closures. Freezing gutters and ice dams at eaves can cause serious moisture problems. If you seal the eaves edges to withstand occasional submersion in water, you’ll never be disappointed or accused of misjudgment. If gutters are not used, the roof panels should overhang the drip edge by at least 4 inches
Hip and Valley Flashing
Cutting a panel diagonally across a rib produces a large irregularly shaped void that is difficult to flash and close off. Unfortunately, hip and valley details are usually left for the installers to figure out in the field. A contractor can save a crew a lot of grief, however, by selecting a panel profile with the narrowest possible rib. Similarly, it is best to select a panel that is as flat as possible between ribs – one without minor stiffening ribs or flutes between the major ribs.
Common practice calls for installing a bitumen or modified bitumen underlayment under valleys and over hips to protect the roof sheathing from damage and leaks. However, relying on this added protection may prove to be a mistake, especially in cold climates. Once water gets under the roof panels, it can corrode the underside of the metal panels or lead to freeze damage of the panels and fasteners. Such problems are impossible to remedy, short of a roof tearoff.
Instead, hips and valleys must be made absolutely watertight with closures and tape sealants. Because closures are designed for use at the end of a square cut, however, fitting the closures can be difficult.
For standard hips and valleys, some panel manufacturers might provide special skewed closures. Since the closures are made by a separate company, you may have to press the panel manufacturer to find out if these are available. However, skewed closures are expensive. In most cases, you will have to customize the standard closures.
Sealing valleys. For valleys, cut off the rib portion of a standard male closure, so you are left with several “plugs.” Position these plugs square to the panel’s length. Install tape sealant on the top and bottom of the plugs, and use a close fastener spacing in the pattern shown in Figure 7 below. As always, be sure the screws pierce the sealant, or are placed on the dry side of the joint.
Use a valley flashing made from prefinished flat roofing stock, bent to the roof slopes, with an inverted “V” in the center. Install the flashing prior to installing the roof panel by temporarily nailing along the upslope edge of the flashing. Be sure that the nail locations will be upslope of the sealant in the finished assembly. Keep the roof panel edge at least 3 to 4 inches upslope of the valley centerline, and make sure the flashing extends at least 4 inches past the panel edge so the closures seal to the flashing.
On long valleys, use several valley sections to avoid problems with thermal expansion. Overlap the sections at least 3 inches and use a double row of tape sealant. If the valley sections nest well, don’t fasten the sections together with screws. If you need to snug up the connection, place the screws in the upper section only, just upslope of the lower flashing section. This will hold the lower section in place with friction and allow for differential movement between the sections.
Sealing hips. For sealing hip ridges, most manufacturers provide metal J-trim, which is capped by a metal ridge cap (Figure 8 below). On simple hips in steep roofs, this assembly can be installed without tape sealant. However, on complex roofs where snowmelt and ice damming patterns are difficult to predict, use plug closures and tape sealant to render the assembly watertight.
Cutting Panels
Be sure to use the proper tools whenever you are cutting panels in the field. Cutting metal panels with abrasive cutting blades will overheat the panel at the cut, burning the paint and permanently damaging the metallic coating. It also leaves a ragged edge. Use electric nibblers for cutting across the panel and electric shears for cutting parallel to the length of the panel. Be sure to sweep the roof clean of all cutting and drilling debris daily, or you will end up with unsightly rust stains on the panel surface.