I recently inspected a new house near Des Moines, Iowa, that had multiple siding and window problems. The builder had installed inferior windows and reportedly installed them poorly, resulting in extensive leaks. In an effort to remedy the problem, the owner bought new windows from Pella to replace the original ones and had them installed by a Pella-certified installer. It was this new installation I was inspecting, and it was also done wrong. There were several critical mistakes, all relating to the trim. How a window gets wrapped on the exterior is not just about aesthetics; exterior trim details can have a big impact on how the window performs.
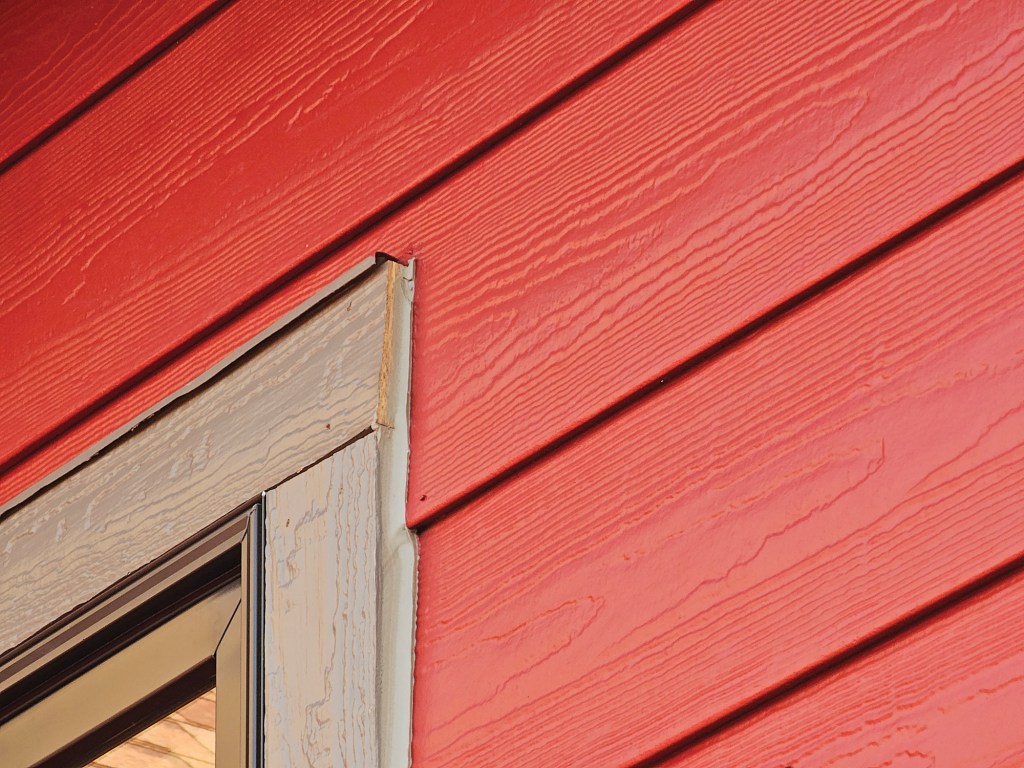
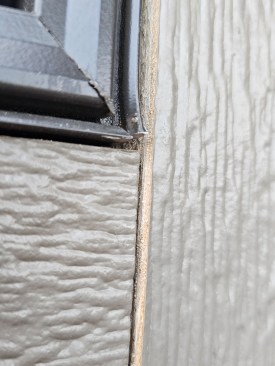
The original windows had been wrapped at the exterior with fiber-cement trim stock. For the new windows, the installer used prefinished LP SmartSide Trim. This trim had to be ripped in width to fit the space between the window frames and the existing siding, and I am reasonably sure the window contractor chose LP SmartSide, which is an engineered wood product similar to OSB, because it is easier to cut and rip than fiber cement. But the contractor failed to meet the installation requirements of either LP or Pella. These were the two most egregious mistakes:
Paint and finish. LP requires all sides of all SmartSide products to be primed and painted. This is especially important at cut edges—in this case, both the ripped edges and the ends.
In conversation, the builder told me Pella advised him “the homeowner is responsible for painting the exposed edges of the trim.” However, doing that is clearly impossible once the trim is installed. It is imperative that the installer ensure all cut edges of the trim are properly sealed before it is installed. However, none of the cuts on the new trim work were sealed and, because these edges are now tight to the window or to adjacent trim pieces, there is no way to paint them without removing the trim altogether.

Mark Parlee
All exterior wood trim, especially an engineered wood, such as t…
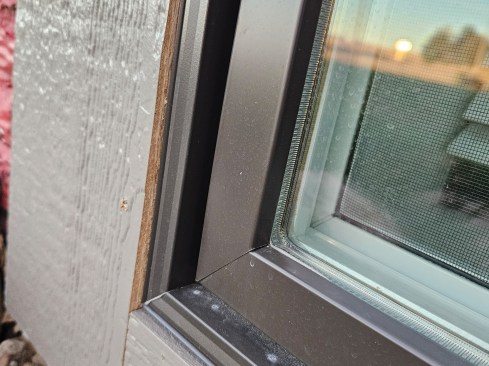
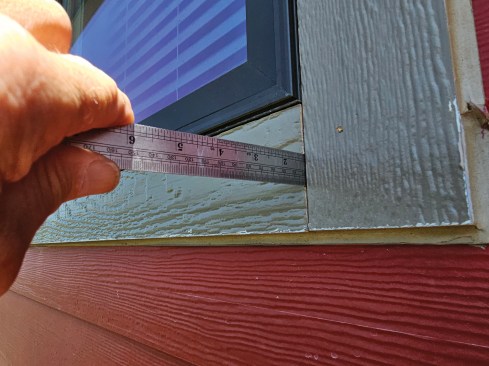
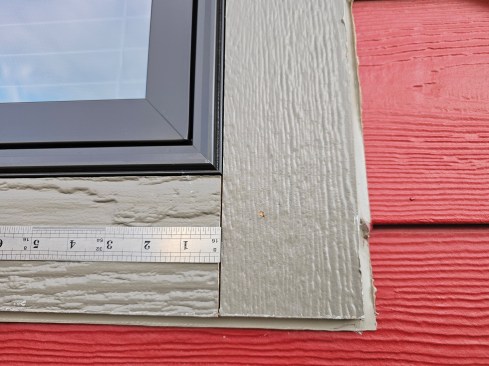
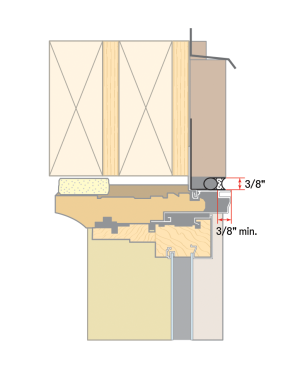
Gap at the window frame. Pella is specific about leaving a 3/8-inch gap between the window trim and exterior cladding, and a similar gap between the trim and the window (see illustration, facing page). Most window companies require similar gaps, though the exact size might vary by manufacturer. This gap is needed to create a proper seal using backer rod and sealant to prevent water from leaking under the trim where it might find its way under the nail fin and into the wall.
Here again, the window contractor ignored this detail and installed the unpainted edges of the trim tight to the window frame. Not only will the trim wick moisture and begin to degrade but, without the gap, there is no way to seal between the window and the trim, risking the potential for leaks.
Mark Parlee
Both Pella and LP require leaving a gap on both sides of the tri…
Ola Kwiatkowska
In this detail adapted from the Pella installation instructions, a 3/8‑inch gap is required between the window and the trim to allow for backer rod and sealant. This seal must be set back at least 3/8 inch from the face of the trim.
In its installation instructions for SmartSide, LP also recommends a gap and sealant on each side of the window trim. However, LP specifies only a ³⁄₁₆‑inch gap, which is narrower than the window manufacturer requirements.
The International Residential Code explicitly requires builders to follow the window manufacturers’ instructions. The building code also tends to give precedence to the most restrictive requirements in cases where a conflict arises, and I usually recommend when in doubt to follow the more rigorous requirement. In this case, I interpret the Pella instructions as allowing for the more durable seal. Backer rod and a properly formed caulk seal are not optional in the Pella instructions, whereas the sealant details other than the minimum space are not specified in the LP instructions.
Keep the conversation going—sign up to our newsletter for exclusive content and updates. Sign up for free