
If vinyl window units have been shipped loose and you need to mull the windows together in the field, please follow each step listed that is the appropriate scenario to your application.
Tools You Will Need:
• Power drill & assorted drill bits
• 3/8” vinyl hole plugs
• Vinyl snap mullion or H mullion trim
• Pre-cut treated plywood (size depending on model of window)
• 1/16” x 3/8” double-sided glazing tape
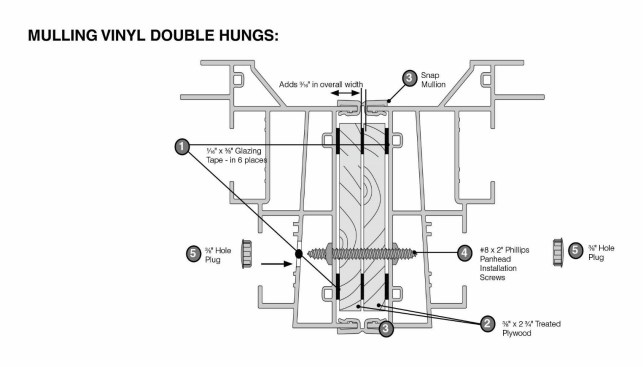
Step 1 – Install 1/16” x 3/8” double sided glazing tape to inside of frame of each window and to each side of plywood (see illustration).
Step 2 – Install (pre-cut to the window size) treated plywood, making sure each piece adheres to the glazing tape.
Step 3 – Install the snap mullion (or H mullion) to both the interior and exterior sides of both windows.
Step 4 – From inside the home, install the #8 x 2″ Phillips installation screw in 3-4 locations staggered depending on height of window. If you use the factory prepped location on one window, make sure to stagger the installation screw on the opposite window to keep the screws from hitting each other.
Step 5 – Install hole plugs for the mulled side only.
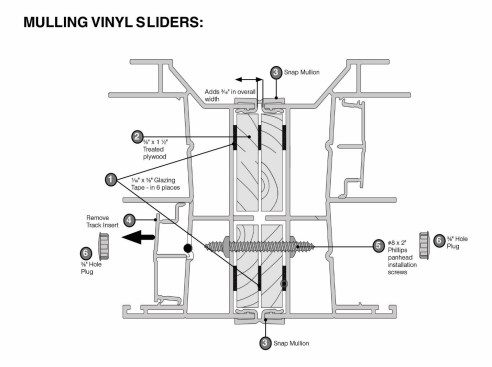
Steps 1 – 5 See “Mulling Vinyl Double Hungs.”
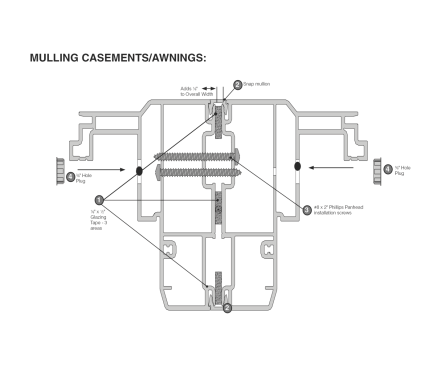
Step 1 – Install 1/16” x 3/8” double sided glazing tape to inside of frame of each window and to each side of plywood (see illustration).
Step 2 – Install the snap mullion (or H mullion) to both the interior and exterior sides of both windows.
Step 3 – From inside the home, install the #8 x 2″ Phillips installation screw in 3-4 locations staggered depending on height of window. If you use the factory prepped location on one window, make sure to stagger the installation screw on the opposite window to keep the screws from hitting each other.
Step 4 – Install hole plugs for the mulled side only.
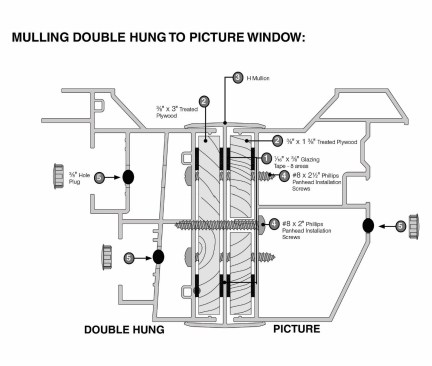
Step 1 – Install 1/16” x 3/8” double sided glazing tape to inside of frame of each window and to each side of plywood (see illustration).
Step 2 – Install (pre-cut to the window size) treated plywood, making sure each piece adheres to the glazing tape.
Step 3 – Install the snap mullion (or H mullion) to both the interior and exterior sides of both windows.
Step 4 – From inside the home, install the #8 x 2″ Phillips installation screw in 3-4 locations staggered depending on height of window. If you use the factory prepped location on one window, make sure to stagger the installation screw on the opposite window to keep the screws from hitting each other.
Step 5 – Install Hole Plugs for the mulled side only.