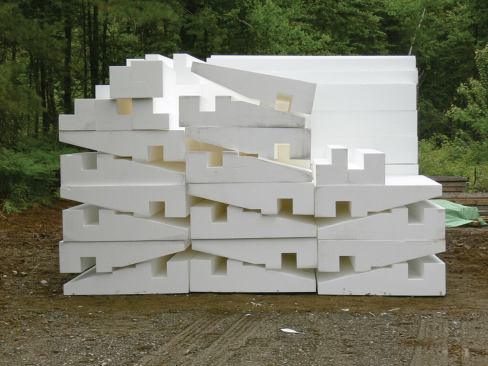


Custom-manufactured polystyrene served as the form system for th…
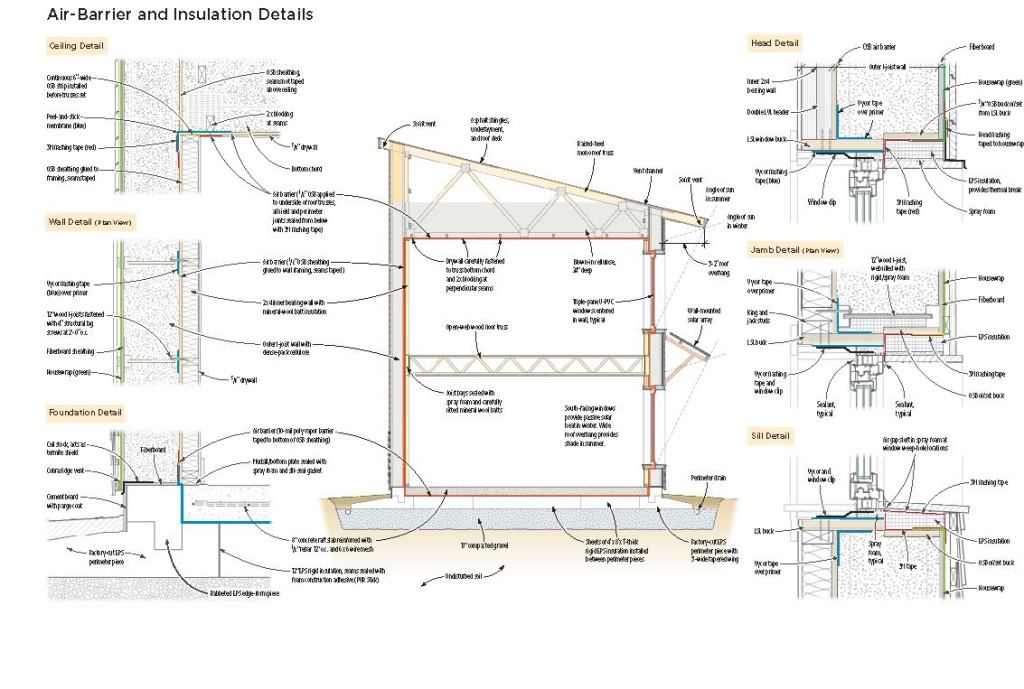
Foundation
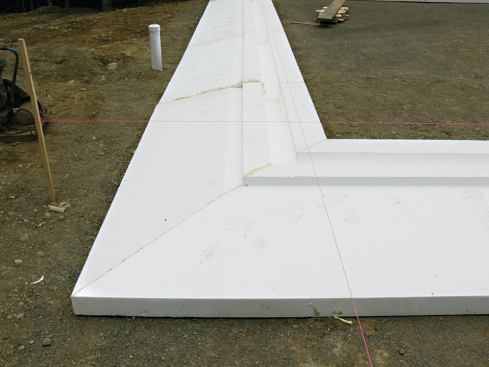
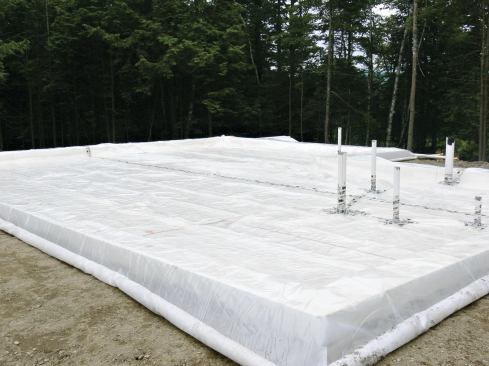
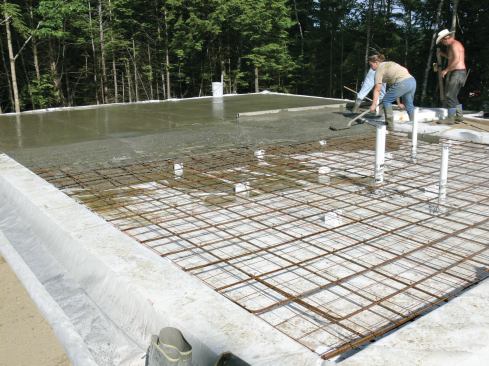
The foundation for this house is an 8-inch-thick concrete “raft slab” resting on 12 inches of high-density (2 pounds per cubic foot) GeoFoam Type 9 structural expanded polystyrene (EPS). The slab is reinforced with half-inch rebar (spaced at 1 foot on-center) plus 6-inch wire mesh. A 3-foot polystyrene wing extends horizontally around it at grade for frost protection.
In Europe, insulated raft slabs are common, especially for commercial buildings, and you can buy off-the-shelf prefabricated insulating form systems much like the one we created. But there’s nothing like that on the U.S. market, so we designed our subslab form system in CAD and sent the shop drawings to Branch River Plastics in Smithfield, R.I.
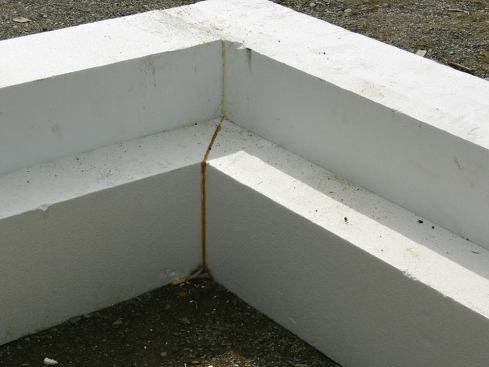
The underslab sections are simple 1x4x8-foot sheets, but the wing pieces for the perimeter were factory-cut with a 3-foot taper for drainage, and have a dado to accept 12-inch-by-14-inch edge-form pieces. Branch River precut most of the parts for us on their CNC equipment, and we did the rest – including the corner cuts at the miters in the wing insulation – in the field with a hot wire.
The sub-base for the raft slab is business as usual – 18 inches of one-inch-minus crushed stone, placed in 6-inch lifts and compacted to 95 percent. I did insist that my contractor level the stone base to within 1„8 inch, which he was able to do by spending a little extra time. That flat, even sub-base made it easy for my crew to set and join the foam blocks accurately.
We joined all our foam pieces at the seams with PUR Stick, a polyurethane gun-foam insulating adhesive from Todol (todol.com), which the manufacturer assured me would bond well and last indefinitely in this use. I have tested it out informally at my shop, gluing different things together and leaving them out in the weather for six to eight months, so I am reasonably confident in its performance.
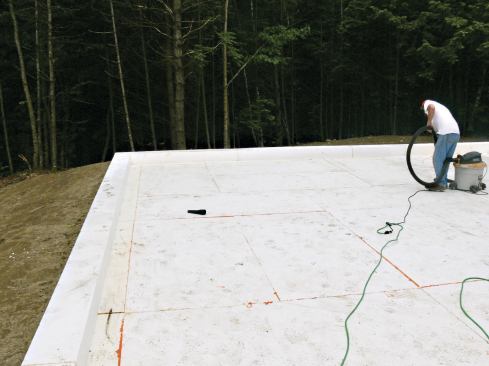
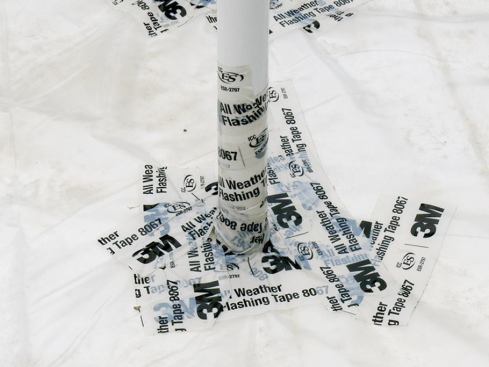
On top of the foam, we placed 10-mil poly to act as the air and vapor barrier and capillary break. We sealed all the joints and penetrations with 3M 8067 flashing tape (3m.com), which is air- and vapor-tight, flexible, and tenacious. Later, we would fold the subslab membrane up at the edges and seal it to the wall to perfect the air barrier at that joint.
With the foam forms under it, the slab is insulated to R-54. I had originally planned on R-38, but as I worked with the numbers, I realized that the thicker foam would cost just $800 more, so I went for it. As I see it, you’ll never get another chance to insulate under the slab, and it’s a great place to “hide” insulation.
Still, it was expensive. In fact, the only reason we could afford it was because I bought the EPS foam direct from the factory – and even then it came out to almost $8 per square foot. I have about $5,000 in foam under this home’s foundation. But there were also some real savings as a result. Two carpenters cut and placed all the foam (as well as the 10-mil poly) in two days – so with 32 hours of labor, we had the slab formed and ready to pour, and all the insulation and vapor barrier installed. I only had to pay the concrete contractor for placing the steel and concrete.
Incidentally, my concrete guys were extremely skeptical when I first started explaining the system to them. They were worried about bracing the foam, and they expected the job to be complicated. But when the crew got there, the foreman called the office on his cellphone and said, “This is going to be a breeze” – and it was. So across the board, labor savings offset a lot of the material cost of our combined insulation and forming system.
Another cost-saving step was to use the slab surface as the finished first floor. I made sure the installers power-troweled the concrete for hours, making it very smooth and flat. We also let it cure for three weeks before we came back to start framing the walls. Then we sealed the slab with a zero-VOC soy-based penetrating clear sealer called Acri-Soy (ecoprocote.com).
Meeting and Beating the Metrics
Passive House may be a tough standard to meet, but it’s quite simple to describe. Three numbers define the whole thing, and if you hit those numbers, you pass. How you hit them is your business. The specs cover three items: total annual heating energy use; total annual energy use including heating, plus everything else; and airtightness. Keep in mind that these metrics are based on the treated floor area (TFA) of the house, or “usable space” – which is quite different from how energy modeling is typically handled in the U.S., where it’s based on the entire envelope. The TFA of the 1,600-square-foot house described in this story is 1,140 square feet.
Space heating. The space-heat demand of a Passive House must be no more than 4.75 kBtu per square foot per year. (By the way, that requirement is the same in any climate, from Bangor to Honolulu. Obviously, it’s harder to do in Maine than it is in Hawaii.) Scaling that spec up to whole-house dimensions, we had to achieve a total annual heating load of no greater than 5,415 kBtu per year for our house. We beat that number: The house is calculated to use 3.11 kBtu per square foot per year, or 3,545 kBtu per year for the whole house – two-thirds of what the standard allows.
Primary energy demand. “Primary energy” includes not just heating and cooling but also domestic hot water, lighting, any auxiliary appliances (such as the stove and refrigerator), and any other incidental power requirement. For a Passive House, that total can’t exceed 38 kBtu per square foot per year – again, for any house in any climate. For this house, that worked out to 43,320 kBtu per year. We beat this metric, too: Our total primary energy demand is 36,480 kBtu per year for the whole house, or 32 kBtu per square foot – 15 percent under the bar.
Airtightness. Every Passive House must pass a blower-door test with no more than 0.6 air change per hour at 50 pascals of negative pressure (0.6 ACH50). This strict standard is really about quality control. Airtight houses do save energy, but the more important point is to ensure the home’s durability: If we limit the home’s uncontrolled air leakage to this extremely small amount, we practically eliminate the risk of moisture damage and mold, or any other harmful effect of air-transported moisture filtering in or out of the building envelope. Because energy saving is not the only purpose, we’re not allowed to trade the airtightness spec off against insulation, glazing, or anything else. The 0.6 ACH50 requirement is absolute.
We beat this metric as well. Our house tested at 0.287 ACH50 – less than half the permissible air leakage.
PV doesn’t count. Passive House doesn’t give any credit for photovoltaics, because the program’s focus is on energy consumption, not energy production. However, for this project, it happens that we were able to squeeze six 235-watt grid-tied photovoltaic panels into the budget. So in reality, the house will be net-zero or close to it, on an annual basis. In any given year, the owners will probably pay no electric bill to live in an all-electric house.
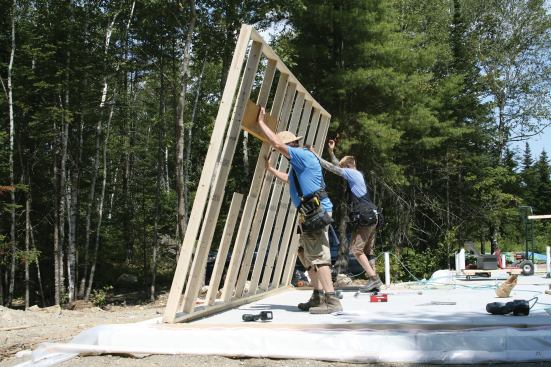
Hybrid Double-Wall Framing
The exterior wall design we used came to me via Katrin Klingenberg, the director of Passive House Institute U.S. (passivehouse.us). When Katrin showed me the design, I liked it immediately because it solves so many problems at once. It’s practical to assemble on site within the construction sequence; and all the materials, tools, and fasteners are conventional stuff you’d find on any job. Making the assembly airtight is simple – you just tape every crack on the load-bearing inner wall sheathing. The outer I-joist layer virtually eliminates thermal bridging, both in the field of the wall and at intersections. For me, it’s a textbook example of how to build a vapor-open, airtight, R-60 wall without having to resort to spray polyurethane foams.
Step one was just to frame a conventional 2×4 house – load-bearing first-floor walls, open-joist second-floor deck, second-floor walls, and a truss-built shed roof. We used PUR Stick to glue the sheathing to the walls, just for added tightness, but the key Passive House detail was to seal all the OSB seams with 3M 8067 flashing tape. Where I intended to fasten the wood I-joists for the outside wall, we applied Vycor modified-bitumen flashing tape over primer to ensure that the fasteners would self-seal. Once this house was finished, I knew there would be no way to access and repair any of the joint-sealing tape – and I wanted to improve the odds that the joints and screw penetrations will remain airtight over a century or more of service, even if the wood shrinks or moves and the house settles.
Once all the bearing walls were built, we nailed plywood strips to the top of the second-story walls, flush to the outside OSB sheathing and projecting a few inches inside the walls. This flange would serve to connect the wall-system air barrier to the ceiling air barrier – a small but critical detail that we needed to take care of before setting the roof trusses. [Story continues next month.]
Christian Corson owns EcoCor Design/Build, based in Belfast, Maine.