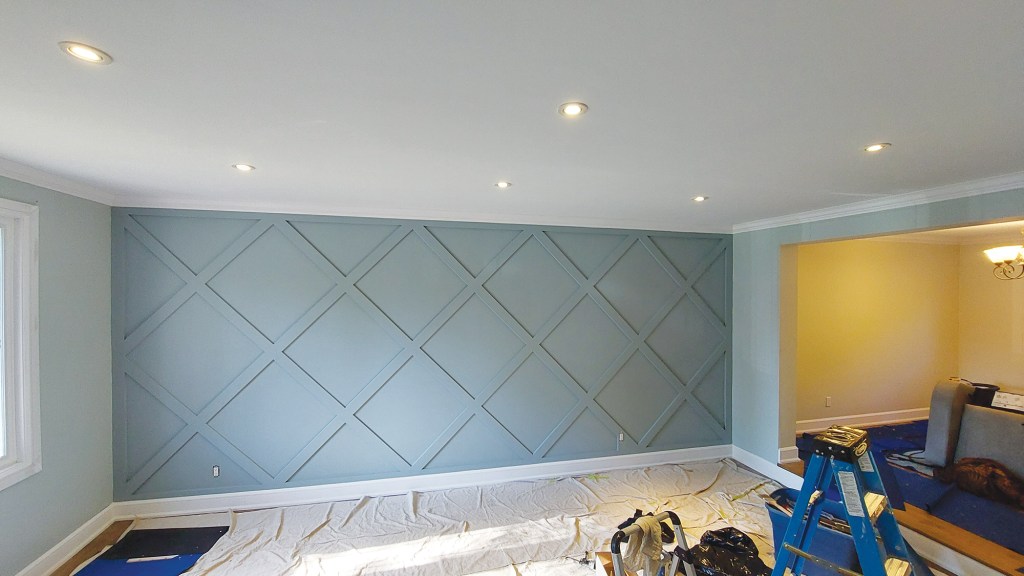
While the speed with which we produce a product determines whether we turn a profit and keep a client happy, it will never make up for poor execution. Most of the jobs you will do will involve careful planning. And for some tasks, planning makes up the bulk of the work. Our attention to careful layout and allowing enough time for it is the focus of this article. A fair portion of the field work I did involved cutting various moldings or bits of wood, then attaching them to walls to create patterns matching inspirational photos or sketches from designers or homeowners. The actual installation was not usually the challenging part. The cuts were often simple miters, and the fastening did not require overly specialized tools or skills. The work was in making the idea fit the space that it was going into.
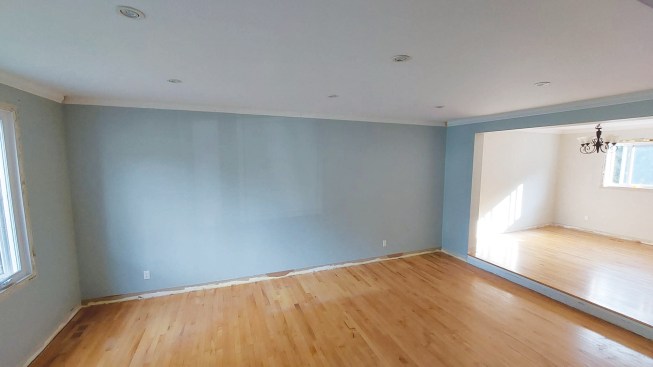
I made the example shown here using 1×4 flat MDF stock to create a straightforward lattice pattern on a wall that does not have many features (switches, outlets, art, wall sconces, etc.) to work around or emphasize. The design is based on a picture that my boss of 24 years had seen on Pinterest and requested be roughly duplicated in her living room. Since she was unable to find a cheaper contractor than her husband, I got the job.
Marc Forget
Looking a blank wall with a drawn plan can be intimidating. Looking at that wall with just an inspirational picture is worse. By taking the time in layout to work through all the issues you will achieve the result needed.
Finding center. The first step was to create a plumb and parallel frame in which the lattice would sit. I removed the existing crown molding and with the baseboard already removed for floor refinishing, I began the frame. For the ceiling and floor, I ran 1x8s level and parallel to each other to provide backing for the base and crown while allowing enough material to be exposed. Then I scribed a strip of 1×4 and ran it plumb at each end of the wall. Within that box, I found center both vertically and horizontally and drew lines up and across the wall. The pattern would radiate out from these anchor points. They were also my reference for all the steps that follow (see “Measurements.” illustration)

JLC Staff
Gather the measurements, double-check those numbers, and then form the plan. Starting with accurate information and a square frame to work in will give the project the best chance of success.
Defining pattern size. Next, I needed to determine how big each diamond would be and how the diamonds would merge with each of the four sides. I knew from the inspiration photo that a diamond would be centered on the wall, but not how big it would be. In much the same way as I would lay out panels for wainscoting, I took the total wall length and divided it by the number of boxes I thought might work, subtracting the width of the grid work between each diamond.
My first thought was one diamond in the middle with two on each side for a total of five diamonds. There would then be four spaces (grid material) between the diamonds. Each of those spaces measured 4 7/8 inches, which equals the horizontal length of travel of a 1×4 as it passes through the horizontal center line at a 45-degree angle.
Here is the math. The total width of grid material across the wall is: 4 7/8 x 4 = 19.5
Subtract that from the wall length: 221.625 – 19.5 = 202.125
Divide that by the five diamonds: 202.125 ÷ 5 = 40.425
Converted to fractions, the interior dimension of each diamond would be about 40 ⁷⁄₁₆ inches. That may need to be adjusted, but it’s a starting point for laying out lines on the wall. For new carpenters you will see that while I talk about the measurements in fractions, to do the math I convert to decimals. (.625=5/8″, .5-1/2″, .125=1/8″) I have found it useful to have these memorized for quicker calculations.

JLC staff
Starting from the center lines, mark out the long lines of the grid. Double-check them each time for spacing so they remain parallel to each other.
Laying out. Just above the horizontal center line and next to the vertical one, I ran a strip of masking tape on which to draw my first pencil marks. I used tape so I could easily remove the first marks without taking out my center lines. A trick I use to differentiate these often repeated marks is to put a number or letter above them. First run may have a one or an “A” above the mark, the second go around a 2 and so forth. This way I can keep track of my different layout options. I measured out from the dead center 20 ⁷⁄₃₂ inches (half of the diamond) vertically and horizontally along my center lines and then placed a scrap piece of 1×4 cut at 45 degrees to make a mark where the next diamond would begin. Having done this in both axes, I could see if I needed to change the diamond size so the partial diamonds at the walls, floor, and ceiling would look balanced.
In a perfect world these partial diamonds would be exactly half, but a perfect world does not exist in carpentry. It was close but not the same measurement at the ceiling as at the walls. Running the layout again, I settled on 40 3/8 inches for the inside dimension of each full diamond. Next, I ran the full pattern on the wall to be sure.
So far, I had representations of the lattice just in one strip vertically and horizontally. To be sure that my pattern would not wander, I then drew two more horizontal lines across the wall where the middle points of the diamonds in the next rows would land above and below the center one. Using these three lines, I drew out how my first run of 1x4s would look. Then, I drew in the rest of the lattice pattern on the wall (see illustration below).

JLC Staff
After the long lines are drawn, fill in the rest of the grid. A full-scale representation of the design allows for solving problems early and facilitates final approval. With everything laid out this way, the install goes quickly with less waste. Measurements for parts and angles for cuts are all easy to determine.
A note on professionalism. Other than installing the border, I had not installed any other material at this point. There are three main reasons for taking this much time to create a layout. First, I want to make sure that the layout will work visually. By drawing it out, I can see if any adjustments are needed. Second, while the math may say it works, I check to see if the layout reflects the intention of the original inspirational sketch or photo. It’s easy to start plowing ahead with the first marks and lines and then realize that, in your hyperfocus on the measurements, you missed on the impression you were trying to make.
The third point is getting consent. With the pattern drawn out, the client or designer can see close to what the layout looks like on the wall. I have done layouts in the past and been told that they didn’t work and weren’t what the clients expected, and to not go ahead. It’s better to find that out before you put the material on the walls. To this last point, clients and designers have also made adjustments on site that ended up looking different from what we had started with. Be sure to get signatures every time a change is made to the original plan.
Decorative projects are not the same as framing a wall or laying shingles, where the layout must be technically correct. The priority in projects like a feature wall, wainscoting, and other ornamental details is the visual appearance. Those who are going to live with it (and pay for it) or who have designed it often have their own ideas of what looks good. It’s important to compromise and let go of your opinions (unless the client or designer asks for them). If the sketch says the element should be a certain size, and you start cutting and installing right away, you leave yourself in danger of doing the job three times: once how you thought it should be done, a second time tearing it out, and a third when you do it so it fits the space and client’s expectations. Take the time a professional should to have a fully worked out plan before you start.
Marc Forget
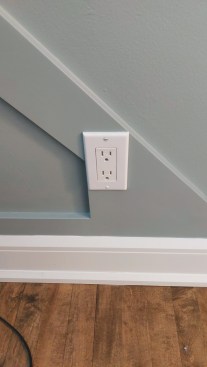
To incorporate this outlet, I added material to fill the space below it.
Installing. Once the layout was complete and approved, I cut the parts, glued them to the wall with adhesive caulking, and fastened them with an 18-gauge nailer, hitting studs where I could. With this being an exterior wall, I was not worried about hitting plumbing but still used 1 ½-inch nails. For these jobs, the glue is doing the heavy lifting so I prefer to save the steel and not fill my work with holes. (I’ll get a better finish later.) Because of how the parts fit together, I did not bother using a biscuit joiner. After three years, no cracks have shown at the joints. I did apply PVA glue where the 1×4 grid work connects and applied Bondo over those joints. I could have used Dyna patch or spackle, but I have found Bondo gives a better paint finish and is less prone to cracking.
All the edges were caulked to the wall, joints sanded, and surfaces primed before I applied two coats of finish paint. For the color, we went two shades darker than the surrounding walls from the same paint color swatch.
Keep the conversation going—sign up to our newsletter for exclusive content and updates. Sign up for free