I own and operate a small roofing company, Stewardship Slate, which specializes in the restoration and repair of slate roofs. In January, I was contacted by a rental property owner seeking my assessment of a slate roof in Burlington, Vt. She had recently purchased the 120-year-old house from the estate of an elderly homeowner who, after living in the home for decades, allowed the two-story structure to gradually slip into disrepair. The new owner wanted to keep the slate roof, but numerous contractors told her it needed to be replaced.
Sam Simon Imaging
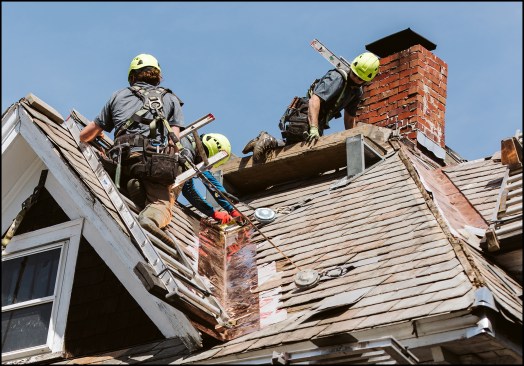
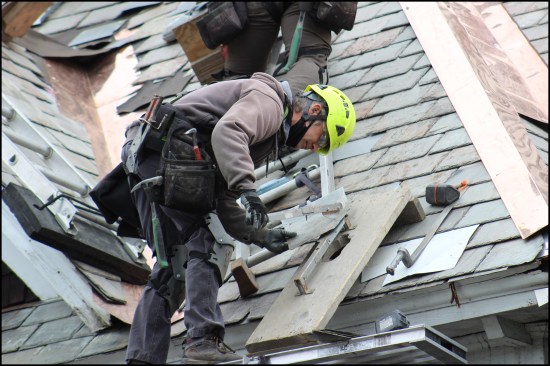
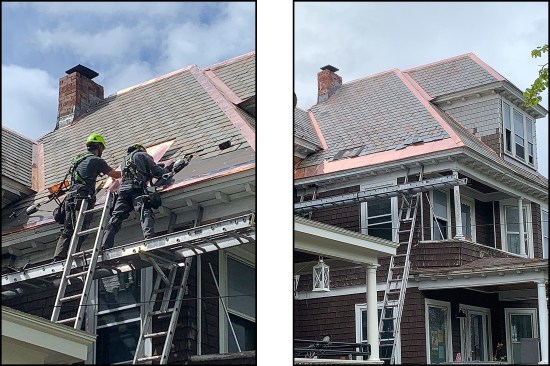
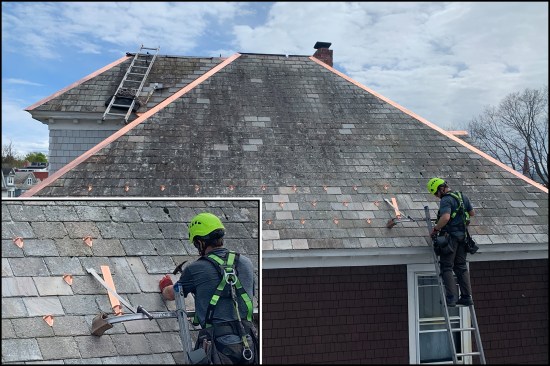
Stewardship Slate crew members install new valley and chimney flashing during a slate roof restoration project in Burlington, Vt. From left to right: Ethan Ryan, Michael Dillon, and Micah Sanguedolce.
Upon inspection, I noticed the roof was in rough shape. Most of the existing terne metal flashings were corroded, and it had numerous broken and missing slates. There was evidence of some dubious repair work done over the years and a fair amount of the historical trim along the eaves was rotted, with most of the corners chewed open by squirrels. Yet, with all wear and tear taken into account, I believed the roof was worth restoring given the life expectancy of the undamaged slate, which I estimated at approximately 75 years. The owner was pleasantly surprised by my quote and jumped at it (she later divulged that my estimate to restore the roof was a third of the lowest quote she received to re-slate the roof and comparable to the quote she received to reroof with architectural asphalt shingles—a 25- to 30-year roof).
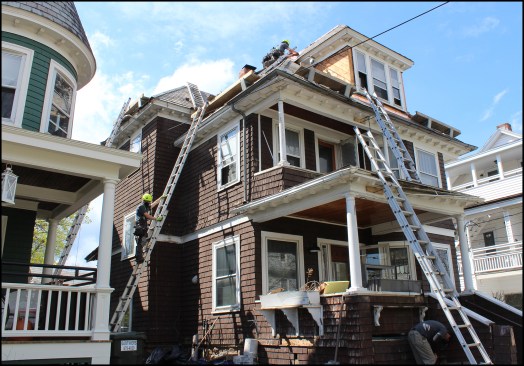
A large percentage of Burlington’s housing stock dates from the late 1800s to the early 1900s and is roofed with slate. The roofs are typically steep, three stories-plus high with complex geometry; the neighborhoods are densely packed.
Slate in the City
We work primarily in the downtown area of Burlington, Vt., where the majority of the homes are roofed with semi-weathering green-gray (or sea-green) slate quarried in the southern portion of the state. To maintain the character of the city, Burlington requires homeowners who want to replace a slate roof with asphalt to go through zoning and show that the cost difference to restore the slate would create economic hardship. Fortunately for us, most homeowners choose the restoration route.
While we do install some standing-seam and fluid-applied roofing, 90% of our work is restoring existing slate roofs, with the occasional new slate roof thrown into the mix. There are few skilled slaters in our area and demand for this niche restoration work is high, so we’ve managed to stay continuously busy over the years, repairing more than 300 roofs since 2010.
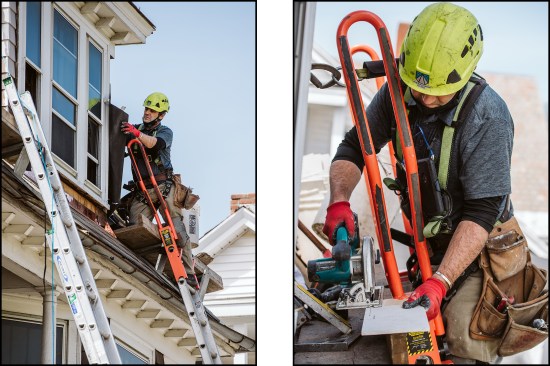
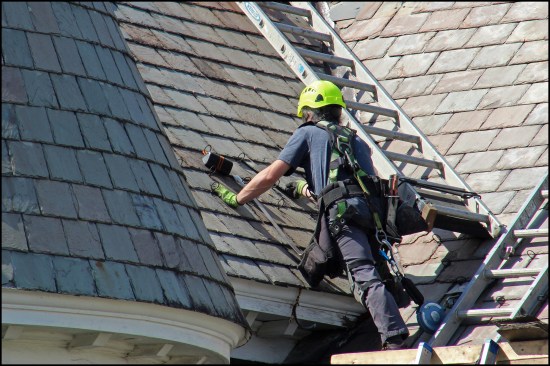
Slate repair in city neighborhoods requires having patience, working at a careful pace, and being mindful of where you, your crew members, and any bystanders below are at all times. It can be hazardous at times working high up on late 19th-century roofs on which roof framing is often “bouncy” (especially on rakes) and slates can break easily. When we work, we wear ANSI-rated rock-climbing-style helmets and safety harnesses clipped to self-retracting lifelines or ropes at all times. We take time to set anchor points, secure ladders, and cordon off work areas we are concerned about with caution tape (housing in the city is often close together and falling shards of slate is commonplace). We typically have to access roofs from both the client’s and their abutting neighbor’s driveways, so we have to work around their comings and goings—moving ladders, magnet sweeping, and broom cleaning driveways often a few times a day.
Replacement slate. We use salvaged slate for restoration work because it’s thinner than newly quarried slate and therefore easier to slide under existing slates. Also, newly quarried slate doesn’t color-match well with existing, weathered slate. New semi-weathering green-gray slate starts out uniformly sea green, then gradually weathers to a mosaic of colors such as gray, blue, and pink (slates that “weather” to pink have a higher ferrous mineral content). The irony is never lost on us, though, that we rely on people taking entire slate roofs off houses and barns as part of our supply chain.
Tools. Our primary tools are slate hammers, slate rippers, and slate cutters. We use two types of slate hammers. For installation work, we use a traditional slate hammer, which has a sharpened upper edge on the handle for cutting slate and a punch for making nail holes through the slate for fastening. For beating on slate rippers and reinstalling slate and flashing, we use a restoration slate hammer, which is similar to a traditional hammer but heavier.

Slate tools include standard mounted slate cutter (1); restoration slate hammer (2); traditional slate hammer (3); slate ripper (4); and hand-held slate cutters (5).
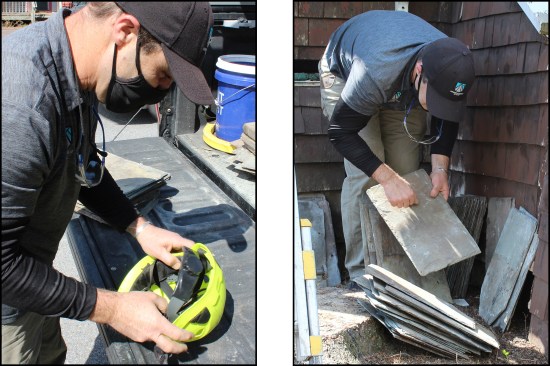
ANSI-rated Jorestech rock-climbing-style helmets are worn at all times (left). The author “sounds” a slate to make sure it’s intact (right); he rejects 10% to 15% of the salvaged slate he buys.
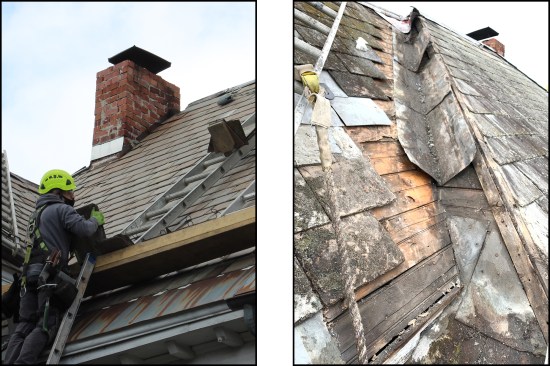
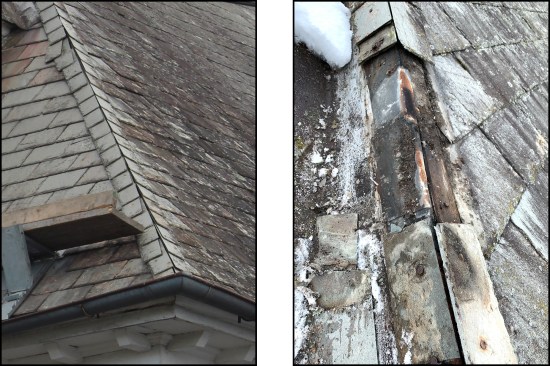
The roof’s existing terne metal flashings had done their time and need to be replaced (right). Rusted galvanized-steel snow belt — retrofitted at some point to address ice damming on the south-facing roof — also needed replacing (left).
To cut slate, we use a mounted slate cutter or bench cutter and hand-held slate cutters; occasionally, to cut thicker, new slate, we use powered shears that attach to a drill. Bench cutters offer more leverage and cut slate more easily, while hand cutters offer convenience for tricky tasks in hard-to-access areas, such as valley restoration work. We buy most of our slate-specific tools from Slate Roof Warehouse and John Stortz and Son, both based in Pennsylvania.
Slate Restoration
A typical full-restoration project includes pulling off existing slates to access and replace the worn metal flashings with new ones—typically 20-ounce copper in the valleys and 16-ounce copper everywhere else. We check all the slate on the roof and replace missing, cracked, and disintegrating “shingles.” We encounter many bad repairs where the wrong-size slates were used or the slater broke slates when installing replacement pieces. A common mistake we fix is where someone face-nailed a patched-in slate and did not cover the nail with bib flashing. In the end, we leave approximately 75% of the existing slates intact, though that percentage can vary depending on the condition of the roof.
Some carpentry is usually involved in restoration work. Repairing damaged trim and roof decking is commonplace, as well as re-siding dormer walls to install new step and apron flashing.
Open valleys. We began this restoration project by pulling slates from the edge of an open valley on the east-facing dormer (the home’s hip roof had three dormers with a total of six valleys). What remained of the roof’s original rosin paper “underlayment” quickly disintegrated, exposing the board-sheathed roof deck, which was in surprisingly good shape given the condition of the existing slate and flashing. For the new V-shaped valley flashing, we bent lengths of 18-inch-wide sheets of copper with a brake in our shop. (On each side of the valley centerline, we planned for 4 inches of exposed copper and 5 inches under the replacement slates.)
On new-slate installations, we always apply ice barrier membrane in the valleys and at the eaves and integrate roof underlayment with the peel-and-stick. While we feel obliged to install ice barrier membrane on restoration work, it’s something we’ve wrestled with over the years. Joseph C. Jenkins, the author of The Slate Roof Bible, advises not to use peel-and-stick membrane on slate roofs because the slate has the potential to stick to the ice barrier membrane, making future repairs difficult. We have installed felt paper between the peel-and-stick and the metal flashing on past projects for this reason. But here we used Titanium PSU30—an ice barrier membrane with a slip-resistant surface. We ran a 30-inch-wide strip up the valley, tucking it under the staggered pattern of the existing slate. We then installed the new V-shaped valley flashing and fastened the edges with stainless steel roofing nails.
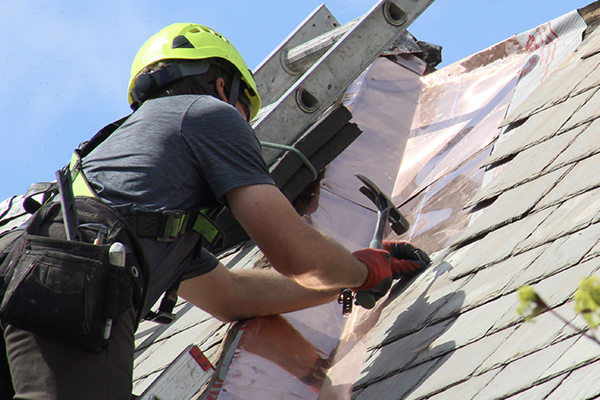
When installing replacement slate in a valley, we try not to nail through the copper flashing, but sometimes it’s hard to avoid with smaller slates. Our rule of thumb is to keep the nail no more than an inch from the edge of the copper flashing—in this case, an 8-inch “no-nail zone” from the center of the valley. We strike a line up the valley representing the 5-inch slate overlap, then begin the time-consuming task of slating the restored valley.
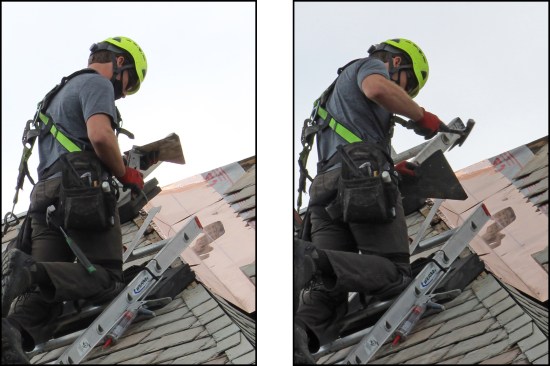
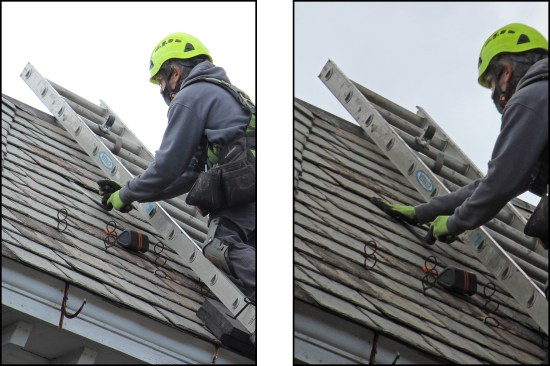
Slater Michael Dillon trims replacement slate along the angled valley line with a hand-held slate cutter (left). He uses a restoration slate hammer (right) …
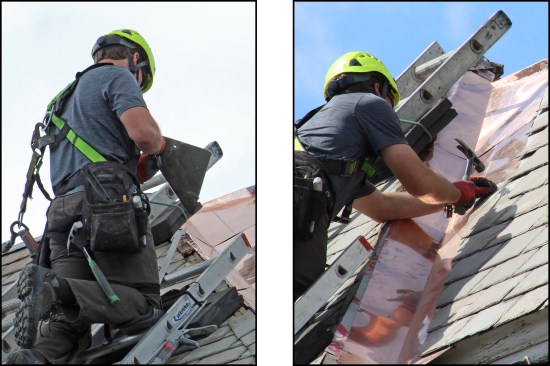
… to punch a nail hole in the trimmed replacement slate (left). The slate is nailed into place with the restoration hammer, overlapping the valley flashing 5 inches, leaving 4 inches of exposed copper (right).
Dillon inspects the shingle alignment. New valley flashing is installed over ice barrier membrane; the roof had six valleys, three close to hips.
Slater Micah Sanguedolce uses a mounted slate cutter to shape slate for a valley rebuild; the slate is cut from the back.
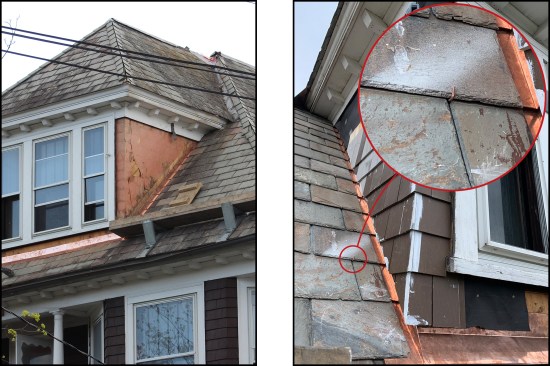
The shingled walls of the hip roof’s dormers are stripped to make way for new step and apron flashing (left). Copper slate hooks (shown in red circle) secure replacement slates along the roof-to-wall perimeter (right).
Sam Simon Imaging
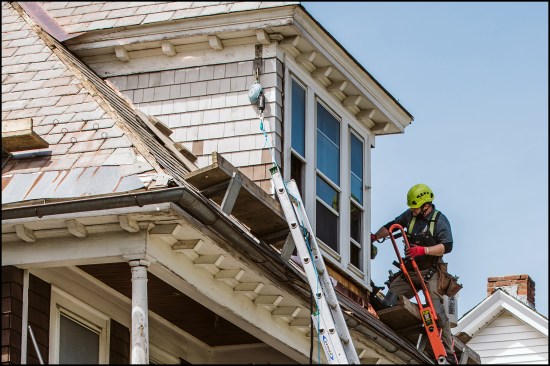
Complex roofs with multiple dormers are common, requiring some carpentry work. Here, author Jeff Spencer shingles a dormer side wall after installing new copper step and apron flashing.
Sam Simon Imaging
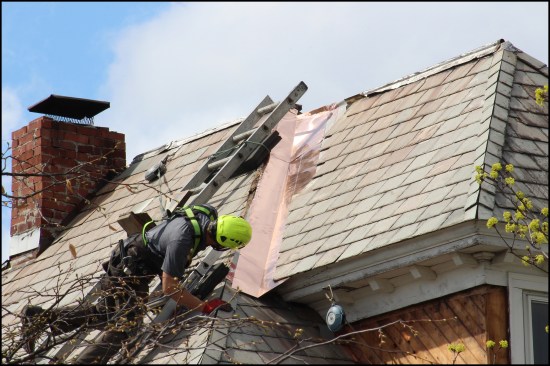
Spencer installs a 15-lb. felt building paper WRB (left) and cuts shingles to piece in the dormer’s sidewalls while harnessed to a self-retracting lifeline (right).
Replacing damaged slate. We remove a damaged slate by first sliding the flat end of the ripper under the slate and pushing it up until the hooked end is above the nail. We pull it sideways and down to hook the nail in the notch of the ripper, and with a few hammer taps downward on the ripper’s handle, the nail loosens. Most slates are fastened with two nails, so we repeat for the other nail. We slide the ripper back under the slate, press down on the top of the slate with our free hand—sandwiching the slate between our hand and the tool—and pull down on the ripper to slide the slate out. We then slide a salvaged replacement slate in its place.
There are two ways to fasten a replacement slate. One way is to punch a nail hole in the new slate between the edges of the slates above, midway up the joint. We slightly pry apart the overlaying slates above, just enough to drive the new nail between them. Unlike other materials, slate has to be nailed loosely; it is important to leave the head of the nail just flush with the face of the slate, so that the slate “hangs” on the nail. If the slate is nailed too tightly, it will break under the stress. If the nail sits too high, it can poke through or break the slate that lies on top of it. We cut a 4-inch-wide piece of copper or aluminum coil stock to make a “bib” long enough to reach the top of the new slate and cover the nail by approximately 2 inches. Before sliding the flashing into place, we bend the top up and the bottom down a little bit, creating a slight “S” shape to help it pass over the nail and stay in place.
Our preferred method to replace damaged slate is to use slate hooks instead of nails. That way, we don’t have to punch nail holes and risk breaking slates or worry about bibs sliding out over time. We drive the pointed end of the hook into the roof deck, leaving the crook of the hook in line with the bottom of the replacement slate. The replacement slate is pushed into place over the hook, then pulled down to rest on it. (For more on slate replacement, see “Repairing Slate Roofs” by Norm Yeager, Dec/03.)
Sanguedolce slides a ripper under a slate to help slide the slate out (left, right).
A salvaged replacement slate is slid into place and later secured with a slate hook. See “Repairing Slate Roofs,” Dec/03, for more on slate replacement.
Fastener lifespan and length. We match the relative life expectancies of the slate roof and the fasteners when selecting nails. For this restoration, where the roof should last roughly 75 years, we used 1 1/2-inch hot-dipped galvanized roofing nails to secure the field slate. On new-slate installations that should last 100 or more years, we use 1 1/2-inch stainless steel nails. It’s a common misconception that slate has to be fastened with copper nails. Virtually none of the roofs in this area were originally installed with copper nails. In fact, many of them were installed with non-galvanized steel cut nails, since they were installed during the industry transition to the modern wire nails used today.
In addition, it’s fairly common in Burlington to come across slate applied directly over cedar shakes; slate was marketed as the “fireproof roof” at the beginning of the 20th century. We use longer roofing nails and modify the copper slate hooks to ensure that the slate is fastened to the sheathing and not just the cedar shake.
Hips and ridges. If the roof had an Achilles’ heel, it might be the detailing of the slate hips and ridges. During the height of slate’s use as a roofing material, it was common to install “mitered” slate at hips and ridges without step flashing; I believe the thinking back then was that any water that happened to find its way into the unfinished attic would eventually dry out. Mitered cap slate tends to spread apart over time and open up to the elements.
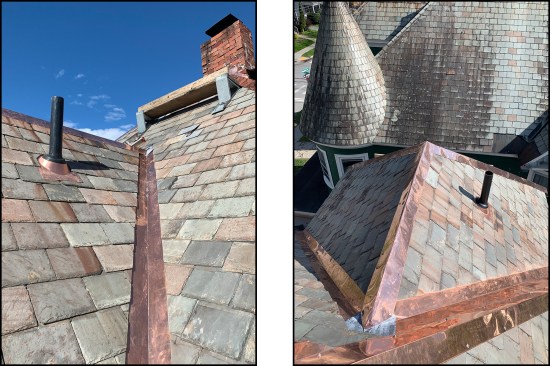
Rebuilding slate hips and ridges with step flashing tends to be expensive and time-consuming. To help lower the costs, we removed the existing hip and ridge slate and installed copper cap flashing (bent from a 12-inch-wide strip of 16-ounce copper and hemmed 3/4 inch at the edges). We secured the flashing with stainless-steel gasketed screws driven through the slate below and into the deck and hip framing.
Hips (and ridges) were commonly covered with “mitered” cap slate without step flashing; the “mitered” slate wasn’t cut at 45 degrees, but at 90 degrees. The mitered slates are cut from the front so the sharp edges (where the slates are joined) are on the face. Cap slates tend to spread apart over time (left). A cost-effective solution is to remove the existing hip (and ridge) slate (right) …

… and install new copper cap flashing (left). Mitered cap slate at ridges also spread apart over time and these were capped with new copper as well (right). New cap flashings were secured with stainless-steel gasketed screws.
Snow belt and snow guards. On homes of this vintage, snow belts were often retrofit on roofs to address ice damming. Along the south-facing eaves on this project, we replaced a poorly installed, rusting galvanized-steel snow belt with copper. We first applied ice barrier membrane, then a layer of felt paper to thwart the replacement slates from potentially sticking to it. We fabricated the copper snow-belt panels in the shop, then installed them on site, joining the seams together with rubber mallets and hand seamers. On the north side of the roof, we installed Alpine SnowGuards’ PD10 pad-style snow guards to keep snow and ice from falling into the neighbor’s driveway.
Galvanized-steel snow belt is replaced with copper panels along roof eaves (left, right). Ice barrier membrane is installed on the deck, then a layer of felt paper to thwart the replacement slates from potentially sticking to the membrane.
Copper snow guards (inset photo) applied on the north side of the roof will help keep ice from falling into the neighbor’s driveway below. On north-facing roof sections and areas shaded by trees, discoloration from mildew and lichen is common. Roofs can be hand-scrubbed clean with a mildewcide like D/2 Biological Solution.
Finishing up. We take great pride in this project and leave with the satisfaction of knowing that the house would likely have gone through three asphalt roofs before the restored slate will wear out, which represents a significant reduction in the building’s carbon footprint.
Salvaged semi-weathering green-gray slate blends into the existing slate on a finished open valley (left) and dormer roof (right).
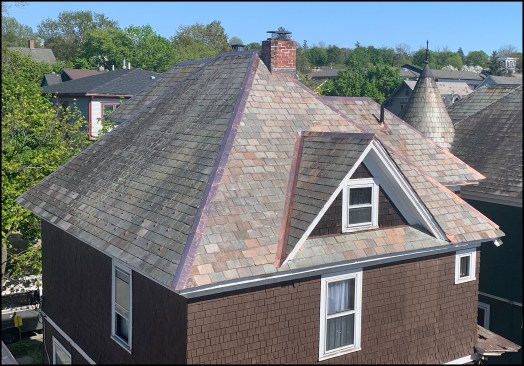
A view of the north- and west-facing sections of the restored roof. In the end, roughly 75% of the existing slates were left intact.
Photos by T Jeff Spencer, Tim Healey and Sam Simon Imaging