Miscommunication is the No. 1 reason why projects and relationships go sour. And the No. 1 miscommunication issue has to do with whether the builder or remodeler produced what the client thought they purchased in the time frame they were expecting.
If you’re small enough that you are both selling and producing the work yourself, then a good written contract with complete specifications along with a thorough pre-construction meeting to review the project one last time before you start it might be enough. But as soon as you add employees or subcontractors to the mix, you need a better process. If someone else will be supervising the work, you need to make sure that they understand the project as well as you do, including budget, schedule, subcontractors, and the rest.
For every job, large production-oriented contractors conduct an “EPO review,” short for “Estimate-to-Purchase Orders.” The name might be a little odd—let’s just call it a “job start review”—but the purpose is crystal clear: The job start review conveys exactly what was sold from the sales/design/estimating department to the project manager and production team. The review is one last chance to uncover any errors, omissions, or special conditions that could send the job into a sinkhole of delays and cost overruns. It also serves to hand off responsibility for the job from sales to production.
Production builders actually perform a “trial” run of purchase orders and compare it with the estimate. This is more than most small companies need, but the job start review can be easily adapted to practically any size operation doing any type of projects. It has two main purposes: to ensure that what is about to be built or remodeled is exactly what the customer actually purchased; and to give the lead carpenter or project manager the opportunity to catch estimating errors and potential cost overruns while there is still time to do something about them.
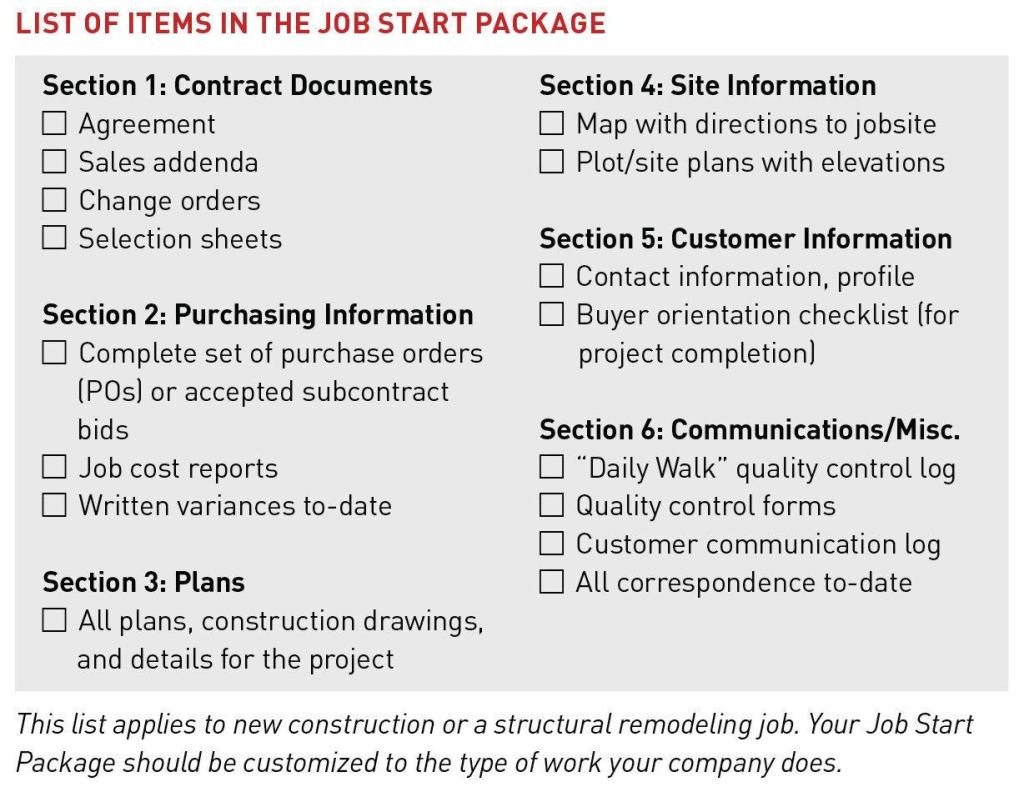
At a small-volume company, the process involves a meeting between the lead carpenter or project manager together with the designer and estimator (and sometimes the salesperson) to compare the “job start package” (see sample list, below) with the final direct cost estimate and preliminary schedule. If issues are discovered during the review, the project manager can then adjust the schedule (within reason), modify estimates and trade agreements (before they’re signed), and fine-tune anything affected by these changes.
Don’t confuse the job start review with a “pre-construction” meeting where the customer is present. Both are important communication tools that help to put everyone on the same page, but the job start review gets deep into the nuts and bolts of the job at a level of detail that most contractors wouldn’t want their customers involved with. (For example, a historically accurate addition may require spending more on high-quality subs to save money and headaches over the long run, while a pole barn may just need “fast and loud.”)
The project manager or lead carpenter should review the job start package at least 24 hours before the job start review is to take place, and note any changes or questions that need to be addressed with the rest of the team. Any issues discovered should be resolved during the job start review meeting, and new, clean copies of the modified items made available to everyone. Retain the originals, but make sure that there is only one version active at any given time.
Sample agenda for a Job Start Review meeting
1. Initial estimate: Review the direct cost estimate for incorrect or missing prices, making certain 100% of the job is represented. Also verify that indirect costs, such as sales commissions, are included.
2. Project overview and sales documentation: Review and look for errors and omissions in the specifications, sales agreements, owner selections, and any other known details about what was sold to the client—for example, a spec for an “upgraded fireplace mantle and surround” when a fireplace was not selected.
3. Option/upgrade/allowance check: Scrutinize selection sheets and the sales agreement for any and all customer-selected options, upgrades, and allowance items. Make sure that each item is correctly identified in the cost estimate, vendor agreements, POs (if you use them), and the like. This is one of the most important “checks” in the job start review and is the best way to ensure that what was purchased by the client will match what is built.
4. Lot/site check: Unforeseen site problems are a major source of cost overruns (extra drainage required, unplanned retaining walls, extra hauling), not to mention a major source of disappointment for the customer (the addition “sticks too far out” of the ground, the stairs are too steep, and so on). If the project requires a site plan and an existing drawing with cut/fill elevations is not available, use photographs and shoot the grade yourself (or sub it out). A surveyor may charge a few hundred dollars to provide all of the elevation points necessary, but considering that a single cubic yard of crusher-run gravel is now pushing $40 delivered, and machine time to move it around is another $100 per hour, shooting the grade is a minor expense.
5. Vendor review: Review the preliminary list of subcontracted trades and vendors. Are all a good match for the locale and project scope? It’s better to know for sure what your costs are going to be than to assume a low-ball quote will hold up. If you think there’s a chance that prices for lumber or other items are going to substantially increase, negotiate a price lock for the duration of the project, even if it’s a bit more than your initial estimate.
6. Scope-of-work check: For every direct and indirect cost code on the estimate, there should be a specific scope-of-work indicating exactly what is expected of each vendor before its invoice or PO will be approved for payment.
7. Foundation check: Review that the foundation plans are complete and correct, concentrating on the size and location of all footings (especially deep frost footings), reinforcement, top-of-wall elevations, and support shelves and ledges for all slabs, steps, and other constructions that could settle toward a foundation wall. Reference all items to the cost estimate, making sure nothing is left out.
8. Lumber and sheet goods check: Check the lumber list for obvious omissions and sizing errors (for example, at headers or beams), making sure that any structural options (such as a deck) or interior finish items (such as soffits or landings) have been included in the estimate. Pay special attention to any engineered lumber and the truss package, looking for extra items or omissions. Sill plates and anchor bolts are another source of problems, as are estimates for bracing, blocking, backing, and other lumber that is “burned up” during framing but never seems to make it into the estimate.
9. Window/door check: For windows, interior and exterior doors, and all other openings, check any structural options (including finished basements) selected that may require additional openings that may have been overlooked. Compare the following list of attributes on the plans to corresponding “schedule” and section of the direct cost estimate:
- Unit counts
- Unit sizes
- Window styles/hinge location
- Door style/hinge location
- Door and window hardware
- Special finishes/special-order items
- Special flashing or other unique installation requirements
- Extension jambs, sills, and other millwork
10. Schedule check: While a thorough schedule review should be done separately by the project manager prior to actually starting construction, the job start review meeting is a good time to catch glaring errors or omissions, such as critical path items with a “0” day duration, any scheduled resource or trade that does not show up in the cost estimate (for example, a painter is scheduled, but no painting is in the estimate), and any missing inspections or other milestones.
11. Past problem/error check: This is a final catch-all that should be a focus for continuous improvement. Examples of often-missed items include: tubs or toilets requiring joists to be cut; no place for ductwork or mechanical equipment; improperly sized stairs or landings; requested lighting or plumbing locations that didn’t make it onto the drawings; interior finishes with no corresponding estimate item; final caulking and paint touch-up; and costs for any between-trades prep or cleanup.
Documenting the Job Start Review
Whether you use one of the several construction-specific services (such as BuilderTrend or Co-construct) or build your own with generic services such as Dropbox or Evernote, the Internet provides an easy way to keep members of your team supplied with up-to-date documents, as well as a place to store updated versions for use during construction. Next time we’ll look at how you can use the “cloud” to collaborate on and document your job starts package.
Joe Stoddard consults with contractors about business systems.jstoddard@mountainconsulting.com.
Download the detailed Job Start Package here .