All photos by Sue Burnet
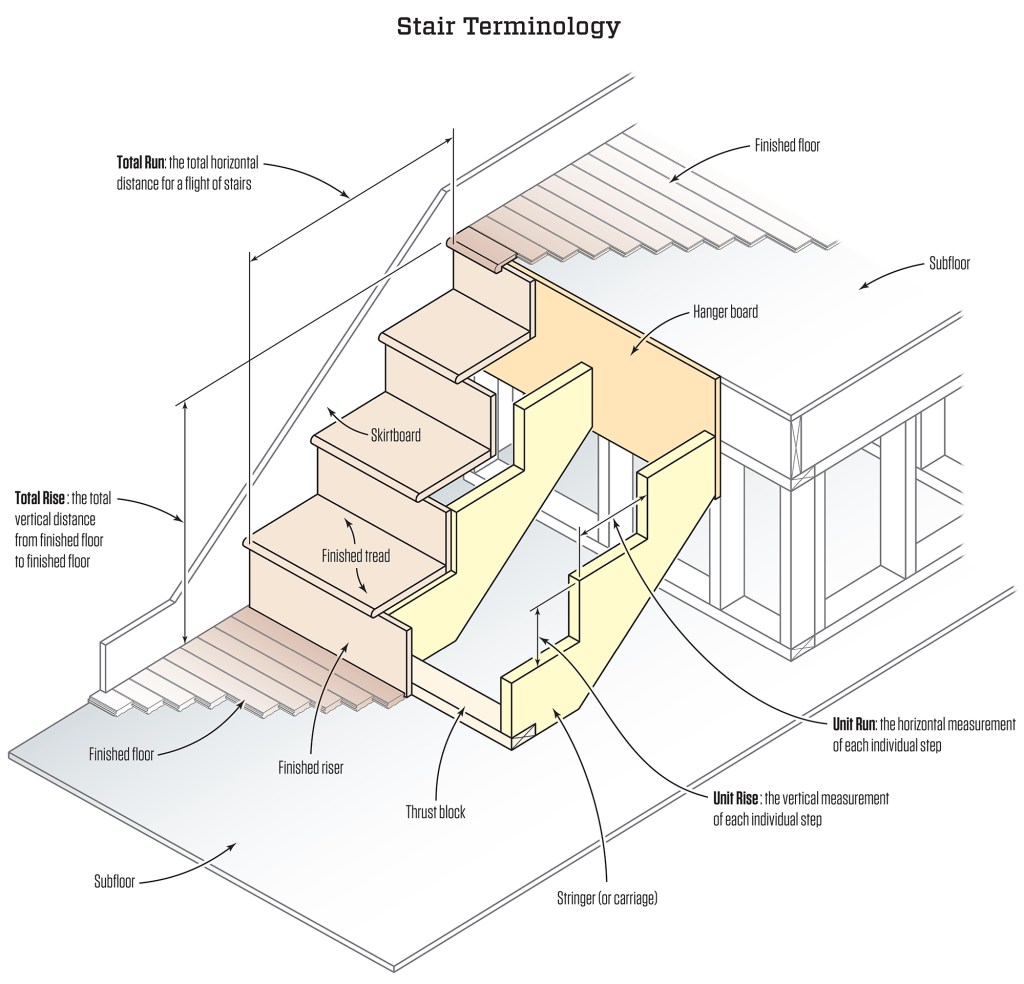
LAYING OUT AND CUTTING OPEN STAIR STRINGERS
Laying out the stair stringer is the best way to double-check all your calculations. As a checklist, here are a few items to always keep in mind when laying out and cutting stair stringers:
- Account for the finished flooring thickness at the top and bottom of the stairs.
- Deduct the thickness of the tread stock from the first rise.
- Consider how the stringers will be attached and supported. You may need to shorten the stringer to allow for extra material used to hang the stringer from the landing or second floor. (We describe one way to do this below.)
- Avoid overcutting the tread and riser cuts. This weakens the stringer. Instead, finish each cut in the corners with a handsaw or jigsaw.
Prepping the stock
With all the numbers recorded, we select stock for the stringers. We prefer to use laminated veneer lumber (LVL) for most interior stringers these days. LVLs are straight, consistent, free of defects, and strong. LVLs are also expensive, so if they are not in the budget, choose good-quality 2×12 lumber. Good quality here means straight and dry, and as few knots and other defects as possible. Because most 2×12 stock has some wane (a defect along the edge of a board where wood is missing at the edge of the board where there once was bark), or the lumber has eased edges (rounded over), I often trim a small amount (usually 1/4 inch or so) from what will be the top edge of the stringer. This straight-line ripping removes small imperfections and creates a straight, square edge to work from, which makes for a truer stair.
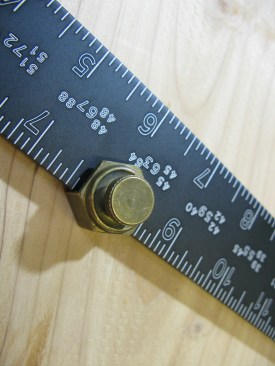
Working out from the heel, or point, of the square, attach the first stair gauge at the rise measurement on the tongue of the framing square (the narrow portion).
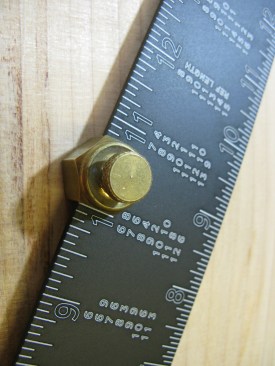
Measure out from the heel of the square and attach the second stair gauge on the blade (wider portion) of the framing square at the run measurement.
Setting up the square
Begin layout by attaching small brass buttons, known as stair gauges, to a framing square. Starting at the corner, or heel, of the square, place one gauge on the longer blade of the square. Set the gauge at a distance from the corner equal to the unit run. The inside edge of the gauge should be on the measurement. Place the other gauge on the shorter blade of the square at the unit rise distance from the corner.
Slide the square against the edge of the board until the gauges make contact. Start with the run gauge 4 or 5 inches from the end of the board.
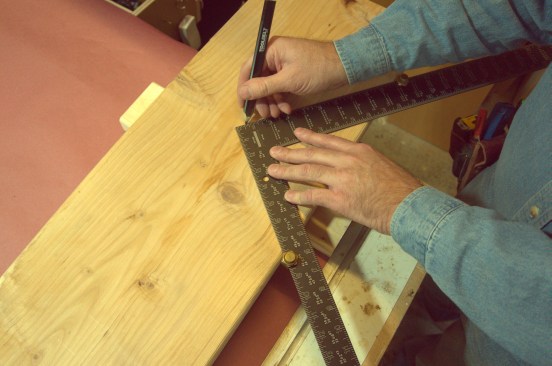
Run a pencil along the outside of the square to trace the first step.
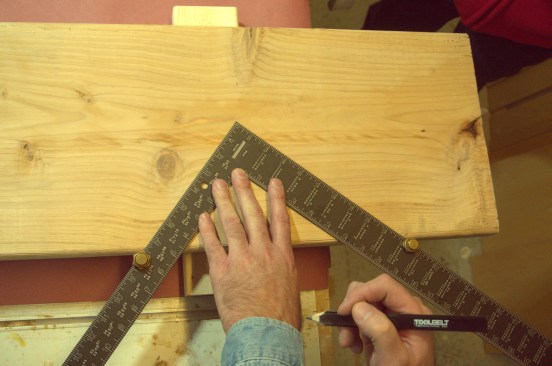
Draw in the steps
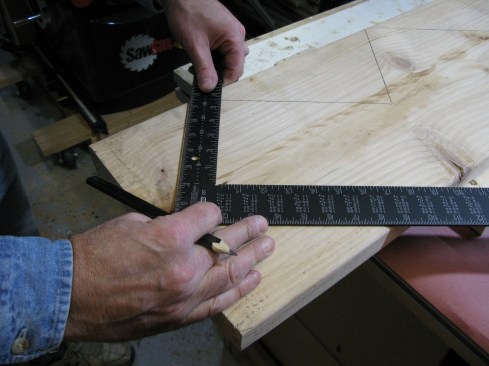
Place the square on the edge of the stringer stock as shown in the photo below. If you are using dimensional lumber, be sure you place the square against the crowned edge of the board. With the gauges touching the edge of the board, and looking down at the square, I like to start with the run on my right, but it doesn’t really matter as long as you visualize which direction the stairs are running and stay consistent with the layout. I start with the run gauge a few inches from the end of the board, and then trace the outer edges of the square for my first step. Working with the eased edge of a typical board, it’s helpful to make tick marks aligned with the measurements before scribing the adjacent steps.
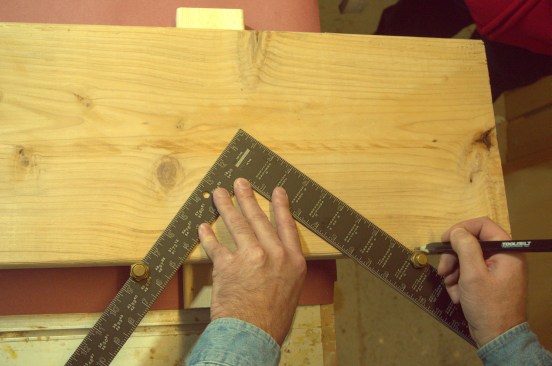
Before moving the square to the next position, make tick marks to guide the placement of the square for the adjacent lines.
Slide the square to the next position, line up the edge with my tick mark, and trace along the edge of the square for that step. Continue this process until you’ve traced in all the risers for the stair (in this case four).
Move up the stock, aligning the square on the tick marks and tracing the edge of the square. Continue until you have laid out the number of rises you'll need.

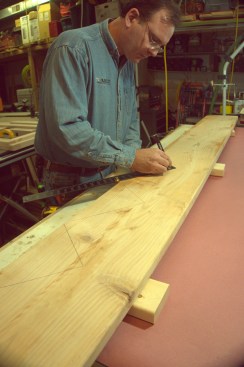
To mark the bottom rise, spin the square around and draw a perpendicular line.
At this point, there is just a series of triangles drawn along the edge of the board. To draw the bottom step, spin the square around so that the heel corner faces you, and slide the gauges against the edge of the board with the inside of the square lined up with the tick mark you made earlier. Draw that perpendicular line for the rise of the bottom step. (You can also accomplish this step by placing a second square against the first to create the perpendicular).
Measure down and mark the rise distance for the bottom of the first step.
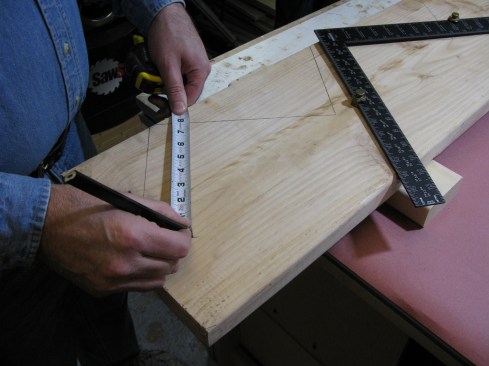
With the tongue of the square on the perpendicular line, align the blade with the rise measurement and draw the line for the bottom of the stairs. Repeat the same procedure to draw in the top of the stairs.
Using either a square or a measuring tape, measure over the rise distance from the bottom run. Remove the gauges and place the square on the perpendicular line you just drew with the other side on the rise measurement. Draw that line and now you’ve created the theoretical bottom step. I say “theoretical” because we still have to adjust for the finish floor thicknesses. Using the same process, draw in the top step as well.
Adjustments for the flooring
The first thing to draw in is the tread thickness on the bottom step. The distance from the top of the tread to the top of the finished floor should be the unit rise distance of 7 5/8 inches for this stair: Draw that line, as well as the 3/4-inch thickness of the finished flooring material. Label everything including the cut lines, whether you’re installing the stairs on top of the finished floor or on top of the subfloor.
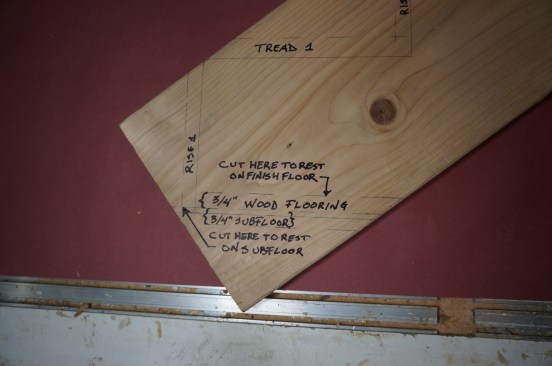
Draw in the bottom tread stock and measure down the unit rise to the top of the finished floor. Careful labeling will help clear up any confusion when you are cutting the stringer.
At the top of the stair, draw in the subfloor as well as the finished floor. As a check, draw in the thickness of the top tread and measure to the top of the finished floor. That should give you the unit rise distance.
Go down to the first actual step and draw in the horizontal cut line. Measure in from the rise line and draw a plumb line at the distance of the unit run, as shown in the photo below.
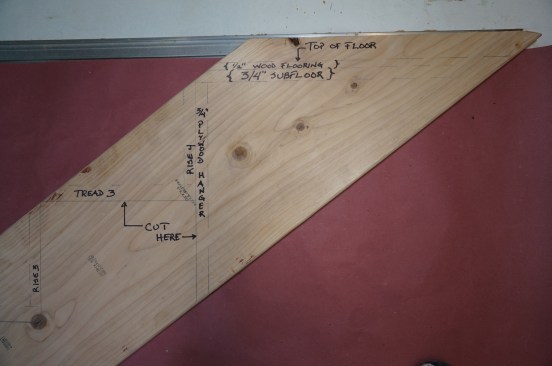
At the top of the stair, draw in the finished flooring and check the unit rise dimension to the top of the tread on the first step. At the top it's also a good idea to draw in the material you'll use for hanging the stringers.
ATTACHING THE STRINGERS
How you attach the stringer to the framing is critical to building a strong set of stairs. Usually, the stringers bear on a second-floor or landing joist, or on the header of the stair opening. Either way, you need solid blocking behind each stringer, and account for the attachment methods when laying out the stringers.
Plywood hanger. To attach the stair, we like to use a piece of 3/4-inch plywood. We rip this piece of plywood to match the vertical distance from the top of the subfloor to the bottom of the plumb line that I just drew. We then cut the plywood to match the width of the stairs. To account for this plywood hanger on the stringer, draw a parallel plumb line behind the top riser, as shown in the photo above.
Thrust block. At the bottom of the stairs, we install a thrust block—2-by stock cut to the width of the stairs and attached to the subfloor. This blocking is shown in the illustrations on page 1. When using a thrust block, we have to layout and cut a notch at the bottom of each stringer.
CUTTING STRINGERS
With all the cut lines drawn, carefully cut along them with a circular saw. Take your time here—the more accurate your cut, the more accurate and attractive the finished stair will be. In the notches at all the tread-riser intersections, stop cutting when the blade reaches the line. Overcutting the lines will weaken the stringer. I finish the notch cuts with a handsaw or jig saw.

When cutting the stringer, carefully cut over to the line. Over-cutting can weaken the stringer.

Flipping the stringer on edge shows where the circular saw cuts ended. Use a handsaw or jigsaw to finish the cuts.
Using the first stringer as a template, carefully trace and cut the other stringers. Then cut the hanger board for the top of the stringer and the thrust block for the bottom. Lay out the stringer positions on one and then transfer the layout to the other. I attach the hanger board to the stringers using construction adhesive and plenty of fasteners, and then I fasten the assembly to the solid blocking. At the bottom of the stair, I attach the thrust block to the stringers and then secure the thrust block to the floor. The theory here is that even if the top of the stringers were to break loose, the thrust block would keep the stair from sliding forward and collapsing.
Next step: To learn more about framing , explore the JLC Framing Workbook.