
When his children were young, my client’s home featured an above-ground swimming pool. But eventually the kids grew up, and with the children and pool long gone, he was looking for a way to utilize the level, circular area where it once stood. Traveling down back roads during his daily commute to and from work, he passed a farm that had three grain silos on a busy corner lot, one of which had been hit by a car as the result of a traffic accident at the intersection. He daydreamed about someday removing the damaged area and creating a large opening or doorway in the round silo, which was otherwise intact and undamaged. Putting two and two together, he wondered if the modified silo would fit somehow in the space vacated by the pool.
After passing by the silo for several years, he finally stopped in one day and spoke to the owner of the property, an older woman who told him that the silos were used primarily to store junk. She was willing to sell him the damaged silo for $300, as long as he could figure out a way to move it. His concept for his backyard was slowly taking shape, but he had no idea how to pull it off or what to actually do with the silo, which is when he contacted me.
Recycled Materials
The basic plan that we first discussed involved repurposing the conical silo roof as a pergola or patio cover. But we identified several issues on the site that needed addressing, including drainage and grading problems and a dilapidated and undersized builder’s-grade deck that he wanted to replace.
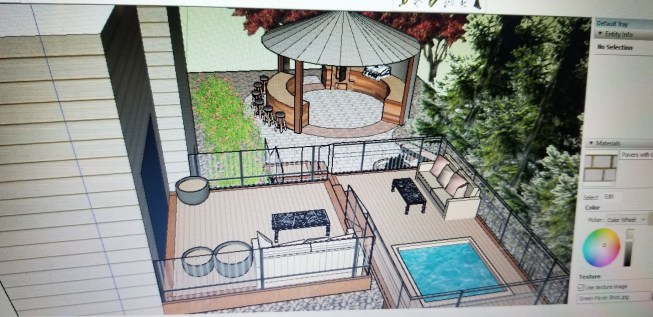
Taking the raw steel of the silo for inspiration as my plan took shape (see drawing, above), I created a theme of steel and concrete with usable patio space and an outdoor kitchen. Instead of using just the top of the silo, we would use every part of it that wasn’t damaged. I suggested using pavers rather than pouring a concrete patio, as slabs typically crack within a few short years in this area of Colorado.
There are always budget restrictions on any project, but this project seemed to take the word “thrift” to another level, as we were able to find a majority of the materials free or discounted. In addition to the inexpensive reclaimed silo, the homeowners found overstock pavers that had been discounted 50%. We crafted a fire pit from a broken piece of concrete culvert pipe left over from one of my previous projects earlier in the year, and to face the steel-framed kitchen cabinetry, we used old fence pickets from the demolition of another project.
The homeowner’s association unbelievably had no problem with our plan, and all the neighbors were excited to see the project evolve. It was presented to the building department as a pergola, which allowed us to place the structure up to the 5-foot accessory building and utility property setbacks. Everything really fell into place on this project.
Site Work
To prep the site, we graded and shaped the yard to accommodate additional xeriscape landscaping. Next, we cleared the patio base and drilled the support caissons for the silo post anchors. Because I planned to build the silo’s kitchen cabinetry on site using steel framing supported by a concrete base, we poured a pair of semi-circular slabs prior to installing the paver patio. The slabs also outlined the silo’s location and gave us an opportunity to work around it before it arrived. This way, we were able to complete all the remaining landscaping and deck work, leaving the silo installation as the final phase of the project.
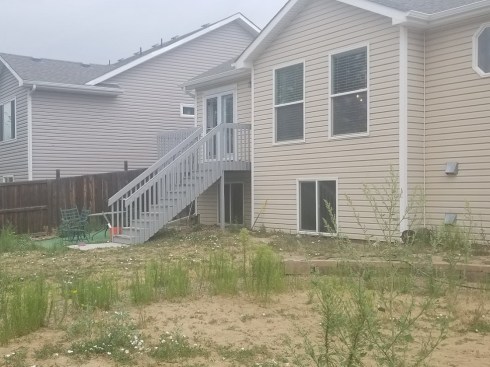
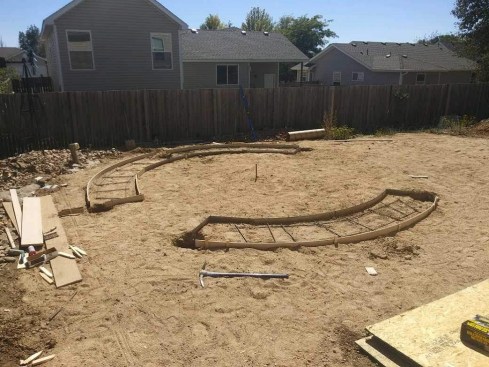
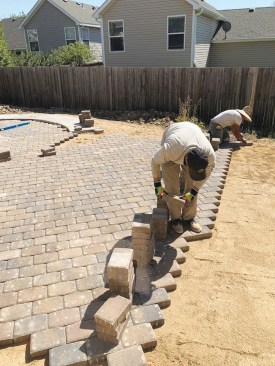
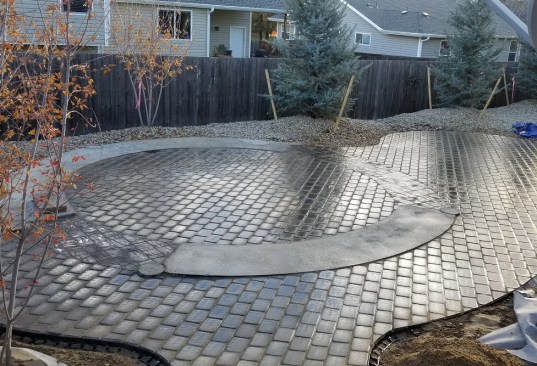
The barren backyard once had a small deck and an above-ground pool, which had long since been retired (top left).The author designed a new outdoor environment centered around the grain silo pergola, that would bear on footings and a pair of semi-circular concrete pads (top right). In preparation for the installation of the new pergola, most of the backyard was reconfigured with a new stone paver patio (left and above).
Moving the Silo
We hired a local crane company to help us move the silo, so it didn’t have to be completely disassembled into individual panels. To prep for the move, we removed almost all the screws holding it together at the top band of corrugated steel, leaving four screws to hold it up until the crane was ready to lift it off the base.
After removing the cap on top of the silo, we lowered the crane rigging down into the center and strapped an old tractor tire to the rigging. The crane operator lifted the rigging enough to take the weight off the structure so that we could remove the last four screws, then lifted the top section away from the base and placed it on a flatbed trailer.
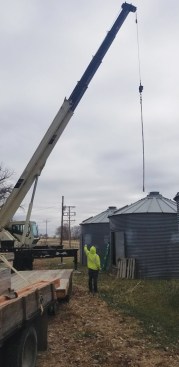
After most of the bolts holding the grain silo sections together were removed, a crane lifted the roof and upper section from the rest of the structure.
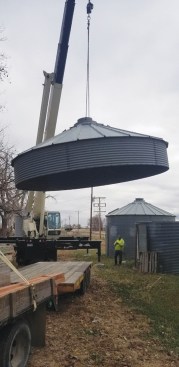
The roof and upper section were set onto a flatbed trailer and trucked several miles down the road to the client’s home, where they would be hoisted over the house and set gently into the back yard.
We strapped the silo to the trailer and moved it two miles down the middle of a gravel road, through the back entrance to the owner’s housing development, and up to the curb in front of the owner’s house. There, the crane set up a second rigging and lifted the silo off the trailer, over the house, and into the backyard.
To finish up the crane work more efficiently, we lowered the silo onto temporary 4×4 support posts, positioning the silo high so that we could then lower it onto its permanent 6×6 posts later, without the crane. There the silo sat for about a week while we made adjustments to our caisson layout (it turned out the silo wasn’t a perfect circle, thanks to the car accident that had damaged it, and so we had to move a couple of piers) and installed the permanent posts. While the silo was perched up high, we prayed for calm weather and no wind every day.
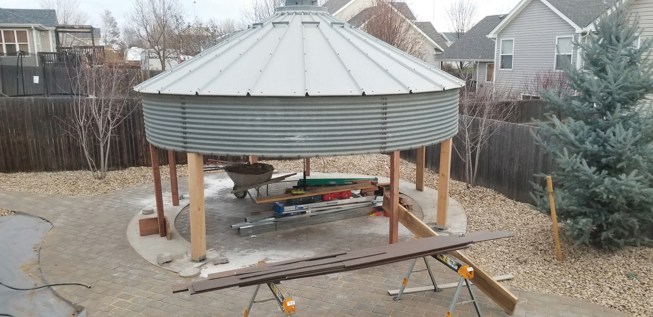
Here, the silo roof is shown supported by both temporary 4×4 posts and some of the permanent 6×6 posts.
Finally, it was time to lower the silo to its final resting place. It was a Sunday, and I was alone, so I used a jack to slightly lift one side while I unscrewed one of the temporary 4×4 posts. But as I lowered it, the whole thing tipped toward me. I was able to catch it and keep it from toppling to the ground, but the owner wasn’t home and I couldn’t let it go or it would all fall. (Keep in mind, it was barely connected to a few unsecured 4x4s.) I couldn’t reach posts to resecure it, but I had my phone in my pocket and I was able to call one of my employees to come and help me. But he lived more than 30 minutes away, so I had to hold the silo until he arrived about 45 minutes later.
He was just in time. Though the silo was primarily stabilized by the remaining temporary supports, acting as the final support post began to wear on me. Lowering the silo was much more of a task than I had originally thought. There really wasn’t an effective way to detach the temp posts, lower it, and reconnect it to the permanent supports without it tipping down on one side while rising up on the other. We had to work in a circular fashion around the perimeter of the silo where we were able to use a floor jack to brace each post location, making the silo easier to lower. We finally got it to the right elevation and connected to the new 6×6 support posts.
Finishing Up
We spent the next week disassembling the remaining sections of the silo for reuse, and building the framework for the outdoor kitchen. We had enough undamaged sections to reconstruct a back wall for the kitchen and give it an enclosed feeling, but we lacked enough undamaged pieces to enclose the whole thing. Instead, we left a large portion of the structure open on two sides, which added to the functionality and open-air feeling. To increase the functional seating, we added a knee wall capped with a bar top to the side of the pergola opposite the kitchen.
We used light-gauge galvanized steel studs to frame the kitchen cabinets. We chose steel framing because in addition to being perfectly straight and rot-resistant, it is non-combustible, an important consideration in an outdoor kitchen with an insert grille planned for installation in the countertop. Finally, we needed the steel framing to support the weight of all the concrete that we were planning to pour to form countertops.
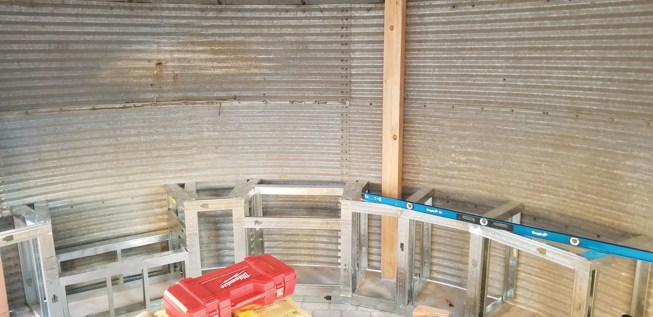
The author framed the kitchen cabinetry with light-gauge steel.

Cement board was used to form the base of the countertops, and smooth MDO plywood screwed to blocking was used to form the sides.

Once the concrete cured and the forms were removed, the tops were polished smooth.

The countertops were then acid-stained and sealed with epoxy.
We chose concrete as the medium for all the countertop work because it was the most adaptable material for the curvature of the pergola. We have a lot of experience with cast concrete and have developed a few techniques that we were able to incorporate into this project. For example, we used Hardibacker cement board as the base for our formwork, because it’s strong and easy to secure to the framework with screws, and we don’t have to worry about having to remove it after the concrete has been cast in place.
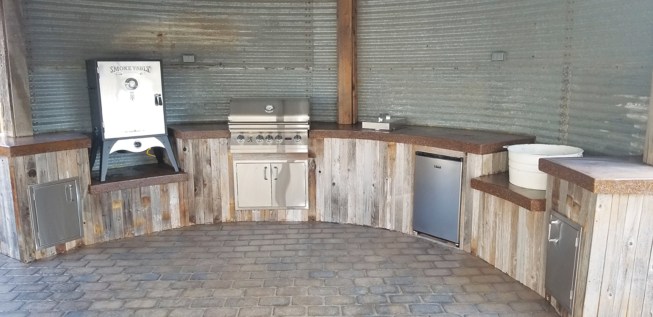
Reclaimed random-width fence pickets face the kitchen cabinetry, which wraps around the inside of the silo pergola.
Also, we no longer reinforce our slabs with #4 steel rebar, but instead use what we call hog wire, a 10-gauge welded wire fabric with a rubberized coating. We’ve found that this material provides plenty of reinforcement, but the wire gauge is small enough to allow the aggregate in the concrete to flow easily around it. When using rebar, we’ve found that the jittering process used to settle the concrete into the forms leaves aggregate stacked on top of the rebar, creating visible lines on the slab surface showing where all the rebar was located.
We started the project in the late fall, which in Colorado means that we experienced several snowstorms and freezing temperatures—in any other application, the weather would have meant long delays waiting for the right window of opportunity. Fortunately, on this project, we were able to close off all the openings with plastic sheeting, allowing us to keep a heater going inside while we poured the concrete and let it cure in 65°F heat for a week.
We polished the slabs to an 800-grit glass finish, stained them with a mix of amber and ebony acid stain, and sealed them with a two-part exterior-grade UV-resistant epoxy. All the elevations were cast in place, creating multiple levels of countertop. These allowed for flexibility with the placement of components such as a smoke box, grill, wash tub/ice bin, and refrigerator. We left several areas open under the counters in order to have versatility in placement of access doors and a balanced feel.
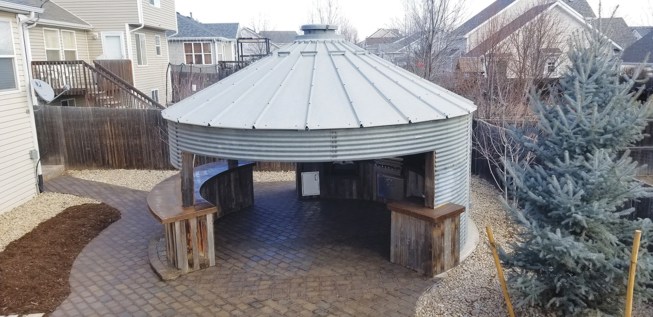
Situated in the midst of a Colorado Front Range subdivision, the steel structure is a friendly reminder of the area’s agricultural roots.
We faced the cabinets with multiple sizes of reclaimed 3-, 4-, and 6-inch-wide fence pickets, installing them vertically in order to match the pergola’s circular shape more accurately.
Photos by the author.❖