The International Residential Code is widely adopted in the United States and, though it is amended in an unlimited variety across the country, some commonalities can be found. Along with these common provisions are also common mistakes that can lead to a failed inspection.
These mistakes, however common, are not necessarily obvious. Often mistakes come from impatience and innocent ignorance of the code—and from forgetting that the way we once did things is not always the way we should do things. Based on my experience as a longtime (and former) building inspector, here are some of the mistakes that often get flagged on residential building sites.
Failure to Follow Directions
The best way to avoid inspection problems is to both read the manufacturer’s installation instructions and keep copies on file. Many failed inspections result from simply not having instructions on site for the inspector to review. Many re-inspections fail as a result of not following the instructions. As smart as many of us think we are, we can all stand to learn something from the product manufacturer.
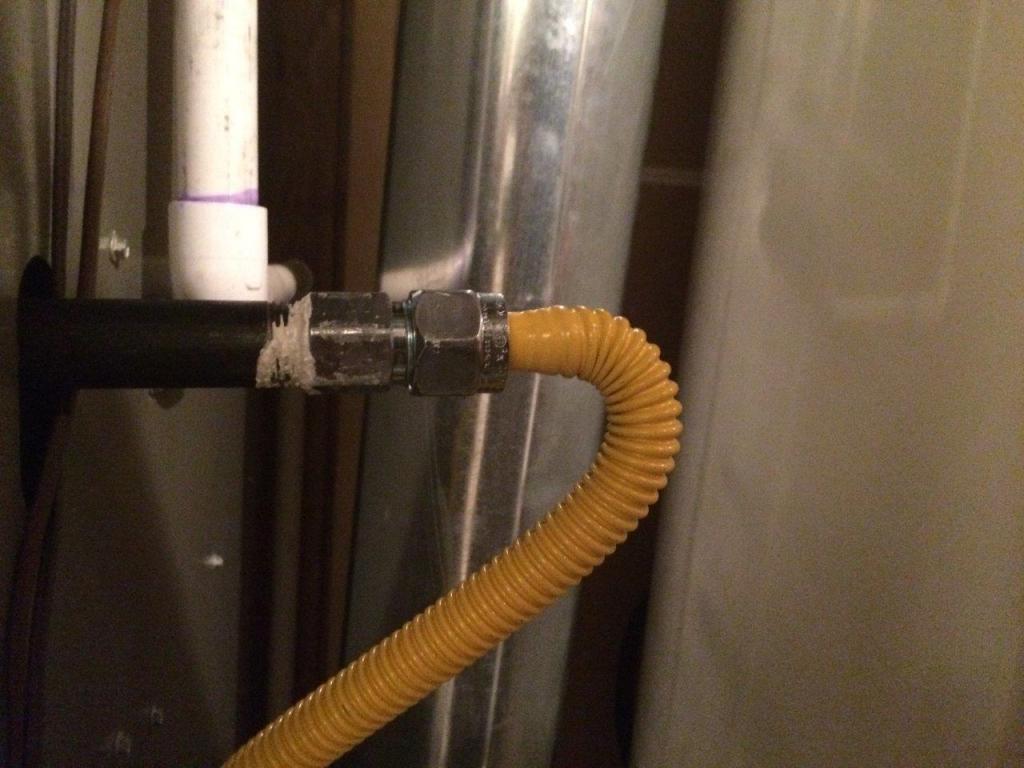
Consider pipe threads, for example (see the photo above). Of course, the code requires that they be sealed … or does it? For air-admittance valves, it’s the manufacturer that calls out the thread sealant between the valve and valve fitting. On the other hand, any joint compound, tape, or sealant on the threads of the flare joint on a fuel-gas appliance connector is specifically prohibited in the installation instructions and listing of the product. That’s just one example of why it’s important to read the instructions and have them available for review by your inspector, in case there is any question. (See “Paper Tools,” Tools of the Trade.)
Faulty Fire Blocking/Fire Stopping/Draft Stopping
These three construction elements are one word away from each other, but the relationships end there. To make matters even more confusing, what was once called “fire stopping” is now called “fire blocking.” Whether called fire stopping or fire blocking, the practice has been around since the 1800s, when it was first called “filling of walls at floors” before taking on the name fire stopping. In the 1990s, fire blocking became the more common terminology, but it has always been the same thing: material inside the concealed cavities of wood-framed buildings that slows and compartmentalizes the hidden spread of hot gases and fire. A hundred years ago, it was bricks and mortar in the wall; today it can be 2-by wood material, 23/32-inch WSP (wood structural panels), 1/2-inch drywall, or even particle board or an assortment of other materials.
Fire-stopping materials are intumescent (meaning they expand when heated) products used to stop the spread of fire, smoke, and gas through penetrating materials that can burn or melt in a fire.
Draft stopping is needed to divide floor areas exceeding 1,000 square feet into smaller, equally sized areas.

Fire blocking is used to seal up holes through the framing members that divide concealed cavities into separate compartments, to slow the passage of flames and combustion air.
Acceptable fire-blocking materials include drywall, fiber-cement board, and certain types of expanding foam.
Whichever materials are selected, the care in their installation is more critical. Applying fire blocking isn’t glamorous work, so it is often done sloppily, either through lack of skill or lack of interest. Apparently, that has been true for some time. Consider this quote from a 1920’s building code:
“Because such work does not show when a building is completed, and because its importance is usually entirely underestimated, it is common to delegate it to a boy, or some other careless incompetent person. The result is that the fire-stop [fire blocking] is so in name only; it being merely a delusive imitation which if called upon to fulfill its purpose, fails completely. Such work does not require any high degree of mechanical skill, but it is absolutely necessary that it be done by an intelligent and conscientious workman if it is to be efficient.”
In today’s building code, fire stopping is something completely different. The IRC requires certain fire-resistive-rated wall and floor assemblies between different dwelling units, such as the wall in the middle of a duplex, or the party walls separating town houses. No matter how these walls and floors are constructed and from what materials, they must resist the passage of fire from one side to the other. Holes in these walls—for plumbing, electrical boxes, and other features—create paths for gases and smoke to sneak through, so the code requires a “listed penetration firestop assembly.” Fire stopping refers to the tested proprietary products that are approved for sealing these holes against a fire and can be anything from a caulk material to a pad of putty that wraps around the back of an electrical box.
Draft stopping is similar to fire blocking but in the IRC, only in reference to the size of the concealed space inside a floor/ceiling assembly. When assemblies such as floor trusses create a concealed horizontal space greater than 1,000 square feet, draft-stopping materials must be used to divide the space into smaller, near-equal areas. [In the IRC, draft stopping is significantly different and simpler than it is in the International Building Code, or IBC, for commercial or multifamily residential buildings.] Draft-stopping materials can be less robust than fire-blocking materials, but if gypsum board is used, it must be the same 1/2-inch thickness, due more to the strength of the product to span the top and bottom truss chords rather than draft resistance. With that consideration, thinner, 3/8‑inch WSP sheathing (minimum) can also be used as a draft-stopping material, along with other materials that are approved by the building official.
While filling small holes with densely packed fiberglass insulation is OK, loosely stuffing fiberglass batts into framing gaps to act as fire blocking is a practice that will be red-flagged by a building inspector.
Guards and Handrails
There are a number of common mistakes when it comes to guards and handrails, but sometimes the mistake stems from simply not knowing what these features are and what each aims to accomplish. Both terms are defined specifically in Chapter 2 of the IRC. A handrail is defined as a “rail” designed for grasping for guidance or support. These are only required at the sides of certain stairs and ramps. Guards, on the other hand, are not “guardrails” as is commonly stated, since no “rail” is required.

Guards are needed to prevent falls from elevated walking surfaces that are higher than 30 inches above grade. This measurement is taken from a point that is 36 inches horizontally away from the edge of the walking surface, which is why a guard is required for the deck shown here.
As defined by the IRC, a guard is a component or system of building components at the edge of an elevated walking surface to help prevent a fall to a lower level. A guard can be a rail, and—inside of a house—it often is. In deck construction, however, a guard may be a bench with a back, a planter box, a fireplace, a barbecue kitchen counter, or a privacy wall. It just needs to be a barrier that meets the other geometric and structural requirements for a guard.
At the sides of stairs, guards and handrails are often joined together, but they serve separate functions. The top of the guard can also be a functioning handrail, but then the top of the guard must also follow the handrail provisions. This is where things often go wrong.

In addition to being located at the right height—between 30 and 38 inches above the walking surface or stair tread—handrails must be easily reached and easily graspable, unlike this one.

In addition, stair rails must be continuous from the bottom to the top of the stairs. This one would clearly fail inspection.
A guard is simply a barrier, but a handrail is something that must be located, aligned, sized, and arranged to be easily reached and held tight by the hand and to not be obstructive to the use of the ramp or stairway it serves. A person must be able to grasp a handrail, as if it were a pull-up bar, as opposed to pinching it from the sides or hooking it by fingers but no thumb. A handrail also must be continuous from the top to the bottom, such that a person does not need to let go of it or adjust their hand. The ends of a handrail must be turned back to a post or wall or otherwise architecturally rolled out into a larger shape; this reduces the likelihood of the end jabbing something or catching baggy clothes or purse straps. The key concept is that a handrail helps prevent falls not as a barrier, but as a feature to hold on to for stability.
Hanger Gaps
In deck construction, the shrinkage of wet, treated lumber often leaves the joist hovering over the saddle of a joist hanger that was once tight beneath it, but that’s not the problem I am discussing here. The gap I am focusing on isn’t quite as obvious; it’s the gap above your head, between the end of a truss and the girder truss carrying it. Though this gap can appear in floor and deck construction, it is very common in trusses.

When the gap between a supporting framing member and a truss supported by a joist hanger exceeds 1/8 inch, the hanger’s published load capacity no longer applies and must be reduced according to tables published by the hanger manufacturer.
Trusses are large and heavy and are typically moved and placed while suspended from boom cables. They are a 3D puzzle of 2D triangles and other shapes. When joined together, they can meet at different portions along their vertical height. Top chords, webs, and bottom chords can—and should—all fit together tightly. However, any twists, curves, bows, or out-of-plumb or out-of-level installations can cause the bottom chords, where the hanger is located, to not meet.

For a joist hanger to provide maximum load capacity, a joist should fit snugly against the flush beam or ledger that is supporting it.

Gaps between a joist and the saddle of the joist hanger that is supporting it also reduce the load capacity of the joist.
A maximum 1/8-inch gap is permitted in a hanger between the carried and carrying members. When mistakes are made, a gap larger than 1/8 inch can’t be feasibly closed, which is why manufacturers provide load reduction tables and repair techniques. When those tables are ignored and the required adjustments are not made, an inspector has no choice but to red-flag the problem.
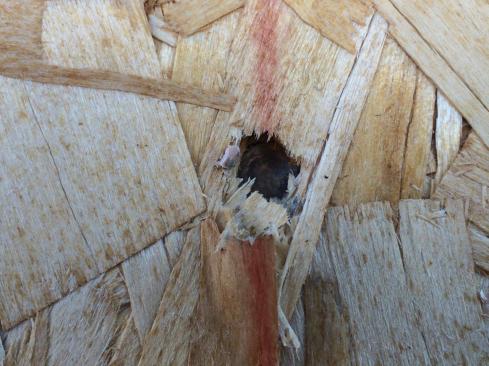
Improperly Installed Floor or Roof Sheathing
Throwing down sheets of CDX plywood or OSB onto floor joists or roof rafters seems simple and basic, like there is little to consider other than covering the area. At face value, the code provisions and span tables could seem to suggest that … until you read the footnotes.
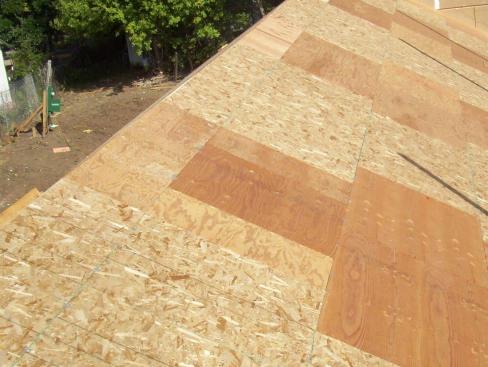
Small sheathing offcuts should not be "patched in" (as shown in this photo) to complete a subfloor or roof deck; sheathing must span three or more rafters or joists to adequately support concentrated loads.
For example, the footnotes to Table R503.2.1.1(1) require that sheathing be continuous over two or more spans and be supported by at least three rafters or joists. Often overlooked is footnote “c,” which states that the spans and loads in the table only apply to sheathing that is 24 inches wide or more; narrower panels—such as at the ridge or at the edge of a floor system—require support from solid blocking or edge clips, depending on the width of the panel and the location. This is identical to what is found in the E30 standard by the APA, an approved alternative to the IRC provisions. Because this is a common mistake, the APA prepared a Technical Note titled Panel Edge Support for Narrow-Width Roof Sheathing. Last revised in 1997 but still applicable (and still overlooked) today, this Technical Note offers solutions such as additional edge clips for and blocking beneath noncompliant sheathing.

Narrow rippings between 16 and 24 inches wide are OK as long as the sheathing spans at least three framing members and the edges are supported by clips or blocking.
At the ridge, sheathing sometimes is ripped to widths that are narrower than 16-inches in order to complete the roof deck. Here, the edges must be supported by solid blocking.
Overdriven Nails
Builders should be familiar with the fastening details for sheathing on exterior walls found in Table RR602.3(1) of the IRC. Sheathing on exterior walls is most likely providing the house with lateral stability. Before WSP sheathing, let-in diagonal braces were notched into the studs to create a triangle and brace the wall. Today, a sheet of OSB or plywood (the technical term is Wood Structural Panel, or WSP) does this effectively, as it’s not easy to reshape it from a rectangle to a parallelogram.
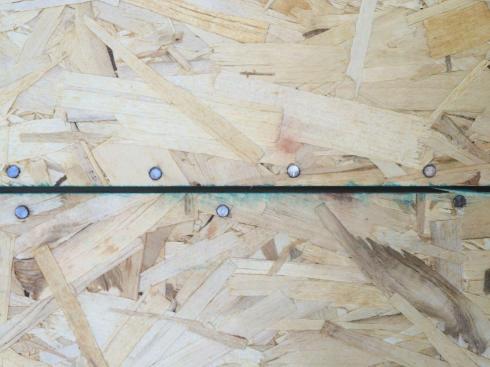
When installing sheathing, leave a 1/8-inch gap between sheathing joints, which should occur over the centerline of the framing, with nails installed per the recommended nailing schedule and 3/8 inch from the panel edges (seismic and wind zones require closer spacing).
Where a WSP-braced wall is most likely to fail is at the nailing. This is where the forces must transfer between the studs and the WSP. When nails are overdriven, it greatly reduces the thickness of WSP they engage. The strength of the bracing follows the weakest connection, so overdriven nails are similar to thinner sheets of bracing. Depending on the depth of the fastener head in the sheathing, this can be a significant reduction. Fortunately, similar to the case with narrow roof sheathing, a technical report called TT-012: Effect of Overdriven Fasteners On Shear Capacity, from the APA, Engineered Wood Association, provides detailed and reputable information, including guidance about when overdriven depths are not significant and when they are.
Depending on how many overdriven nails there are and how deeply they are embedded in the sheathing, they may reduce the shear capacity of a panel.

Ideally, fastener heads should be set flush with the surface of the sheathing.
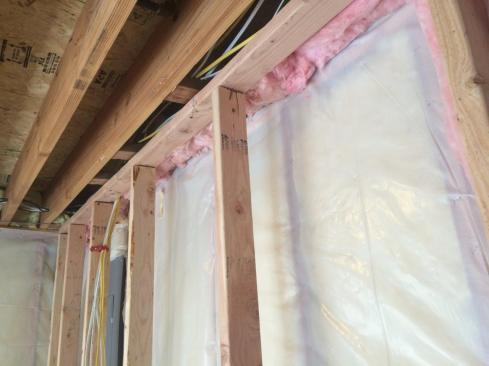
Exposed Paper
One of the most common and obvious (at least, it should be) mistakes is leaving the paper facing of kraft-faced batts of insulation exposed. This paper is treated with a bituminous material to function as an effective vapor retarder. The dry paper and vapor retardant are combustible. The warning not to leave it exposed is printed all over it. Even when enclosed in a construction cavity, it must not be exposed to air within the cavity. It must be in substantial contact with another material, such as the back of the wall covering.
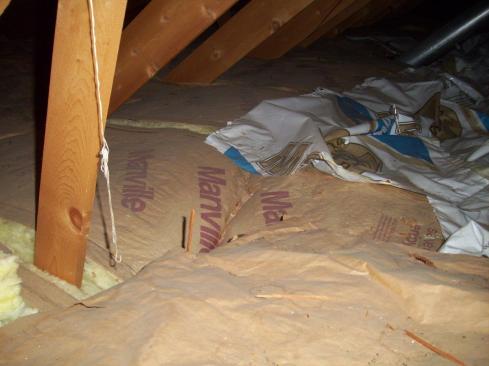
While fiberglass batts are noncombustible, their kraft paper facings will burn when exposed to an open flame. When they're installed in a semi-enclosed space such as an attic, the paper facing should be removed (or use non-faced batts).
When batts are installed in an open non-living space such as a garage, the paper facing should either be removed or be in close contact with drywall or another substantial material, rather than air, to reduce the risk of fire.
In inspection practices for permitted work, inspectors should identify this exposed paper for correction. However, grabbing a roll of insulation from the local home improvement store to install in a cold garage or as an upgrade in an attic or crawlspace is a common DIY, weekend-warrior type of job that doesn’t usually include a professional inspection. Though I have found this code violation many times, I have rarely found it during an insulation inspection.