Whenever you build a superinsulated house, you encounter a dilemma. Where do you set your windows in those fat walls—flush to the outside of the wall, flush to the inside of the wall, or somewhere in between? As a Passive House consultant in upstate New York, I have had to analyze this decision from several different perspectives. I’ve learned that if energy efficiency is the goal, positioning the window in the center of the wall (to be more precise, in the center of the wall’s R-value profile) turns out to give the best-performing result.
To predict the thermal performance of a window, I analyze the window as part of the wall assembly using Flixo, a versatile and powerful thermal-bridge-analysis application. Flixo can output a variety of reports, as well as diagrams and illustrations such as the ones shown below. (Learn more about Flixo at certiphiers.com/flixo.)
Here, I used Flixo to create a two-dimensional drawing of the window in its rough opening, set the design indoor and outdoor temperatures, and assign each shape a thermal conductivity. Flixo then output the “psi value” (Ψ-value) for the juncture between the window and the opening. The psi value is a correction factor between the window and the wall assembly accounting for the thermal discontinuity of different materials as well as framing effects.
Using Flixo, I can take a fine-grained look at the window. I model the frame U-value (rate of heat loss), the glazing U-value, the installation psi value, and the psi value at the joint between the glazing and the frame (which is called the spacer). With those four values, I can get a much more accurate overall window U-value than is possible from a standard National Fenestration Rating Council (NFRC) window label. I then input that value into the Passive House Planning Package (PHPP) to see the contribution of the windows, as installed, to the overall heating or cooling demand of the building.
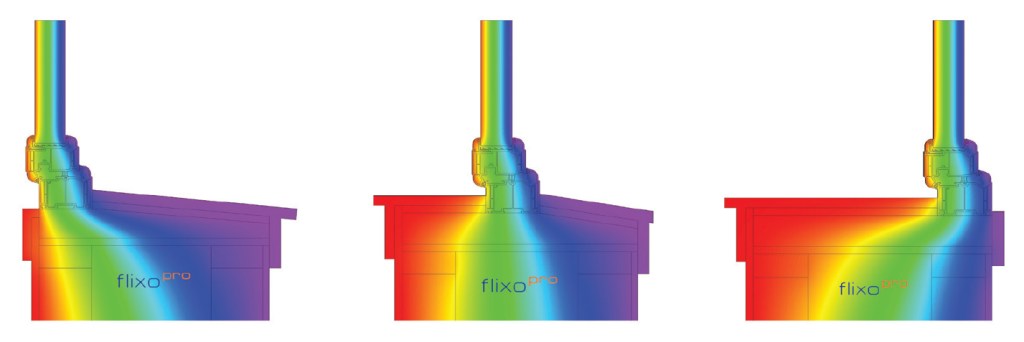
The rainbow drawings shown below are the output from Flixo for three different window installation configurations. One window is placed all the way to the inside of the insulated window buck, one is centered in the wall, and one is placed all the way to the outside. As you can see from the rainbow patterns, the heat flow and temperature gradients in the walls are different.
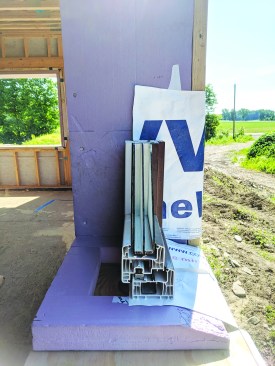
A mockup of the author’s window installation shows the insulated window buck and the window’s location near the wall’s center of mass.
I analyzed this problem for a new construction project, a 2,559-square-foot house built to Passive House levels of efficiency. To find the values in the table below, I input the psi values from Flixo into the PHPP. You can see that the difference in the window position carries through to the annual heating demand for the entire house. In this example, keeping the windows in the center is the only option that allows me to meet the Passive House criterion for heating demand, 4.75 kBtu per square foot per year. Setting the window to the outside was worse, and setting it to the inside was the worst of all. The difference in the numbers might be noise in conventional code-compliant houses with a peak heating demand of 60,000 Btu/hr or so. But in advanced energy-efficient projects, these are make-or-break decisions.
In a high-performance house, there are a number of reasons to think carefully about window placement. Energy consumption, which we’ve just discussed, is only one consideration. Probably more important is the question of condensation potential and durability. Cold spots in a wall system are vulnerable to condensation; by keeping the window and its surrounding framing warmer, we minimize the risk of condensation. Hand in hand with that concern is the issue of comfort. By eliminating a cold spot in the wall, we avoid a source of discomfort.
We also need to consider aesthetics and think about how the house will look from the street. If the wall is a foot or more thick, you (and your clients) may not want the windows pushed all the way to the inside. Along with this concern, there’s the “tunnel vision” effect that may be created when a window is installed all the way to the inside or all the way to the outside.

The author’s analysis of the position of a high-performance window in a superinsulated wall established that location in the center of the wall yielded the best performance, maximizing the insulation value and removing a condensation risk.
In addition to those factors, we have to be mindful of the extent of shading that’s going to occur on the glass in the various window positions. When the window is installed all the way to the outside, the window buck isn’t going to shade the glass much. But when it’s installed all the way to the inside, now you have substantial shading on that window—which could be either good or bad, depending on the project.
Assuming you’ve decided to optimize the window’s thermal performance, exactly where in the wall you position the window depends heavily on the characteristics of the particular window. With the Klearwall windows I modeled for this example, the center of R-value of the wall turned out to be the best spot. But if, for example, you have a wood window with an inch of foam or a half-inch of foam on the outside of it with aluminum cladding, that window might need to go in a slightly different location in the wall to be optimized. In any case, that optimal position can be analyzed using a program like Flixo. Or you can ask your window vendor; some vendors are able and willing to do the calculations for you.