Curved walls. We considered special-ordering curved ICFs for the home’s 30-foot radius walls, but for budget and schedule reasons ended up fashioning the curved blocks ourselves, from straight ones. We followed a table in the Logix manual that shows how to make various curves by shortening the inside face of standard blocks.
By flexing the blocks slightly, we were able to get them to follow the desired curve. Continuous bracing along the grade beam — kerfed 2x10s — held the bottom course in place; then each succeeding course mated with the nibs of the one below. Considering that they were made from straight blocks, the curves were surprisingly smooth. There were a few lumps and bumps, but nothing we couldn’t fix with a belt sander.
Fastening Ledgers
Floor joists in ICF buildings have traditionally hung from ledgers fastened with cast-in anchor bolts. On this job, we saved time by using Simpson’s ICF ledger-connector hardware. In accordance with this method, we inserted the legs of an ICFVL wall plate through slots cut in the foam; the concrete anchors the plate. To install the 2-by ledgers, we placed them against the wall plates, lapped them with ICFVL-W hangers, and drove structural screws through into the plates. Hangers for LVL ledgers are also available, while light-gauge steel ledgers can be screwed directly to the plate.
We spaced the wall plates 32 inches apart, taking care to locate them so that the ledger hangers wouldn’t interfere with the joist hangers.
Door and Window Openings
If the door and window openings in this house had been rectangular, we could have used vinyl bucks. But because the heads were arched, we built wooden bucks on site.
Often, door and window bucks can be left in place after the pour. But the doors and windows in this house were inset — and the exterior jambs finished with stucco — so the bucks would have to be removed. To make this easier, we fastened the bucks with metal framing angles and screws.
For the arch-top openings in curved walls, we made the bucks straight but much thicker than the wall, to accommodate the radius.
Bracing and Pouring
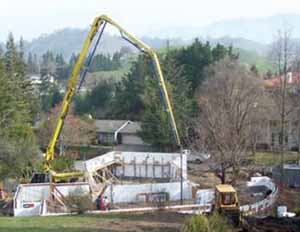
Solid bracing is of course key to a successful pour, because wet concrete places a lot of pressure on the ICFs. We used the standard adjustable metal bracing designed to hold staging planks (Figure 8) and added wood bracing at those locations where the connections were the weakest — at cut blocks, for example, and at inside corners and the ends of walls. The smaller bucks were faced with solid sheets of OSB and were stiff enough to resist the force of wet concrete. The bucks in the larger openings required additional vertical and horizontal bracing.
We stacked and poured the walls in stages. The first stage brought the walls to just above the main floor level. After a week of curing time, we framed and sheathed the floor, and then we formed and poured the rest of the way up.
Concrete. We used a 5-inch-slump five-sack mix containing 3/8-inch pea gravel and 20 percent fly ash. Normally, we wouldn’t drop concrete more than 3 feet, but the forms contained so much rebar the concrete more or less rolled to the bottom. There wasn’t room to use a tremie pipe. To avoid blowouts we worked our way around the perimeter — placing concrete in 3-foot lifts and vibrating as we went. We drilled witness holes through the bottoms of the window bucks so we could see whether the concrete had flowed underneath; if need be, we inserted a rod through the holes to move the concrete.
Plumbing and Electrical
ICF plumbing penetrations are simple: You can sleeve through the form before the pour or drill through after. Drains and vents of up to 2 inches in diameter will fit in a channel in the side of the foam form; we cut the sides of the channel with a recip saw and then rake out the foam with a pry bar.
Electrical wire is run in smaller channels, which we fill with spray foam once the wire’s in place. Electrical boxes can be cut into the foam and screwed to the concrete. Logix ICFs are ribbed on the inside; we’ve found that if we cut through the foam and remove the concrete ribs with a cold chisel, a standard electrical box will come out flush with the drywall.
Exterior Finish
To keep the below-grade portions of the building dry, we waterproofed the foundation with Tremproof 250 GC (Tremco, 800/321-7906, www.tremcosealants.com), then covered it with MiraDrain 2000 (Carlisle, 888/229-0199, www.carlisle-ccw.com), a polyethylene air-gap membrane that drains water away from the wall.
Though ICF homes are often finished with lap siding, stucco is preferred in our area. With ICFs, we use the same synthetic stucco materials used with EIFS, which can be applied directly to the foam without paper and lath.
Our plastering sub applied a base coat of Parflex 304 (Parex, 800/537-2739, www.parex.com) with an embedded layer of fiberglass reinforcing mesh, followed by a second coat of the base-coat material. The top coat was Fino Alto (Variance Acrylic Finishes, 888/323-6404, www.variancefinishes.com), an integrally colored acrylic plaster.
Finally, to protect any areas of exposed foam between the top of the waterproofing and the stucco, we parged with Thoroseal (Thoro, 866/518-7171, www.thoroproducts.com).
Victor Rasilla is a working supervisor for Brinton Construction in San Leandro, Calif.