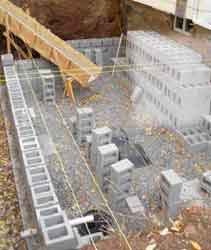
Project manager Danny DoCouto started the blockwork by setting the corners, laying the blocks in a full bed of mortar. Then we strung masonry lines between the corner blocks and laid the rest of the first-course blocks, using the strings to keep the courses straight and leveling each block with a 2-foot spirit level. The elevation at the top of the first course measured 88 inches — exactly 11 courses of block — below the top of the existing foundation. If we matched the existing sill, joist height, and subfloor, the floor of the addition would match that of the existing house.
During the first-course run, we had to install a 3-inch-diameter PVC pipe that would later connect to the foundation drain and bring water into the basement sump well. I’ve never been comfortable with the idea of allowing water to drain into a basement, but on a flat site there’s no alternative: Water that’s 8 feet down won’t gravity-flow anywhere else.
At the building inspector’s suggestion, we installed the PVC pipe in the foundation wall rather than through the footing, where it can cause weakening and cracking. We notched the first-course block with a diamond-blade-equipped grinder, locating the notch high enough in the block that the pipe would clear the poured slab. After setting the first and second courses, we filled the block cores with concrete along the entire run.
The plans called for a set of basement stairs on the south side of the addition, with one side abutting the existing foundation wall. Therefore, we needed to build a section of block wall next to the existing foundation to help carry the bulkhead door. First, though, we had to underpin the part of the old footing that was exposed during excavation and form up a new footing. (Eventually, we’d have to underpin the length of the exposed existing foundation wall, but for the moment we wanted to keep our focus on the block, so we concentrated on the stair area.)
To keep on course with the rest of the foundation, we formed up a 12-inch footing, then used 4-inch solid block to bring us up to 16 inches above the new footing, the equivalent of two block courses.
A story pole marked off in 8-inch increments (the height of each course) helped keep us on track for succeeding courses. Each day, we’d set up the transit and mark our story pole, working off the existing footing. As a second check, we also measured down from the existing sill, exposed earlier.
Our daily ritual consisted of setting up the transit and marking the story pole, setting corners, running lines, leveling blocks, checking walls for plumb — with a level and plumb bob from the lines above — and checking the distance to the sill, making sure it was divisible by 8. If we were off, we’d adjust the 3/8-inch-thick mortar joint to correct the wall height.
As we laid up the block, we used Dur-O-Wal galvanized truss reinforcement (Dayton Superior, 800/323-0090, www.dur-o-wal.com) on every other course to laterally strengthen the foundation. At the corners, we dropped in rebar and filled the cores solid with grout all the way to the top. Where new block adjoined old, we fastened ties to the existing foundation with a .27-caliber Remington powder-actuated fastener.
For additional lateral reinforcement, we built a pilaster midway through the longest wall; we crisscrossed the blocks, installed rebar, filled the cores, and ran the Dur-O-Wal through the pilaster.
For the last two courses, we switched from 12-inch to 8-inch block to create the brick shelf for the brick faade that would cover the foundation, installing brick ties between the two courses in preparation for the brickwork. The brick shelf ended at the entrance to the mudroom door, where a poured platform stoop would provide a step into the house.
Brick would also be used to frame the basement window openings.
Parging and Water Management
We parged the below-grade portion of the walls using the same basic 21/2-to-1 sand/mortar mix that we use to lay our block, spread evenly over the entire foundation 1/2 inch thick. Adhesion is always tricky, and the exact mix always needs adjustment for temperature, humidity, and the wetness of the sand.
Before applying the mortar, we used a mason’s brush to splash and spread water on the block. Then we troweled on the mortar, screeding it smooth with a straight board. A lot of mortar falls during this process, but we pick most of it up and reuse it. As we proceed, we keep an eye on the work that’s already been done, watching for the right time to wet-sponge-float the wall.
We gave the parging a week to cure, then brushed on a coat of cold asphalt. The parging fills the pores in the block, and dampproofing provides one more layer of defense against moisture entering the basement walls.
Because the asphalt makes such a sticky mess, we like to give the bituminous coating time to dry before installing the foundation drain. But the sooner you get the drain in, the sooner you can backfill. To keep sediment from building up in the pipe over time, we put filter fabric down before the stone went in, and then wrapped the stone and pipe with it.
We pitched the pipe from the corners of the addition to the sump well 1/2 inch to 3/4 inch for every 10 feet, with the perforated side facing down so that rising water could enter and gravity-flow to the well.
Basement Slab
To prepare for the basement slab, we installed Flexcell expansion-joint filler (Knight-Celotex, 800/596-9699, www.aknightcompany.com) around the foundation’s interior perimeter, fastening the 4 inch-high material to the wall with our Remington. The expansion joint provided us with a thickness reference and screed point for pouring the slab .
We also cleaned up the existing footing with a chipping gun in preparation for underpinning, mixing the debris in with the loose stone. Then we placed 6-mil poly in the hole as a vapor barrier, with wire mesh on top.
We set up our chute again, but this time it didn’t matter if concrete ended up on the ground. We didn’t want it splashing on the basement walls, though, so we used plywood and plastic to protect them during the pour.
At first we used wheelbarrows to move the concrete to the far corners, and then we just let the material pour into the hole, working it with a jigger bug to vibrate the stones down and away from the surface. We bull-floated the slab and, after the concrete had cured slightly, continued to work the slab with hand floats.
The following day we backfilled the foundation in 2-foot lifts, dumping in 2 feet of dirt at a time and compacting it with a jumping jack until we reached the brick shelf. We compacted by hand, intentionally keeping the backhoe away from the hole for fear of putting too much lateral pressure on the foundation.
Finishing Up
To set the anchor bolts, we filled the cores of the top two courses, using busted block to create a barrier and keep the grout from dropping all the way to the bottom. Then we set our 12-inch anchors 9 inches into the grout, leaving 3 inches exposed. The anchors were spaced 18 inches on center, doubled up at the corners.
We counterbored the bolt holes to accept the washers and nuts holding down the sill, which made it easier to install the joists (no notching required) and safer to walk the sills.
Rob Corbo is a building contractor in Elizabeth, N.J.