Building a Reinforced Concrete Block Wall, continued
Bucket Brigade
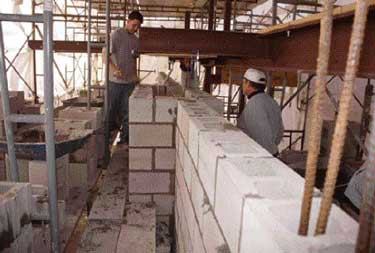
In typical “high-lift” masonry wall construction, it’s most common to lay block to the full height of the wall, then pump grout into the cells from the top down. Because dropped mortar and masonry debris can build up in the cells and block the grout’s passage, inspection and cleanout ports are incorporated at or near the bottom course to ensure complete filling. But the various openings, lintels, and intermediate bond beams on this job, along with the fireplace construction, made that approach impractical. Instead, we did the grouting in 3- to 5-foot lifts, which allowed simple, top-down inspection. We moved the grout from mixer to wall in 5-gallon buckets.
Thanks to the volume of job-mixed, 3,000-psi grout needed to completely fill the block cells, the crew members had their hands full. It took as much time to set steel and pour grout as it did to lay the block. On average, we had four or five masons and four to six laborers working on this job. In all, we used six tons of #6 rebar, 10 tons of #5 rebar, and three-quarters of a ton of #3 stirrups. And we mixed and poured 30 to 35 yards of mortar, grout, and concrete.
Stepped Chimney Construction
The most complicated aspect of the two walls was the fireplace and chimney construction. The large fireboxes required 16-by-26-inch flues. Each firebox was located 8 feet off the gable walls’ midpoints, which meant that the chimneys had to be progressively offset, floor by floor, by that distance to break through at the roof ridge. One flue moved not only 8 feet laterally along the wall, but also 2 feet through the wall.
Shifting a chimney this distance goes well beyond the supporting capacity gained from a graduated corbeling of the block courses. Instead, we poured 6-inch-thick structural concrete slabs at each floor level and just below the roof. Above the first floor, we reduced the chimney dimensions to minimum size to squeeze past window openings in the wall above. But above the roofline, the chimneys expanded again to finish at approximately 4 by 6 feet, which required a final structural slab just below the rafters.
The structural slabs were supported at either edge by the CMU wall and a W10x22 steel I-beam framework standing parallel to the wall and supported on high-strength steel columns. Smaller, W8x18 I-beams running between the CMU and the main I-beams bordered the slab ends. Shear anchors welded to the I-beam webs locked the steel to the concrete, while rebar set in the slabs and grouted into the masonry completed the tie-in.
We formed the underside of the slabs with cement board. Although plywood is typically used in this application and later removed, cement board works well as a leave-behind form. It’s smooth, fireproof, and completely compatible with masonry. Our use of leave-behind forms made it simple to pass the flues through the slabs as needed; cement board cuts easily with a small diamond wheel on a grinder.
The lower flange of the steel I-beam supported the cement board. To prevent the board from sagging under the weight of the pour, we temporarily propped the undersides of the largest slabs, which measured approximately 8 by 10 feet. The conventional 30-inch-wide hearth slabs required no additional shoring.
Bolting Into Block
To attach the floor framing to the masonry on the interior side, we relied on Hilti’s HIT epoxy adhesive anchor-bolt system. The anchor bolts (800/879-8000; www.us.hilti.com) are especially convenient because you can drill directly through the material that is being fastened into the block without having to remove it to expand the holes in the masonry, as with other anchoring methods.
Exterior Stone Veneer
We used that same Hilti fastener system on the exterior side to mount bearing lintels for the stone veneer above window openings and on the cheeks above lower rooflines.
Because building wings extended out under lower rooflines from both masonry gables, we had to provide a means to support the heavy stone veneer on the cheeks above these roofs. We installed short lengths of galvanized steel angle to the blockwork, stairstepping up the roof slope much like step flashing. An orange-colored, rubberized spray-on coating protected all exterior-facing blockwork from moisture penetration, although copper flashing will still serve as the primary barrier against water intrusion in the completed installation.
When this job is completed, we’ll have applied approximately 300 tons of stone veneer to the exterior walls, a process I’ll discuss in a future article.
Mike DeBlasioowns and operates M. DeBlasio Inc. in Littleton, Mass.