On Site With Form-A-Drain – Continued
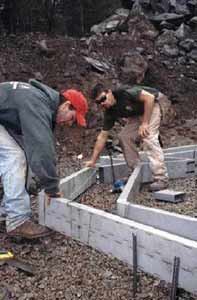
We work our way around the foundation, measuring off the string and setting both the inside and outside forms as we go. Wire spacer straps provided by the manufacturer help maintain the correct spacing between the forms, and a few stakes keep everything in position. We don’t bother leveling the formwork until all the forms are set; then we do it all at once with a rotary laser. We hold the forms about an inch off the stone in case we need to tap down a high spot when we’re leveling everything.
Custom corners. The foundation shown here had several jogs, which used up our supply of corners. Fortunately, they’re easy enough to make from coupling stock. Also, there was a place where the footing widened from 16 to 24 inches. The offset was too short to fit two normal corners, so we made up a customized shortened one. We saved the three-sided bump-out for last, because it’s easier to form odd angles when the adjoining sections are already in place.
Once we’ve set all the forms and everything is screwed together, we install a pair of crossover pipes to connect the inside and outside forms. Otherwise, water collected by the inside form would have no way to drain. We also install an outlet adapter, which connects the Form-A-Drain to a daylight drain.
Leveling the Forms
Once the forms are installed, we bring out the rotary laser and level them, and then secure them to the stakes. One difference between Form-A-Drain and conventional form materials is that you have to use a lot more form stakes. Otherwise, the plastic material will flex under pressure from the concrete. The manufacturer offers metal stakes in 18- and 30-inch lengths and suggests using one every 3 to 5 feet. You also can use wood stakes or regular form pins, but the CertainTeed stakes are inexpensive so it’s no big deal to leave them in the ground. We secure the forms to the stakes with screws.
The manufacturer recommends removing the spacer straps for reuse once the forms are secured to the stakes, but they, too, cost very little, so we leave them in place for additional bracing.
Prepping the Slab
Often we’ll leave a mini excavator and a pile of gravel inside the foundation footprint and spread a layer of gravel before we pour the footings. The gravel provides a free-draining base for the basement slab and gives additional support to the inside form. The next day, after the footings have firmed up, we drive out the excavator and start setting foundation forms.
If tying up the excavator for two days isn’t feasible, we’ll pile some gravel in front of the forms with a shovel to help hold them in place, then bring in the excavator to spread the rest of the stone while we’re setting the foundation forms.
When it comes time to backfill the foundation, we bury the Form-A-Drain forms beneath about 12 inches of washed stone with a layer of filter fabric on top. CertainTeed makes a version of Form-A-Drain with filter fabric already applied, but we haven’t used it.
Limitations
Form-A-Drain works fine for most jobs, but forming up and down on exposed ledge can be more challenging with this product than with wood. Depending on the type and amount of ledge, it also may be tough to assure an effective drainage system. Small sections are okay, but for larger areas it’s frequently easier to use conventional forms and footing drains.
Form-A-Drain is offered in only three depths — 4, 6, and 8 inches. If you need a thicker footing, you have two options. You could dig a shallow trench and set the forms above it. (For example, for a 12-inch-high footing, you could dig a 4-inch trench and put the 8-inch Form-A-Drain on top.) The second option is to leave a 4-inch space between the bottom of the Form-A-Drain and grade, and fill the void with dirt or gravel.
Cost and Learning Curve
With my own crews, it took just one or two installations to learn how to use this product, and installation takes no longer than installing conventional forms. For the project shown here, my three-person crew had the footing formed up and ready for concrete in about three hours.
Builders sometimes tell me they think footings will cost more using Form-A-Drain, but when I factor in the labor savings I think it’s cost-competitive. The components for this 44-by-30-foot foundation with 11 corners cost about $450.
John Pagurko owns Pagurko Builders and PBI Dirtworks in Newcastle, Maine.