A Curved Porch on a Grand Scale, continued
Columns 101
The classical formula for Tuscan column proportions states that the column’s height must be equal to seven times its diameter, including the plinth and capital. So, technically speaking, a 16-inch-diameter column ought to stand 9 feet 4 inches overall. When designing with and specifying columns, this is a good rule of thumb to keep in mind to ensure a good appearance.
The column also features true “entasis,” or an aesthetic tapering over its length. Ours measured 16 inches in diameter at the bottom and 13 1/2 inches at the top. The tapering occurs in the upper two-thirds of the column’s length, and any necessary shortening is done at the bottom. These columns were 10 feet long in the rough and had to be cut to finished length before standing. We cut them about 1/4 inch short to allow for shimming and leveling.
Cutting. There’s some kind of mineral component in the columns’ fiberglass matrix that gives the material a stone-like appearance. You can effectively cut one or two columns with a carbide-tipped blade, but the teeth quickly dull. Instead, we used an abrasive diamond chip masonry blade in a circular saw, resting the columns in a basic cradle to hold them at a comfortable cutting height. One worker did the cutting while another slowly rotated the column.
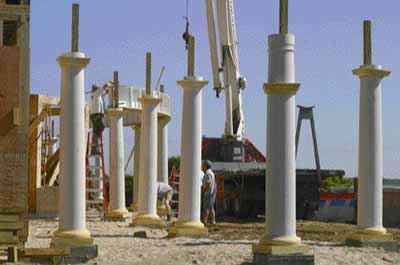
Lifting and setting. A single column of this size weighs about 200 pounds. We looped a nylon choker strap around the top of each column in turn and used a Lull to lower them over the 4×4 posts. After each column was set, a worker slid the one-piece cast polyurethane plinths and capitals over the top. We set all 17 posts, including the 4x4s, in about six hours. Although we’d anticipated having to brace the columns after standing, that proved unnecessary. Thanks in no small part to careful cutting and pier preparation, as well as the columns’ own mass, they stood nearly plumb all on their own.
Carrying Beams
The roof’s straight carrying beams were a series of composite box beams, built in sections to bear on three or more columns each and butting over column centers.
A 3 1/2-inch-square opening cut through the top and bottom plates of the beam on layout captured each post. A worker on a ladder guided the 4x4s into their pockets as the crane operator lowered each beam into place.
For the two circular beams, Mike laminated two 4-inch-thick ring beams from 16 layers of 1/4-inch lauan plywood, bonded with West System epoxy. The rafters were set in pockets cut into the rings’ inner face. Below the ring beams, he constructed an open framework of plywood plates and 2×4 struts to continue the 28-inch-wide entablature band around the circular porch sections.
Fastening the Columns
The beam rested directly on the fiberglass columns, which we’d modified at the tops with four pieces of 2x blocking, screwed and urethane-glued to the interior circumference.
The blocks allowed us to screw directly down through the bottom plate of the beam into the tops of the columns, drawing them up tight to the beam. We used steel shims under the column on the concrete pier to raise the column and beam to final height, checking level with a dot laser. Once the entire beam was leveled, we secured it with three 1/2-inch carriage bolts passed through the post and flange. To plumb the columns, we’d left about 1/2 inch of play between the concrete nipple and the columns’ interior diameter. Using a stick level held against a straightedge equipped with standoff blocks to compensate for the column’s taper, we nudged the bottom around until the column stood plumb in all directions. Later, we grouted the shim gaps at the pier with cement mortar, leaving weep holes to allow any condensation inside the columns to drain.
Finishing Up
We left the cast plinths and capitals loose on the columns, wedged partway up the columns, out of the way of the framing and finish work.
We framed the porch floor on independent supports, with the column piers buried below the framing line. The 1×4 tropical Ipe decking was fitted around the columns, then covered by lowering the plinth. The beam trim was cut around the tops of the columns; then the capitals were slid up into place. We secured the castings to the columns with Excel XPress polyurethane glue (AmBel, Cottonport, La.; 800/779-3935, www.excelglue.com) and a couple of countersunk stainless-steel screws. The countersinks were capped with epoxy filler and sanded to disappear. The columns arrived with rough-ground molding seams that required top-dressing with thickened epoxy (using West’s 401 filler additive), followed by sanding to produce a uniform smooth surface before painting. The completed assemblies were sprayed with latex primer, caulked, and finished with high-quality exterior-grade latex trim paint.
David Baud is president of Baud Builders in Narragansett, R.I.