Test Fitting the Door Blank
In the bad old days, a door blank was truly a “blank.” Cut square on all four sides, it had to be trimmed — and the latch side beveled — on site to fit the opening. Still available, but often only by special order, this type of door is called “full and square.”
These days, “prefit” door blanks are more common; they’re beveled on both sides and slightly undersized, so a 3/0 door blank should fit perfectly inside a 3-foot jamb opening.
Before making any cuts, I like to prop each door blank inside the designated jamb, shim it tight against the head, and check the fit on all sides. If the jamb was installed without stops, I tack a short length of scrap to the head jamb to prevent the door from falling backward.
It’s particularly important to make sure that the latch-side edge of the door is beveled, and that the bevel faces inward. To prevent a costly mistake, I put a mark on the top corner of the door that reminds me where the hinges will go.
On those occasions when I’m installing a “full and square” door, I hold the latch side jamb tight against it; then I open my scribers to 3/16 inch and scribe the door. I keep an older Porter-Cable 9118 planer permanently — well, almost permanently — set on a 3-degree bevel, and I always work from the same side of the door, so it’s a simple matter to put the right bevel in the right place.
Before I take the door out of the opening, I set my scribers to the proper width and mark the cut for the bottom of the door. In most cases, I like to see a 1/2-inch gap between the bottom of a door and the finish floor; I usually leave 1 inch of space beneath bathroom doors to allow for ventilation.
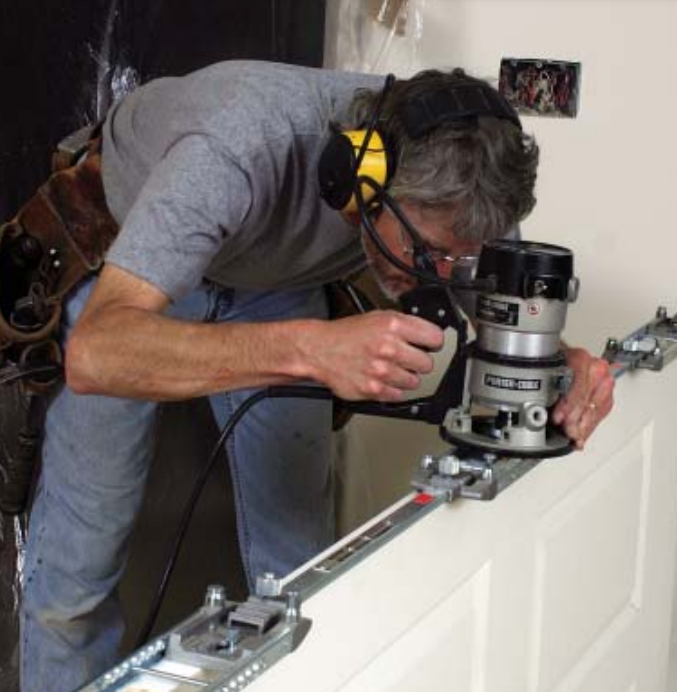
For years I cut door bottoms the tedious, old-fashioned way, using a straightedge to guide a standard circular saw. Last winter I started using the Festool plunge-cut saw and guide-rail system. With this tool there’s no need to measure for an offset — or to knife-cut the grain to prevent splintering. Instead, you just clamp the base on the cut line and the rest is gravy.
Like all Festool products, the saw is hideously expensive, but it’s well worth the cost if you hang a lot of doors or need a first-rate dust-collection system.
Mortising Hinges
If I’m hanging just one door, I mortise the hinges freehand with a laminate trimmer and a chisel; for more than one door, I use a full-size hinge template.
Manufactured hinge templates come in a variety of styles. Fixed units, such as those from Templaco (www.templaco.com), are inexpensive and easy to set up, but you need a different one for each size hinge, and they take up valuable storage space.
I use a Bosch adjustable hinge template (www.boschtools.com). It’s a bit of a pain to set up but extremely versatile — and when I’m done, the whole contraption fits into a case that’s not much bigger than a lunchbox.
After assembling the template and setting up the router, I practice on a 2×4 to make sure that the location of the hinges and depth-of-cut are correct. I secure the panel on its edge in a door buck, then fasten the template to the door using the pins provided.
To prevent chipping, I rout the top and bottom edges of the hinge mortise first; then I plow back and forth across the grain before making a final pass around the perimeter of the template to make sure the edges are crisp and smooth.
After the template is removed, a corner chisel makes quick work of the radius corners left behind by the router bit. I check the fit of each hinge, then use a self-centering Vix bit to drill for the screws. To allow wiggle room when hanging the door, I put only two screws in each hinge at this time and leave the screws loose.
The jamb gets mortised in place, following the same procedure as for the door. Then I separate the hinges, fasten the loose hinge leaves to the jamb, and go back for the door.
Hanging the Door
I set the door panel in front of the opening and lever the hinges into position using a foot-operated board lifter that I bought from a drywall supplier (www.marshalltown.com ). After the hinge pins are in place, I tighten the screws.
Now I’m ready to fasten the latch side jamb. With the door closed, I shim the jamb at the top and the bottom, making sure that the reveal is the same on the side as it is on the top of the door.
Then I open the door and pin the jamb by driving a pair of nails underneath each set of shims. I use a combination square as a straightedge to align the jambs with the drywall.
When I’m satisfied that the reveal is consistent and — most important — that the door swings freely, I nail through the shims to make sure they can’t slip loose. The jamb also gets shimmed and nailed behind the latch.
Applying Stops
If I didn’t tack on the stops when I assembled the jambs, I usually hold off until I’m set up to run casing and baseboards.
To lay out the stops, I mark a point on the face of the jamb that corresponds with the inner edge of the door, then scribe a line with a combination square. To prevent the door from binding (especially after it’s been repainted a few times), I leave the pencil line showing everywhere except for the point where the strike plate will be located — usually 3 feet above the floor.
Until the lockset goes in, I pin the stops with just three or four brads each. Once I’m satisfied with the operation of the door — when I hear that subtle, reassuring thunk as it shuts smoothly, with no bounceback — I’ll nail the stops home.