
For all of the trim jobs and cabinet installations I do on site, I need a good on-site “shop”—a place, usually in a living room or garage, where I can set up my tools, a cutting station, and an assembly area. The heart of that setup is a set of box beams that I use as my workbench, as a stand for most of my power tools, and for creating a dead-flat assembly platform.
I learned how to make these box beams (sometimes called “strongbacks”) 35 years ago when I shared a co-op workspace with a young Swiss cabinetmaker, who proved to me how versatile a pair of well-made box beams can be for any shop. The important features of these are that they don’t flex and that they’re dead-straight so I always have an accurate straightedge. This straight reference is a key to quality trim carpentry and assembly in any house, but especially in the old 19th- and even 18th-century homes in and around New York City and Boston where I typically work. Because the box beams are easy to transport and move around, they are great for on-site work, and I use them all the time in my full-size shop, as well.
Tim Healey
Making a Set of Box Beams
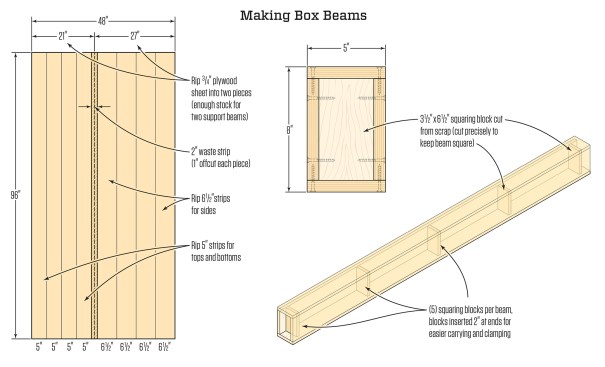
Each box beam measures 5 inches wide by 8 inches tall and 8 feet long. All the rips for two beams (one set) come from one sheet of 3/4-inch, shop-grade plywood. Making the top 6 inches wide makes a slightly better work surface, but requires one extra rip from another sheet of plywood. I cap the top with 1/2-inch Homasote to make a finish height of 8 1/2 inches. It is important to make any additional beam sets the exact same height for large build platforms, like the one I used for routing a 60-inch radius with a trammel router jig (see “Curved Paneling for a Circular Room,” Aug/16). The 6 1/2-inch rips for the sides of the beams must be straight, parallel, and perfectly matched.
Each beam has five interior squaring blocks that are cut from scrap material. Thickness is not so important for these, but they must be cut precisely to ensure the beams run straight and square. A few biscuit joints help with assembly of the beams and add strength. Glue and screw the beams together, clamping them tight.
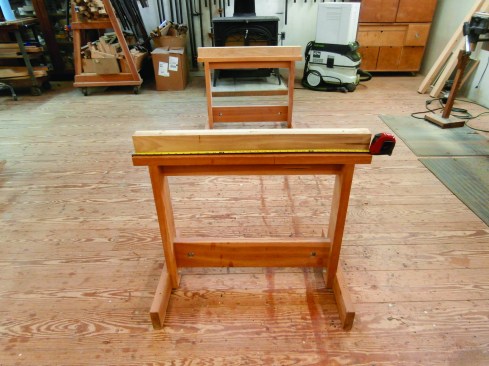
To support the beams, I make pairs of trestle-type sawhorses out of vertical grain fir (I select clear, 36-inch lengths out of 2×10 rafter stock from my local lumberyard). The horses measure 28 inches high with a 2×2 straightedge on the top bar that can be removed and re-milled as it wears out.
Using Box Beams
Large fixed tables are wasted space in any shop. If I need a large table for layout, I clear space and drop a sheet of plywood on the beams. A workbench is made by screwing a half sheet of plywood to the beams. All Domino work and all sanding happens on the beams. I cut 1-inch-wide strips of Homasote and screw them to the beams as stop cleats for holding pieces for sanding. This can be done hundreds of times with no damage to the beams.
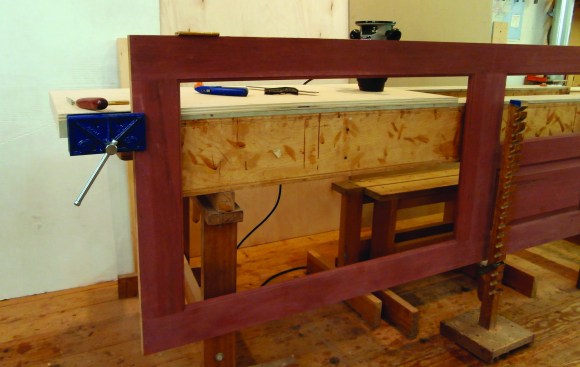
I also lay out and biscuit all my kitchen and built-in storage boxes on the beams. Basic cabinets can be glued up and clamped together on the beams. A set of two perfectly matched beams is essential for clamping up a door that is flat and has no twist. If I need a tail vise (which I use for holding doors when planing the edges and mortising hinges), I double the plywood thickness on one end and overhang it 8 inches to accept the vise (see photo below). Two beams and a few bar clamps make an excellent press for gluing up thick stock from thinner boards (for example, sometimes my door stock is 1 1/2-inch-thick stock made from 3/4-inch boards).
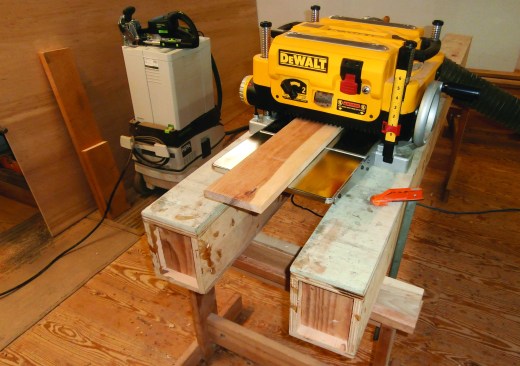
The beams work great as power-tool stands, as well. I set up my miter saw on them and form up a couple of (or more) T-supports from scrap to pick up long stock. I also set up my portable 13-inch planer on box beams, which make a rock-solid platform on which to thickness long boards. I have a 24-by-36-inch piece of MDF drilled for one of my routers that I screw to a pair of beams to create a router table.
I always set up a pair of beams and horses on any big jobsite, and most of the time, other carpenters on the project ask if they can use them to help with some task or to make some cut. I tell them it’s fine, and when they’re done, I make them a quick drawing on a piece of scrap lumber so they can make a set of their own.
Photos by Mark Luzio