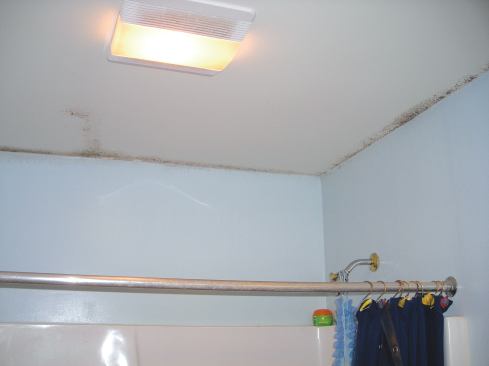
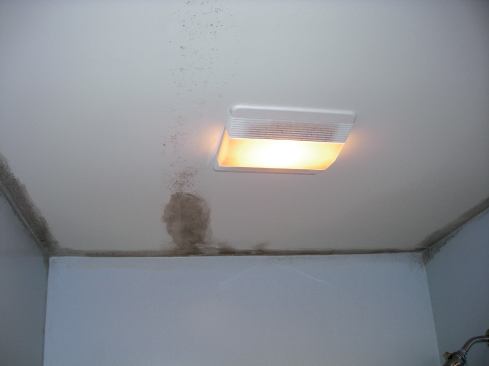
Mold and mildew growing on the bathroom ceilings was all the evi…
New Strategy
I have occasionally connected two bath fans to the same vent hood, but I use a wye fitting, not a tee. There must also be backdraft dampers on the individual lines to prevent one fan from blowing into the other. Because I don’t know a lot about the performance and durability of dampers, I prefer to run exhaust fans to individual vents. My first choice is always to exit a gable wall, with the vent hood preferably tucked up under the overhang to give maximum protection from the elements. My second choice is to exit through the roof; while any roof penetration is a potential leak, sometimes it’s unavoidable. My last choice is to vent through the soffit. Since I’m in a cold climate, I want to avoid introducing any heat source below the snow-covered eaves, and the soffit vent on vented roofs would also allow some of the hot, moist bathroom air to get pulled back into the attic.
Luckily, the customer on this job chose performance over aesthetics, and we decided to abandon the original shared roof jack and run each of the fans to a new individual termination jack. For the master bath, this meant a new roof vent a few feet away from the fan. For the shared bath, we found a spot on an east-facing gable wall, under the north-facing rake overhang. This will provide maximum protection from the prevailing northwest winds and reduce the chance of sleet and ice freezing the vent flap shut.
Installing the Ductwork
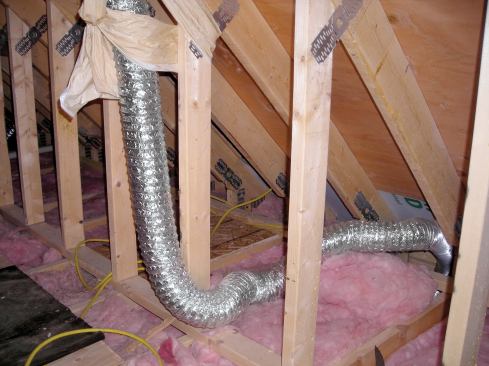
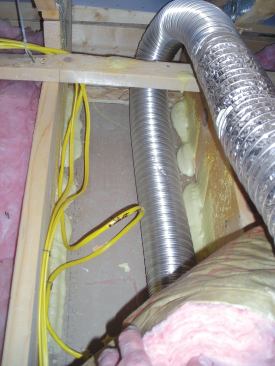
Typically the fan is located between two ceiling joists or trusses, with the exhaust port parallel to the framing members. Some fan manufacturers recommend running at least 2 feet of straight rigid duct before the first elbow so that the exhaust air can build some velocity. I usually follow this recommendation, but I try to turn the duct up and out of the insulation as quickly as possible. I bring it to its high point, then elbow to a horizontal position and gently pitch the duct down until it exits the house, to make sure that condensation drains toward the outside. (I once had a customer call me to fix a “roof leak” above the bathroom; it was actually condensation running down bath fan duct, which rose for about 12 feet before terminating through the roof.)
I use nylon straps to hang the duct – they’re much easier to work with than metal strapping. Each joint gets secured with at least three self-tapping screws and sealed with either water-based mastic or metal tape. I also make sure all the seams in the duct face up to minimize the chances of condensed water leaking out.
Insulation
It’s critical to insulate any metal exhaust duct to minimize condensation and conductive heat losses from the house. I’ve tried various fiberglass insulations that are wrapped and taped around the duct but have been disappointed with them all. They’re difficult to install, and the tape will probably fail in time due to the radical temperature swings that happen in an attic.
Now I buy 4-inch insulated plastic flex duct (the same nasty stuff we remove in most retrofits) and use that to insulate metal ducts. I cut off a workable length – typically less than 10 feet – and slide the insulating sleeve over the rigid metal duct. As you pull the insulation over the metal duct, the inner duct coil compresses and can be pulled out the trailing end. You have to install the insulation as you install the ductwork, a section at a time. Sometimes I can use the old flex duct I’m removing to insulate the new rigid duct.
The section of duct between ceiling joists is tricky to insulate; you can do it with fiberglass batts if you cut and fit it meticulously. Instead, I bring a small bag of cellulose into the attic, hand-shred it, and place it around the section of duct near the fan.
Controls
It’s generally recommended that you run a bath fan during a bath or shower and for 20 minutes afterward to remove all the water vapor. I know in my own home it took some effort to get my teenagers to even use the fan during their showers. But then, after they caught on, they would forget to turn the fan off, exhausting warm air from the house all day long in the winter.
So I typically replace the single-pole fan switch with a push-button electronic timer that operates the fan at 10-, 20-, 30-, and 60-minute intervals. I sometimes add a humidistat wired in parallel; if the homeowner forgets to start the fan with the timer or selects too short a time interval, the humidistat will turn on the fan. My customers like the automation option, although they usually have to adjust the humidistat in the spring and fall to account for the seasonal change in ambient relative humidity.
Some manufacturers are now adding humidistats to their fans. In the past, I’ve ordered controls from EFI (efi.org), but recently I’ve noticed that some of the box stores have started carrying electronic timers.
Testing Out
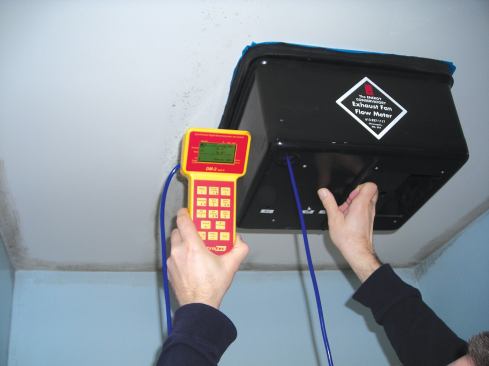
Because we’re doing ongoing work with this client, I decided to improve the ducting first, measure the results, and then later upsize the fans if needed. After we finished the installation, the master-bath fan, now venting up through the roof, was pulling 68 cfm through 4 feet of 4-inch rigid duct with one elbow. The shared-bath fan, now vented to a gable, was drawing 62 cfm through 21 feet of 4-inch rigid duct with two elbows. We increased the bathroom exhaust by roughly 50 percent just by replacing the flex duct with rigid duct. The customer reports that the mirrors are no longer fogging up during showers.
Pete Glogowski is a builder and remodeler in Charlton, N.Y. He is president of Summit Construction of NY.