Laying An Electric-Radiant Tile Floor, continued
Installing the Mat
The matting is purchased to fit a specific floor size, and the manufacturer’s instructions guide its orientation and placement. When planning a tile warming system, I follow three basic guidelines: no resistance wires within 6 inches of a wall (a waste of heat), no wires closer to the toilet than 12 inches (don’t want to melt that wax ring!), and no wires where the floor will be covered with permanent furniture or furnishings (can cause hot spots or overheating). Before leaving the factory, each mat is checked and marked for its electrical resistance, which must be verified on site by the electrician before the matting can be installed. The resistance should also be rechecked before the SLC is poured and again before the tiles go in.
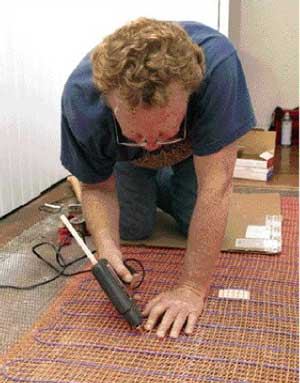
To help keep the wires, which are blue, flat against the plywood, I use roofing nails through the orange carrier netting. Once the mat has been unrolled and positioned, I stake it at the four corners, stretching the material as I go, then nail the interior with more nails. Because of the additional height added by the resistance matting, I need to keep this floor as flat as possible so the profile of the finished tiles is close to that of the strip flooring at the entrance to the bathroom.
Installing the MatFigure 3.Roofing nails (top) and hot-melt glue (see photo at beginning of article) help the mat lay flat, so that the resistance wires stay below the surface of the self-leveling compound. A groove cut in the plywood accommodates the power supply cable. |
The matting must be positioned so that the shielded cable linking the resistance wires to the power supply terminates as close to the junction box as possible. On this job, I pressed the cable into a relief I carved in the plywood underlayment to keep the thick cable below the profile of the matting. A much smaller wire, which connects the floor-level temperature sensor to the system thermostat, is also placed in this relief groove. This sensor provides more precise control than the eye-level box-mounted thermostats supplied with other floor warming systems. To avoid damaging the system, no nails or bare-metal staples should be used to secure the cable, so I use a hot-glue gun.
Since I want the surface height of the SLC to be as low as possible, I give the floor the once-over and secure any errant sections of the carrier netting with a few dabs of hot glue (see photo at beginning of article). I could also staple the orange matting to the subfloor, but I happened to have left my stapler at the shop on this day. Had the system been installed over a concrete slab, I could secure the netting with either hot glue or double-sided tape.
Pouring the Self-Leveling Compound
Since no two SLCs are alike, specific installation instructions must be followed to the letter; however, there are general guidelines that apply to all. In particular, the wet-to-dry ratio is critical, especially where more than one sack of SLC is needed to complete the work. There should not be any variation in mixing. To assure that, I use an idiot bucket for the liquid and a small measuring cup for the reserve liquid.
The instructions for most SLC mixes suggest a narrow volume range for the liquid component. For example, if the instructions call for 5 to 5 1/2 quarts of water, I size the idiot bucket for 5 quarts, and use a one-cup measure for the reserve liquid. Using the minimum amount of liquid results in higher compressive strength, while using the maximum results in a less robust mix.
Rather than just dump the mix in one spot, I try to distribute the material while I am dumping. Time management is essential to a successful pour, so while I’m pouring out the first batch, my helper is mixing the next so that there’s no time lag between batch pours. The entire floor must be covered in one shot, within five minutes. With SLCs, there is no finishing the other half tomorrow.
Pouring the Self-Leveling CompoundFigure 4.Despite its name, self-leveling compound should be persuaded by hand to produce the flattest surface. Rather than dump it all in one place, the author is careful to spread the mix as he pours it out. |
Not exactly self-leveling. Contrary to what the name suggests, most SLCs require human intervention if the surface is expected to be flat and smooth. I use a flat trowel to drag and drop material so that all portions of the floor are wet with mix. This allows the material to flow faster, an essential where the thinness of the pour, the galvanized mesh, and the resistance mat all conspire to slow down the SLC.
An important part of the prep process for SLCs is closing off any holes through which the material could flow; I use duct tape and backer rod for this task. Though you can’t see it in the photos, I stuffed some fiberglass insulation to seal the gap between the closet flange and the plywood subfloor.
At a little over 40 square feet, this floor required just under two sacks of SLC mix. With SLCs, it’s essential to have some material in reserve, just in case. Even if the supplier was only a block away, it’s highly unlikely you could get a top-off batch ready before the first pours had begun to set.
With a decent helper, I can handle a four-sack installation; however, when the floor approaches 100 square feet, I hire a pumper to speed the process and use my helper to assist in distributing the mix. After rough-troweling, I keep a close eye on the floor and use a long-handled rake to even out any irregular areas. Once that is done, though, it is remarkable how smooth and flat the resulting floor can get before the material hardens.
Cutting the Tile
The mosaic floor shown here has a common design feature that required some individual white tiles to be removed and replaced with darker accent tiles. Because of this, and because cutting small tiles can be tedious and time-consuming, I prefer to dry-fit all the sheets before mixing any thinset mortar. I had the benefit of the overhanging wainscot and baseboard at the walls, so I only needed cut pieces against the tub and at the threshold. I adjusted my layout to yield same-size cuts at these locations and marked the sheets for cutting.
When dealing with small, porous stone tiles, like the ones shown here, I prefer to dry-cut to minimize color variations in the finished job. This is because porous stone tiles can retain moisture, which can cause the grout to dry to a color different than grout surrounding tiles that are completely dry. For safe, efficient cutting, I always clamp small tiles tight. The thickness of the stone tiles varied slightly, so I used a sheet of 1/8-inch-thick packing foam to ensure uniform clamping. I clamped the tiles to the bench with one of my straightedges and a couple of spring clamps. I made sure each tile was fully supported by the plywood workbench before beginning the cut.
Cutting Mosaic Tile
Figure 5.For cutting, the author clamps the small mosaic tiles to a workbench with an aluminum straightedge, using a thin piece of foam to protect the tile surface. He then dry-cuts to the line with a grinder. |
Dry-cutting any type of tile generates a lot of heat, much of which is carried away from the blade and the tile by the dust and chips. But if the cut is too deep, enough heat can build up to prematurely age the blade, or cause fractures in the tile. For this reason, I try not to hog off too much material. Instead, I bear down lightly and make several shallow passes. This helps extend the blade’s life and reduces chipping.
Although it’s not obvious from the photos, the cut is about 1/64 inch away from the line. Once the kerf bottoms out, I use the side of the blade to remove excess marble right to the line — similar to the old-school carpenter’s practice of using a rough saw cut and finishing with a plane to trim the piece to its finished size. I leave a little bit when roughing a tile to account for slips, soft material, and other glitches that might ruin a piece if I start sawing right at the cut line.