Laying An Electric-Radiant Tile Floor, continued
Dry-fit first. I dry-fit the entire floor, marking the sheets sequentially so that I could stack them in the order they would be installed. This way, with all the cuts made and the tiles ready to install, I can fly through the task of setting the tiles without having to make frequent, disruptive trips to the tile saw. In the past, I used regular masking tape to mark the sequence, but that sometimes left a hard-to-remove residue on the tiles; I now use low-stick painter’s tape instead.
Dry-Fitting the TileFigure 6.Before spreading any thinset, the author dry-lays the entire floor. This gets all of the tricky cutting done before the wet-setting begins. He labels each mosaic square in sequence so that installation proceeds smoothly. Note the missing accent tiles. |
Smooth Installation
Because the wall surfaces were so straight, thanks to the superb workmanship of the carpenter, and because we were careful to select a tub whose face was also very straight, this was one of the few installations I have done where no layout lines were used. Before removing the dry-fit sheets, I made a small registration mark on the tub so the first sheet was positioned in the exact spot needed to guide the remaining tile sheets.
When working with small tiles, I try for as accurate a placement as possible, since sliding mosaic sheets around in wet thinset is the ideal way to clog the grout joints with unwanted adhesive and create a nightmare cleaning task. When I am satisfied with the positioning, I use a soft rubber grout trowel to press the sheet down into the adhesive layer. In the past, when installing tiles over setting beds of fresh mortar, I would use a hammer and a beating block, and probably displace a bit of mortar, to get the thicker tiles to sit even with the rest. But on thinbed work over a hard setting bed, that technique would likely result in a few broken tiles.
Setting the Tile
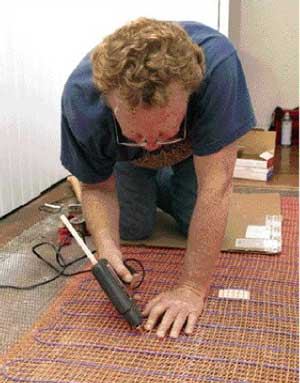
Figure 7.After placing the first mosaic sheet to a layout line marked on the tub, the author gently presses it into place by hand and with a rubber float. He takes care not to press excess thinset up into the grout lines, which would require time-consuming cleaning. Because the tiles were dry-fit first, the wet setting goes quickly. |
Because all the tile sheets were prepared before I spread any thinset, it took less than an hour to cover the entire floor. One reason for such a quick install is that while I paid a lot of attention to aligning neighboring sheets, no time was wasted on setting the tiles at an equal height. That meant that there was more lippage than would be considered appropriate, but I followed with a fast, accurate technique that resulted in a perfectly smooth floor — sanding.
Sanding the SurfaceFigure 8.Rather than fuss with leveling the irregular stone tiles from below with extra thinset, the author smoothes out any unevenness in the surface with a belt sander. |
Though surface grinding of soft, unpolished stone is usually thought to require expensive, specialized equipment and rare grinding compounds, it can actually be rather easily accomplished with an ordinary belt sander and rough-grit carbide belts (50 to 80 grit for starters). Of course, experience goes a long way with this technique, but with a bit of experimenting — to avoid burnishing the tiles with too fine a grit, or gouging them with grit that is too rough for the density of the material being worked — most installers can learn the technique in less time than it would take to shim up errant tiles with adhesive.
Even though the relatively soft marble tiles shown here will quickly wear down the rough-grit belts, the waste material does not clog up the remaining finer grits the way wood does. I use a belt until I feel the drag lessen, then replace it with a new one. However, I don’t throw out the old belts yet; instead, I re-use them for a second pass to remove scratches left by the first run of the sander. Often, this will leave a surface smooth enough for the honed look I prefer.
Once I was finished with the belt sander, I used a simple disc backing, chucked into a 300-rpm drill, and about a half dozen 200-grit carbide stick-on sanding discs to smooth out the remaining scratches. The resulting surface is incredibly smooth, and was a snap to grout.
Contributing editorMichael Byrneis an expert tilesetter and consultant in Los Olivos, Calif. Photos courtesy of Mike Mesikep.