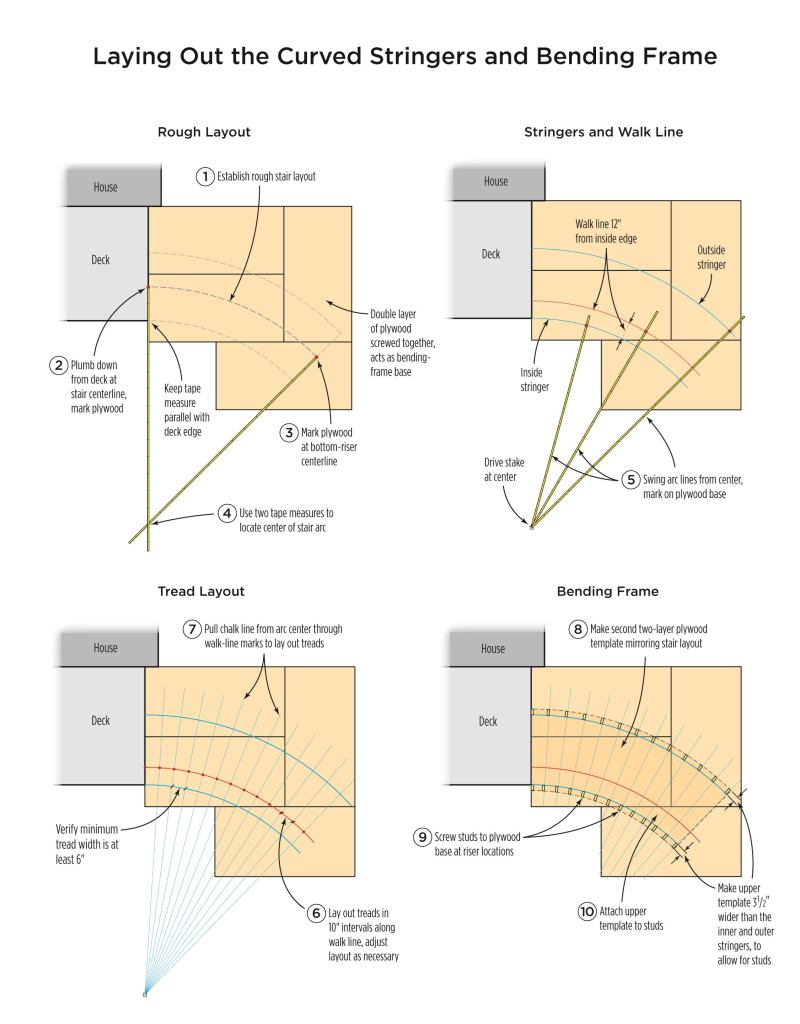


Mike Guertin
Swinging a tape from a wooden stake, the author lays out the inn…
Building the Stringers
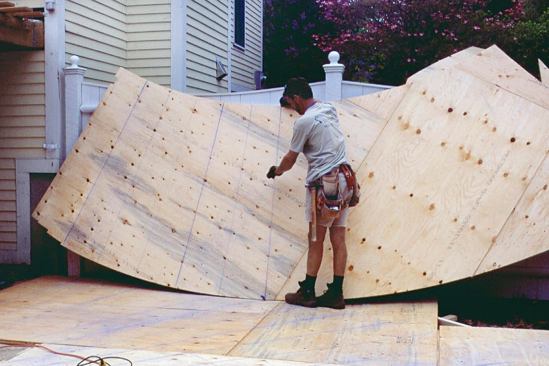
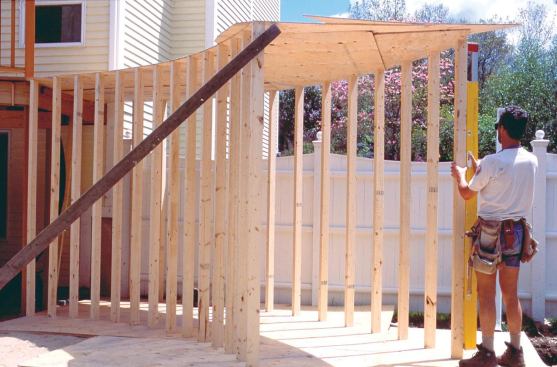
The stable frame makes it easy to lay up the stringers, and its studs double as layout guides for the risers. I generally rip 16-inch-wide strips of 1/2-inch pressure-treated plywood for the stringers, enough for four plies with joints offset by 2 feet. While 16 inches may seem excessive, it’s necessary because the tread cuts are quite deep at the outer stringer.
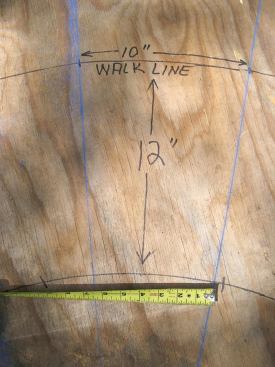
The face of each stud represents a riser position. To establish the line representing the top of the stringer, I make a story pole and use it to mark the tread elevations on the face of each stud. Because I’m usually working on ground that’s not exactly level, I establish a level reference line on the inner and outer frame walls using a laser level.
It’s important to allow for the rough and finish tread thicknesses. I figure 11/2 inches for a structural 2-by tread, 1/2 inch for spacer strips (for drainage beneath the finish treads), and 1 inch or 11/4 inches for the finish tread material — usually decking.
Laminating the stringers. Before assembly, the plywood strips at the top and bottom of the stringers have to be trimmed to match the deck frame and the landing surface. I make cardboard templates for the plumb cut at the top and the horizontal cut at the bottom to use as guides.
To start the process, I align the top edge of the first plywood layer to the tread marks on the studs and tack-screw it in place. If needed, I use clamps to draw and hold the layer tight to the studs while I’m driving the screws. Since the tack screws will have to come out later, I drive them at an angle to the studs through the top and bottom edges.
I then apply a generous squiggle of exterior-grade construction adhesive to the first layer and screw on the second layer with 1-inch-long galvanized or stainless screws. I offset any joints in the laminations by at least 2 feet, and glue and screw the third and fourth layers with successively longer screws driven from both sides. I install the screws for the first, second, and third layers about 8 inches apart along the top and bottom edges. Once the fourth layer is in place, I drive long screws from both outside faces in a 4-inch to 6-inch grid. To make sure I don’t hit any screws when making the riser cuts later on, I keep all the fasteners at least an inch away from the face of every stud.
Riser and tread cuts. To lay out the riser and tread cuts on the stringers, I hold a straightedge against the faces of matching studs on the inside and outside frame walls and mark across the tops of the stringers. The point where the line crosses the edge of the stringer is the outside corner of the riser-tread cut lines.
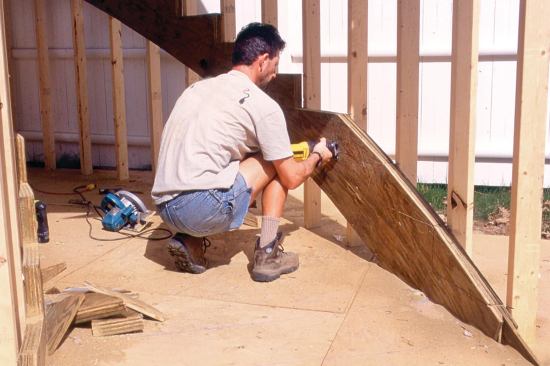
I wait a day or two for the adhesive to cure before cutting the stringers. I set the bevel on my circular saw to match the slight angle where the risers meet the stringers. The tread cuts are flat — no bevel. To make sure I don’t overcut the inside corners, I use a recip saw to finish the cuts.
Structural Treads and Risers
Structural treads of pressure-treated 2-by and risers made from two layers of pressure-treated plywood tie the stringers together and provide a solid base for finishes. I make a tread pattern from cardboard or thin plywood and rip the wedge-shaped rough treads from 2x12s. The wide end of the treads is usually bigger than a 2×12, so I glue and pocket-screw the drop from the taper cut to the rough tread. I typically make the treads a little long, then cross-cut them to length; the ends are slightly curved but can usually be cut with a circular saw.
The risers stabilize the stringers and support the treads, so I use a minimum of 1/2-inch plywood. I rip the riser stock to the same width as the riser height and cut the risers to the same length as the outside dimension of the stairs. Rather than trying to account for the slight bevel at each end, I just cut the risers square and 1/8 inch short. I attach the inner riser layer to the stringers first, using screws and construction adhesive. I then install the tread below, and screw the inner riser to its back from behind. The inner risers also support the front edge of the treads above, so I’ll run a bead of construction adhesive along the top of the riser before installing the tread. The second riser layer laps the front of the upper tread, and is screwed and glued to it. This helps to keep the treads from warping.
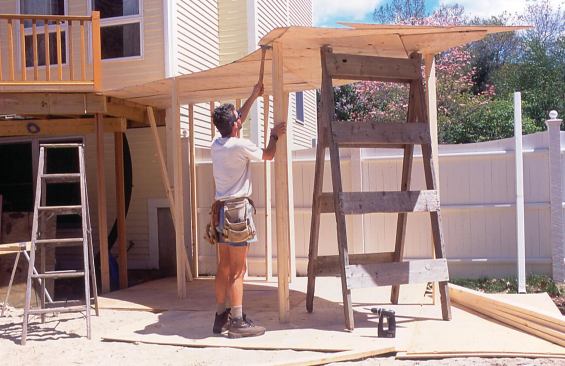
Eventually, as I work up the staircase, the top of the bending frame will interfere with tread installation. At that point, I just install the risers and wait until the frame is dismantled to install the treads.
Install the Finishes
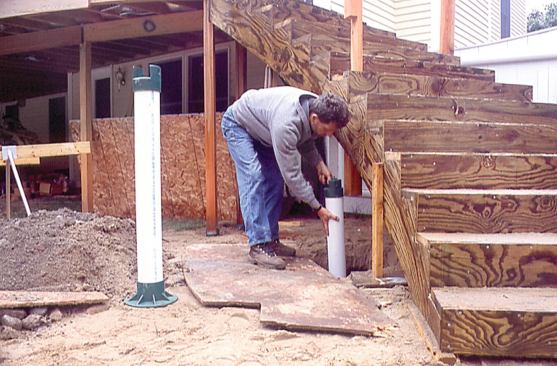
I let the riser and tread adhesive cure for a day or two before I remove the frame. The rough staircase emerges from the frame ready for intermediate support posts and the finishes — skirts, risers, treads, and railings — though sometimes you’ll find a screw tip poking through a stringer face that needs to be filed or ground off flush. On large staircases, the outside stringer needs to be supported before the studs are removed, which you can do by cutting and fastening a couple of 2x4s and setting them on blocks until permanent posts and footings are placed. Finally, I install the top treads and risers — the ones I couldn’t reach before.
Curved stair stringers often need intermediate supports, and I extend these supports upward to double as guardrail posts. I space posts along the arcs at equal intervals — between 4 feet and 6 feet apart — and set them on footings.
It usually takes as long to apply the finishes as it does to build the curved stair frame — or longer, depending on the details. Skirtboards can be either closed or mitered into the risers. Closed skirtboards require less work and look better over time. I clamp, glue, and screw synthetic or rot-resistant wood skirts alongside the stringers, shimming where needed to maintain a fair curve.
Water that gets beneath the treads needs a way to drain, so I bore a few 3/4-inch holes through the structural treads and lay minimum 1/2-inch wood strips over the rough treads as spacers for the finish treads. I rip the finish decking strips on a taper and ease the edges. This looks much better than having a couple of straight decking strips and a wedge-shaped closing piece meeting the riser at the back of the tread. (Remember that this won’t work with the new “capped” composite decking products, because easing the edges exposes the material’s substrate.) I also space the finish riser boards 1/4 inch from the structural risers for drainage.
Bending and laminating curved rails is an article in itself. Done correctly, a curved rail should have the same helical shape as the stringers — which means more lamination or some careful shaping. A useful workaround, however, is to cut rails out of wide 2-by stock to match the curve of the stair, as was done on this project. Rails made this way will have a slightly odd slope as they turn up the stair, so the technique only works if the intermediate posts are less than 4 feet apart.
Cost considerations. The job shown here was finished with clear red cedar trim and railings. It cost the customer about $3,000 more than the same set of stairs built in an L-shape. The job took two men four days, or eight days total: a day for layout and building the bending frame; a day to laminate and cut the stringers; a day to make and install the rough treads and risers; a day to dismantle the bending frame and install the tube footings; and four days to make and install the finish skirts, treads, and railings.
Mike Guertin is a builder in East Greenwich, R.I., and a regular presenter at JLC Live. This article first appeared in Professional Deck Builder magazine.