
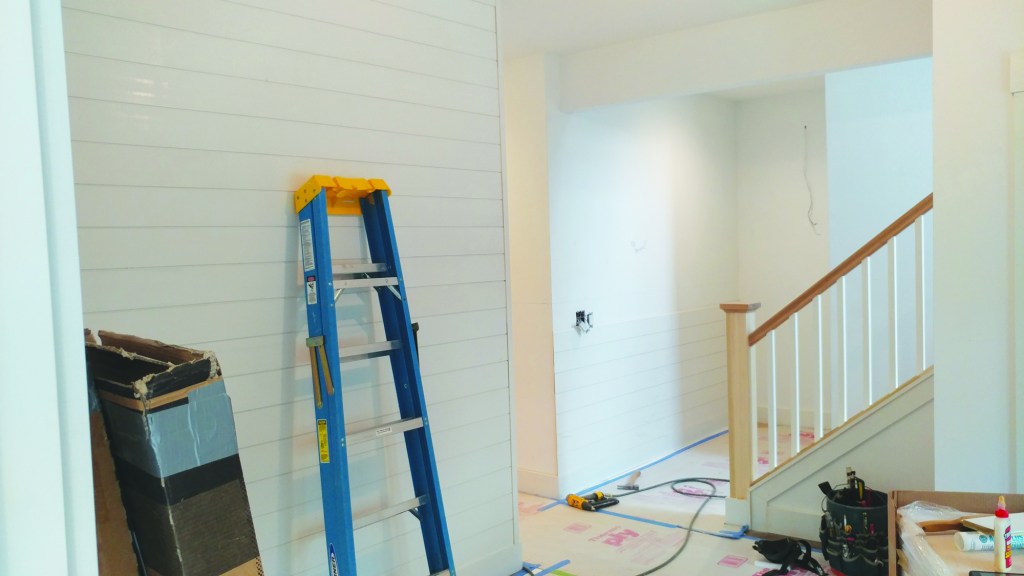
In the homes we trim, we often add visual interest to the interior by installing 1×6 or 1×8 shiplap siding. Whether used as wainscot in a basement or bathroom renovation, a feature wall for a plain room, a visual offset to a niche space for laundry, a coat rack, or a fireplace, or for an entire room, shiplap is a great alternative to plain drywall, and a profitable upsell.
The most common shiplap styles are tight gap and nickel gap. Technically not shiplap siding, tight gap is S4S 1×6 or 1×8 stock that is butted edge-to-edge, but it is lumped into the same design conversation, so I’ll include it here. A tight-gap installation is more commonly used with rustic, rough-sawn, and knotty “barnwood”-style siding, though it also works with smooth, knot-free siding with a rustic style of paint.
Nickel gap, on the other hand, is rabbeted on the top and bottom so each piece overlaps the next, leaving a slight gap (about the width of a nickel) between the boards. Smooth-faced, painted nickel-gap poplar shiplap leaves nice, clean lines and accentuates a room—there’s a reason it’s popular on TV.
Terminations
When we’re working with shiplap, the starting and stopping points—or terminations—determine how we install it and what tools we reach for to get it done. In a square room with no outside corners, the terminations are pretty basic and the main layout challenge is to avoid visible “slivers” (more on that below). Most of the houses I trim, however, have an open floor plan with few places to end runs.
For example, when there is a run of shiplap down a hallway and the termination point is an outside corner, I like to butt the shiplap into a square stop that I mill from 5/4 stock. On paint-grade trim, I sand the cut edges smooth to remove the table saw’s swirl marks. For stain-grade work, I like to use maple, alder, and even white oak, cutting a shallow rabbet in the stop to cover the shiplap ends.
A table saw makes quick work of both cuts—rabbet and square. For the rabbet, I usually run one side, flip the 5/4 stock over and adjust the blade, and run the other edge. If there’s a lot to run, it probably makes sense to set up a dado blade or even a router table with a straight-cut bit, depending on the scope of work.
For mid-wall terminations, I like to run my stops square and butt to them, though if I’m worried about expansion and contraction—say, on a beach house—I might considering rabbeting both sides of the stop to cover the ends of the shiplap. For most of the shiplap we install, however, I think the butt joint leaves a cleaner look; I don’t like the little holes the rabbet reveals where it covers the nickel gaps.
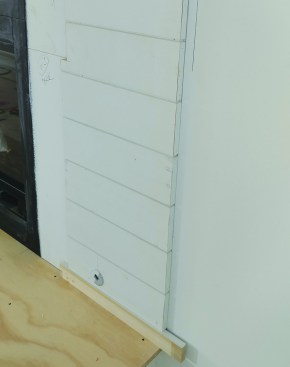
To terminate a run of shiplap in the field, the author uses mitered returns cut flat on a sliding compound miter saw.
This hides the end grain.
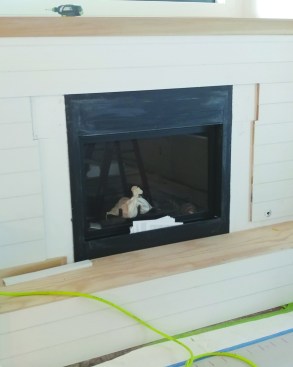
Another way to stop shiplap in the middle of a wall is to cut miter returns, as we did on a fireplace surround we recently completed. I cut the short return pieces on the flat with a sliding compound miter saw, then fastened them with glue and a 23-gauge pin nailer. Setting the bevel of the saw to slightly more than 45 degrees (like 46 or 47 degrees) drives the outside of the miters together, resulting in tighter joints.
This detail can also be used when wrapping the shiplap around a corner into another room. To make sure there’s nothing too irregular about the corner before I start, I check it with an angle finder like a Starrett ProSite protractor, which will tell me exactly how far the corner deviates from 90 degrees.
Miters can also be used to wrap outside shiplap corners and make transitions into other rooms.
Intersections and Transitions
I typically install shiplap over drywall, so it can be tricky to figure out how this element fits with other wall trim, such as base moldings, door and window casings, and crown molding. Is the shiplap thicker than the casing? How do I transition to the base molding? Do I want the shiplap to butt into the base or lap over it?
The answers to these questions will vary based on context. For instance, to accommodate shiplap, it might not be worth tearing out the existing base molding in a renovation; on the other hand, in new construction, it might be worth adding a square stock base. There’s no simple rule of thumb, but there are some easy options.
One approach is to apply a base made of thinner stock (typical base moldings measure 7/16 inch thick) over the shiplap, though it will then be necessary to figure out a detail where the base meets the door casing. The best way I’ve found to create reveals around the base without making it proud of the door casing is to pack out the base so that it protrudes just enough to clear the shiplap and form a shadow line. For example, a 1×6 packed out 1/8 inch is still behind the 5/4 casing but proud of the shiplap, and it blends nicely with the casing. To achieve the pack-out, I use Ram Board or Thermo-Ply to shim it. If your casing allows, you can use lauan plywood, which is around 3/16 inch thick.
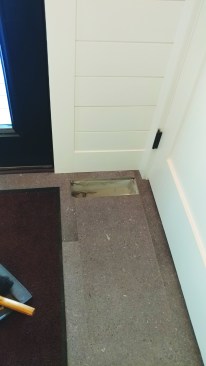
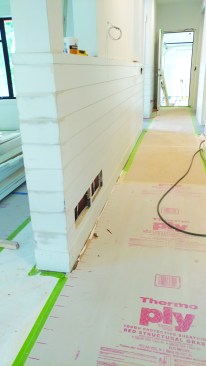
Where the shiplap intersects with existing or to-be-installed trim elements, such as base and casings, the author either uses thicker, 5/4 stock for the trim, or packs the trim out so that it’s proud of the shiplap.

When using shiplap as a wainscoting, consider device heights and how the switch plates will intersect with the shiplap or whatever top cap assembly is being used.
While I usually replace 1-by trim with 5/4 material to create a reveal where shiplap butts up against existing casing, another option is to add a backband to standard 1-by trim. Your lumberyard probably stocks several different backband profiles, but it’s not difficult to mill your own from 5/4 stock with a rabbet and some roundovers.
Layout
Once the termination points have been laid out and the type (dado, butt, return) determined, it’s a matter of nailing the shiplap to the wall. Almost. First, avoid slivers. You don’t want to start running the shiplap and end up with a sliver at the top, or worse, a tapered sliver. So, a little math goes a long way.
I measure the wall height in a few places, measure the shiplap’s face coverage plus the reveal, then—using a baluster-layout app called BalusterPro on my phone—divide to see how the pieces land. Depending on the width of the border piece, you can divide it in half—like tile or a suspended ceiling with even pieces on each end—or put the whole border piece on one end. Sometimes, it looks better to have the border piece at the bottom, sometimes at the top. It’s personal preference.
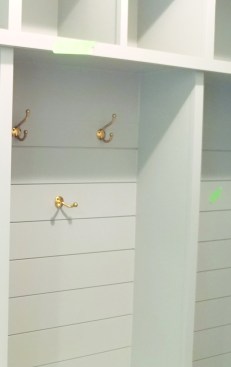
The author plans layout to avoid “slivers,” or narrow lengths, at the top or bottom of a horizontal run when installing shiplap within a shelving unit …
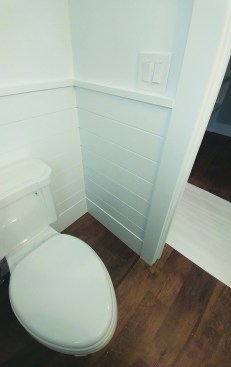
… or as wainscot.
Once I’ve figured out the starter-board dimension and ripped it to width, I use a laser to make horizontal reference marks around the room, and I find and mark the studs. Then I level the starter board, which I nail in place tongue side up with an 18-gauge brad nailer (in some cases, it’s better to run the starter parallel with the ceiling, if the ceiling is out of level).
I face-nail along the bottom, then along the top through the tongue and into the studs. With nickel-gap shiplap, the nails have to be placed high in the tongue so they aren’t visible in the gaps. On tight gap, there’s no tongue, so face-nailing is the only option.
While tight-gap siding can be installed from the top down, we usually run it from the bottom up. At the top, we install a trim piece—either crown molding or a flat stop—to close the gap.
V-Joint Shiplap
V-joint, or 45-degree shiplap, is a little trickier. It takes more patience, layout, and time to get it right. We start by measuring some reference lines off the ceiling and square them up using the 3-4-5 method (a laser level can be used instead). Both vertical and horizontal reference lines are needed to create an accurate 45-degree layout on the walls. Once the reference lines are established, I measure back using a framing square to establish the 45-degree angle and install the first piece. As I continue installing the shiplap, I keep checking along the way to make sure both sides of the V descend the wall at the same rate.
A laser is my friend for the V because the vertical line is so important. On a short wall, only a single, centered vertical layout line is required; on a longer wall with multiple V’s, the verticals need to be laid out carefully depending on where the V points will be located.
After laying out the verticals and snapping those lines, I lay out and snap a few horizontal lines for reference. It doesn’t matter where the horizontals are located as long as the shiplap tips on either side of the verticals are the same distance from the horizontal reference line. As each course is installed, I keep measuring from the line to make sure the layout is staying true.