
Risers and Treads
At this point, the newel posts are up and the skirt boards are cut and installed. The bottom step has a radius-end tread, which installs on a premanufactured wraparound riser box that returns to the bottom newel post. On the second and top steps, the risers and treads must be scribed to the newel posts. The landing requires a special tread with a rabbeted underside so that its top is at the same level as the 3/4-inch strip flooring, but from the front it will appear to be as thick as a manufactured tread (1-1/16-inch).
Installing risers. Eventually, the risers will sit on and cover the treads. With the type of frame that I build, the treads are well supported and won’t move up and down — so this gap along the riser edge is going to stay tight. But the treads are usually around a foot wide and they’re going to move as the humidity varies. I run the tread under the riser edge so that any movement does not show up as a gap.
Risers can be ripped to a width equal to the net rise minus the tread thickness. For measuring and marking risers and other pieces that meet the wall skirt on one end and the newel post on the other end, I use my handmade stair gauge (Figure 7). Alternatively, you can use a scribe. Cut the risers with a 45-degree bevel to match the face skirt. Install them by spacing off of the sub-tread with tread scraps, gluing the miter joints, and nailing off from the bottom working upwards.
![Figure 7: A stair gauge helps to mark cuts for both risers and treads. You can make a stair gauge out of two pieces of plywood, cut off at a bevel, screwed to a stick cut to the right length. You just push them into place and screw them together with the stick. Or you can make up a permanent adjustable gauge by routing an adjustment slot and attaching the bevel pieces with adjustable wing nuts. You can also buy a gauge like the one shown here. [Editor's note: The gauge tool on left has been discontinued since the article’s original publication; the adjustable gauge on the right, the “Stair Wizard” from DNB Tools, is currently available and sells for about $200 on Amazon.]](https://jlconline.stg.zonda.onl/wp-content/uploads/sites/4/2025/06/0399-jlc-dixon-stairs-remediation-07.jpg?w=653)
Figure 7: A stair gauge helps to mark cuts for both risers and treads. You can make a stair gauge out of two pieces of plywood, cut off at a bevel, screwed to a stick cut to the right length. You just push them into place and screw them together with the stick. Or you can make up a permanent adjustable gauge by routing an adjustment slot and attaching the bevel pieces with adjustable wing nuts. You can also buy a gauge like the one shown here. [Editor's note: The gauge tool on left has been discontinued since the article’s original publication; the adjustable gauge on the right, the “Stair Wizard” from DNB Tools, is currently available and sells for about $200 on Amazon.]
After the risers are in place, there is one quick task to take care of — notching the face skirt where the treads slide into place under the risers (Figure 8).
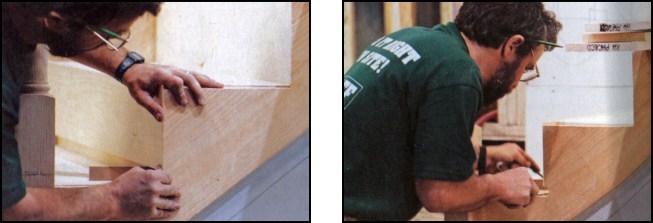
Figure 8: The author spaces the finish risers off the sub-treads before gluing the miter joint and nailing the riser off (left). He then notches the face skirt to make way for the treads later on (right). The depth of the notches equals the tread width minus the net run minus the overhang. For example, if the treads are 11-1/2 inches, and the net run is 10 inches, and there’s a 1-1/8 overhang, the face skirt needs to be notched 3/8 inch.
Treads. Manufactured treads are reversible because they are sanded on both sides. After scribing each tread to fit (Figure 9), I put construction adhesive on the underside of each of the treads and slide them underneath the already installed risers.
If the fit is tight, try using a 5-lb. non-marring rubber hammer to persuade them into place. I use my white rubber Porta-Nailer mallet. Be sure to double-check the overhang. The risers will pin the treads to the frame on the backside, but the treads still have to be nailed off along the front to ensure a good glue bond. To finish out the treads, I glue, and brad scotia molding under the tread nosing and nosing return.
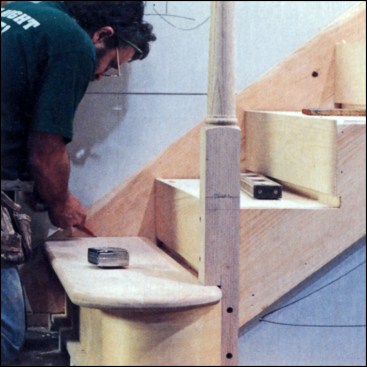
Figure 9: To install treads, the author first cuts them approximately to length — to within scribing range. He then puts them each in place temporarily, making sure the overhang along the front is even. After setting a scribe to the distance between the nosing return and the face skirt, he marks that dimension against the wall skirt. On steps with newel posts, he also has to scribe around the newel post.
Handrail and Balusters
I cut the handrail the same way I cut the face skirt. First I cut the bottom to the theoretical angle, then I prop the rail into place and mark the other end. I cut it a little long on the first try so I can trim it until I have a good fit. While checking the fit, I’m careful not to push the newels out of plumb. I temporarily fasten the handrail with 3-1/2-inch countersunk screws through the newel posts. Later, I fill the holes on the newel posts with bungs taken from scraps of the same wood. However, before permanently installing the handrail, you need to lay out the balusters.
Baluster spacing.
Most codes require a maximum 4-inch space between balusters (Figure 10, “Fastening Balusters and Railings”). Remember that if you’re using balusters that have been turned on a lathe, the maximum spacing rule applies to the thinnest portion along the profile. If you have a turned baluster with a 1-1/4-inch base on a 10-inch tread, you actually end up needing three balusters per tread. With 1-3/4-inch balusters on 9-1/2-inch treads, you might only need two per tread.

Figure 10: After the baluster bottoms are tightened into place using dowel screws, the author installs the handrail over the pin-tops and runs lag screws through the newels to fasten the balustrade system together.
The corner of the first baluster goes right over the corner of the riser and the face skirt. With 1-1/4-inch balusters and a 1-1/8-inch overhang, the centerline is 1-3/4 inches in from the edge. After measuring in from both the side and the front, mark the centerpoint of the first baluster on each tread. To measure the other two baluster centerpoints on a tread, calculate the spacing based on the net run — so that the spacing between the last baluster on one tread and the first of the next is the same as the spacing between the balusters on the same tread. With a 10-inch run and three balusters per tread, you can divide 10 by 3 using the 12th scale on your framing square.
Once you have centerpoints marked on the treads, you can transfer them up to the handrail with a level or plumb bob. At this point, the balusters need to be cut to length and holes drilled in the underside of the handrail, taking care not to blast through the top. I find drilling baluster holes while the rail is temporarily fastened in place works well.
With balusters, I like to see the detail of the turnings follow the pitch of the rail down the stairs. I do this by varying the height of the bottom baluster blocks. In addition, I think that manufactured stock balusters often have ridiculously long bottom squares. I like the longest bottom square on a baluster to be just one rise in height.
On a staircase with a net rise of 7-1/2 inches, the three balusters on each tread will become successively shorter by 1/3 of the rise, or 2-1/2 inches. That makes the bottom squares 7-1/2, 5, and 2-1/2 inches, back to front. After the bottom squares are cut, pin-top balusters should be cut so that they extend at least 3/4 inch into the rail. Square-top balusters should be individually fit and cut so that they butt into the underside of the rail.
For attaching balusters to the treads, all of the stair manufacturers provide a type of dowel screw (a screw that has a lag-type thread on both ends). When screwed into the bottom of a tread, 1/4 x 2-1/4-inch dowel screws really hold a baluster down. To use dowel screws, you have to predrill holes in both the treads and balusters. Some manufacturers predrill the balusters.
To install the balusters, remove the handrail and use the dowel screws to attach the bottoms, making sure the squares line up. Using dowel screws with square-top balusters is harder because they need to tighten to one exact orientation. But with some fiddling, it’s still the best possible option.
Setting the handrail. For pin-top balusters, place glue on the baluster tops and handrail ends. Set the handrail onto the balusters and permanently fasten it into position. Use 1-1/4-inch brads to hold the balusters in position. For square-top balusters, fasten the handrail into position and then plumb, glue, and nail each baluster to the underside of the rail, taking care to center the baluster on the rail. When post-to-post newels are turned on the lathe, blocks are left at the bottom for attaching the newel to the carriage and at the top where the handrails attach. Rails are typically attached to newel posts one inch below the edge of the top blocks.
Jed Dixon operates North Road Stairbuilders in Foster, R.I., and has made several presentations at JLC’s Construction Business and Technology Conferences.
Photos by JLC, illustrations by Tim Healey