Shearwalls for Coastal Homes, continued
Case Study
My current project illustrates how I incorporate these structural solutions into my design concept from the outset (see “A House by the Water,” below). The main house is based on a traditional colonial rectangular shape but with several polygon bays. The bays gather in sunlight and air but are also stronger elements than flat faces that have to be reinforced.
For framing efficiency, I used full-length 40-foot wood I-joists for the first floor, running them from end to end of the house. They are supported on the two end walls and on three framed walls built on their own footings in the basement.
Two of the cross-basement walls also act as shearwalls, anchoring the first-floor diaphragm. Stacked directly above them is a pair of first-story shearwalls, which carry their share of the second floor’s live and dead loads and also serve to handle any lateral load carried into the house by the second-floor diaphragm. Above those two walls I set a third pair, which support the second-floor ceiling (the attic floor) and lock the floor and ceiling diaphragms for that story into the whole-house assembly.
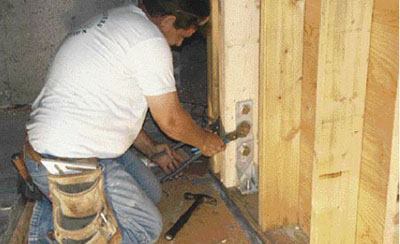
Case Study: A House by the WaterThe author designed this oceanfront home with code shearwall requirements uppermost in his mind from the concept stage. Working with an engineer, he stacked two primary first-story and second-story shear panels directly above basement-level shearwalls (section, below). In this way, he was able to accommodate most of the wind loads from the long axis of the house without cramping the generous space desired in ocean-facing rooms (floor plan, below). The unbroken expanse of the north-facing end wall also contributes (top photo). This wall was left windowless intentionally because it faces the neighboring house on the narrow lot. While the east-facing wall has many windows, the polygonal jogs provide lateral strength through geometry — the same way right-angle jogs in a long foundation wall do. Proper shear panel nailing and hold-down placement are critical, so the engineer prepares a separate plan sheet and fastener schedule for this purpose. The schedule lists the hold-down spec and plywood nail size and spacing for each shear panel location (below). Shear Panel & Hold-Down ScheduleAll plywood panel locations (shown shaded above) are to be fastened to studs using 8d nails spaced at 6″ on-center at all plywood edges and at 12″ o.c. at all intermediate members except for the specially designated shear panel types indicated below.
• All designated shear panels are to have solid blocking installed between studs along plywood edges. • All Simpson hold-down connectors at the second-floor level are to be fastened through to the shear panel below. • All Simpson hold-down connectors at the first-floor level are to be fastened into the foundation wall or supporting beam. |