Rooftop Decks for Coastal Homes, continued
Parapet Wall
We frame the parapet wall with 2×6 plates and studs, and sheath it on both faces with plywood (see photos, below). It supports the deck and also serves in place of a railing; it needs to be high enough so that when the depth of the deck framing and decking is considered, the wall cap will reach the required height for a deck rail.
Half-height parapet walls framed on top of the sheathed roof (top left) enclose most of the deck area, with just a small front panel left open (bottom left). The front opening will receive a cedar railing and will be provided with roof-edge flashing, draining into a painted and copper-lined wood gutter.
Because the roof edge it sits on is sloped away from the house, the studs for the wall have to be individually measured and cut to the proper length, so that the wall height will be uniform above the level walking deck.
The main room walls beneath the parapet walls are mostly full of windows and doors. The headers in those openings are sized to support both the uppermost deck, with its allowable live loads from snow and people, and the more lightly loaded lower-room ceiling frame.
Rubber Membrane
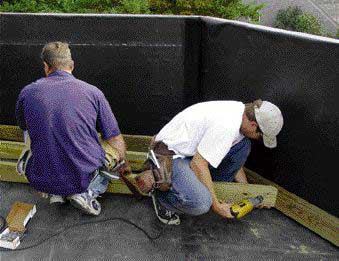
EPDM roofing is a known quantity, with billions of square feet in service and decades of accumulated installer experience. There are several ways to attach EPDM to roofs in the commercial market; for our jobs we use a fully adhered system. First, we screw a rigid insulation board to the plywood roof sheathing, then we apply adhesive to the foam board and lay the rubber over it (see photos, below).
A roofer lays out the specified fasteners for the rigid-foam underlayment (top). After the screws are driven in (center left), the EPDM is adhered to the deck (bottom).
It takes several pieces to completely cover the whole shape of our roof and its parapet walls; seams are formed according to manufacturer specifications, with either applied adhesive or a special seaming tape. We also run the rubber roofing up the main house wall and into the rough window and door openings — when all the seams have cured, we’re left with one continuous, integrated waterproof membrane protecting not just the roof, but also all the vertical walls around the deck, as well as the main house wall and its rough openings (see photos, below).
The roofing contractor rolls adhesive onto the back of the EPDM in preparation for covering the parapet walls (top, center). Lapping and seaming the rubber into wall openings and at intersections and transitions creates a continuous watertight drainage plane capable of protecting vulnerable points in the building envelope against brutal oceanfront weather (bottom).
The contractors I use for my rubber roofs come out of the commercial roofing industry, of course — that’s where most EPDM is used. These little jobs are attractive to them, however: They can make good money on a weekend, and some of my smaller roofs they could just about cover with scraps left over from one of their regular commercial low-slope roofing jobs.