Installing a Twenty-Foot Header – Continued
A bigger challenge was preserving the addition’s clear-span second floor with only 8 1/2 inches of depth to work with. After consulting with a structural engineer, the architect specified 8-inch steel C-channel joists on 12-inch centers; the joists would have to be doubled up under the tub.
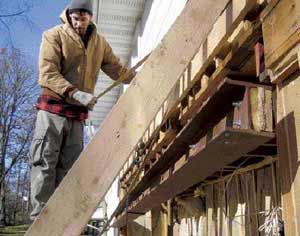
Manhandling the Steel
At 48 pounds per foot, our 19-foot 8-inch header weighed almost 1,000 pounds. We rolled it off the truck on PVC pipes to get it into position, then used a chain hoist to raise it.
We strapped the chain hoist to the temporary 2×10 ledger, found the balance point on the beam, and carefully lifted, keeping an eye on our ledger and shoring as we went.
When it became obvious that we would max out the chain hoist capacity, we finished the lifting with a couple of 1,000-pound-capacity ratchet straps.
The architect planned for the beam’s support posts to bear on the addition’s new concrete foundation. This worked out well; at a little over 8 inches wide, the I-beam wouldn’t fit inside the existing 2×4 framing anyway.
Once the beam was in near-final position, we slipped in the 4-inch-square columns and bolted everything together. We’d had the columns made to exact length, which made it a little tough to get the beam into place. We used a post on a bottle jack to lift first one end of the beam (and the house, too) and then the other end, so we could get the column bases seated.
We didn’t have to worry about cracking the plaster in the bath above as we jacked, because the whole space was being demoed anyway. (Next time, as my fabricator suggests, we’ll make the posts 1/2 inch short to gain a little play, then add shims underneath once the beam is in place.)
Only then — when the beam had solid bearing — did we remove the ratchet straps. We checked the posts for plumb, then installed a couple of wedge anchors through the base plates into the foundation.
Installing Joist Hangers
Next we attached the existing second-floor joists to the beam. To maintain a consistent ceiling plane, we jacked each joist individually to the proper height, toenailed it snug, and installed the hanger. We used a powder-actuated tool to fasten the exterior wall plate above to the top of the header. Finally, with everything secure, we took down the diagonal bracing so we could frame the rest of the addition.
Finishing the Framing
The rest of the framing was a piece of cake — except for the time spent dealing with the steel floor joists.
If you’re used to working with wood, steel framing takes a lot more time. You cut with an abrasive cutoff saw, and all the connections have to be made with an impact driver and self-tapping screws. It took a while to align the precut holes for plumbing and electrical rough-in, and we had to install a row of blocking midspan.
Still, despite the complications, the steel joists were a pretty good solution, especially considering we ended up with a 19-foot span that supports a tile floor and a 70-gallon tub.
Cost of the Steel
The steel beam and posts cost about $1,200 and took less than eight hours to install, including the time spent installing the temporary bracing, plating the web, and preparing the opening.
We hid the steel posts supporting the I-beam in the 2×6 walls of the addition. The addition’s roof and overhang details had been designed to match the existing house, and once the entire house was sided with vinyl, the addition looked as if it had been there forever.
Bjorn Billings owns Billings Carpentry and Construction in Nyack, N.Y.