
Last month in this column, we discussed installing window stool—the first step in trimming the interior of a window. The next step is installing window casing above and below the stool. Casing windows is a task that every finish carpenter faces on just about every project. Experienced carpenters develop methods for casing windows quickly and efficiently, following a series of predetermined steps for each window, the keys of which are outlined in this article.
Window casings attach to the jambs of the window frame, which may require jamb extensions to build them out even with the drywall. The windows in this remodeling project needed thin strips as build-outs, and that step is covered in the installation description.
The details in this article will help you create a strategy to install casing with a minimum amount of time and effort, which in turn will help you become a more professional and successful craftsman.
Objective:
Demonstrate how to install window casing.
Prerequisite Skills:
Basic understanding of carpentry hand tools and techniques.
Familiarity and basic skills with miter saws.
Familiarity and basic skills with pneumatic finish nailers.
Familiarity and basic skills with biscuit joinery.
Tools:
Measuring tape and/or 6-inch steel ruler, pneumatic finish nailer, miter saw, biscuit joiner, basic hand tools.
Vocabulary:
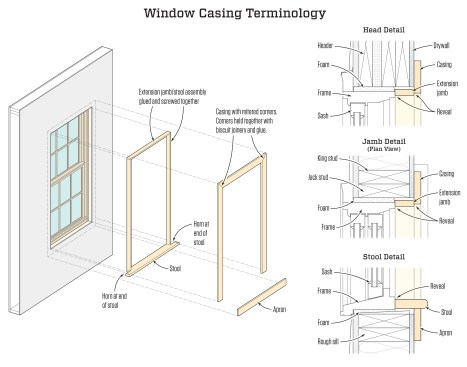
Stool: Flat horizontal part of the window trim at the base of the window.
Jamb casing: Vertical window trim between the side jambs of the window and the drywall.
Head casing: Horizontal window trim between the top window jamb and the drywall.
Apron: Horizontal window trim beneath the stool.
Extension jamb: Strip added to the window jamb to bring it flush with the finished wall surface.
Reveal: The amount of material left exposed as it transitions to a different piece of trim.
Return: A beveled piece of trim that finishes the end with the trim profile.
Biscuit joinery: Using a biscuit spline to align the pieces in a miter joint while strengthening the joint.
Back bevel: A slight angle (usually 5 to 10 degrees) cut into the edge of a piece of trim to let it fit snugly against a mating surface.
Tim Healey