


Tim Uhler
When laying out the footings, the author determines diagonal mea…
Shooting grade. Old-school builder’s levels or transits are accurate but require two people: one to read the level and one to hold the grade stick. Instead, we use a Stabila LAR 250 self-leveling laser (stabila.com), which turns shooting grades and elevations into a one-man job. Whenever possible, I set our laser level up in the middle of the footprint so that I have a sight line to the unit no matter where I am in the hole. I eyeball the footing to see where I think the highest spot is, and take my first reading there. If I set my stick to make sure the minimum depth — typically 8 inches — meets the engineer’s or code requirements there, the rest of the footing will also be thick enough to meet code.
When shooting grade, I start with the outside forms. First I raise a corner to grade and nail one stake, then I move to all the pivot points and do the same. Another carpenter follows behind me, using a spirit level to level the inside forms with the outside forms and then tacking them off. Once the entire footing is raised to grade, we nail off the remaining stakes (one nail per stake), adding nails at the overlaps to keep the forms tight.
Bending and tying steel. When there are no engineering plans to follow, we refer to the prescriptive schedules for steel reinforcement contained in our local code. Often, we source the rebar out to a local shop, and it arrives on site pre-cut and pre-bent. The shop tags the rebar, and we just spread it following the tags and their notations on the prints.
We tie the steel together on top of the spreader cleats, which helps us make sure it is spaced correctly. In our area, code requires overlaps to be 30 times the diameter of the rebar. Since we most often use grade 60 #4 (1/2-inch-diameter) rebar, overlaps must be at least 15 inches long. We shoot for 20-inch overlaps so we don’t have to worry about failing inspection. We use a minimum of two ties at each overlap, twisting the tie wire with lineman’s pliers just enough to keep the rebar tight.
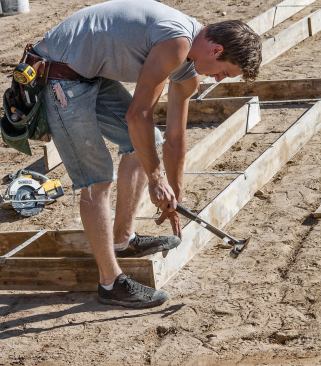
If we’re using pre-cut rebar, the shop usually provides us with 30-inch-by-30-inch 90-degree bent steel for all the corners, which requires a lot of ties. If we’re cutting and bending the steel ourselves (Figure 7), we always put 2-foot bends on full-length 20-foot sticks so that we have to make fewer ties. Once the bar is tied in, we drop it into the footings.
Only after the footing is raised and nailed off do we raise the rebar and tie it to the spreader cleats to keep it suspended in the forms. Then we install any necessary seismic connectors and tie in our vertical steel to the footing steel, leaving the rebar temporarily leaning against the forms until we place the concrete.
Next, if footings for point loads are called out on the plans, we form them to the specified thickness. Sometimes we have to dig down a little so the pads don’t stand too tall in the crawlspace. Typically, we run a wood column through the floor onto the pier pad, though sometimes we’ll pour a stem wall on top of an interior footing if an interior shear wall is required. Then we drop in the steel reinforcement and brace the formwork to keep it plumb.
Placing concrete. Most of the time, we use a local line pump contractor to place our concrete. He does all the line handling, which makes our job much easier, allowing us to focus on screeding and troweling the concrete. We’ve used boom pumps before, but the concrete sometimes comes out so fast it can blow apart forms or even steel, and one of our crew has to man the hose.
A line pump pour is more relaxed, and I can keep my eye on the forms. While it takes a little longer — maybe an hour on a typical job — we still save a minimum of $200 on each pour over the cost of a boom pump.
Once the footings are filled, we screed off the tops of the forms and trowel the concrete smooth with a magnesium trowel. A smooth surface helps the stem-wall forms to sit flat on the footings, eliminating gaps that might allow a wet wall mix to leak out of the forms.
Snapping layout.I like to pour in the morning so that after lunch we can snap lines for the stem walls and set the spreader cleats that will hold the underside of the panel forms. We place the clips 16 to 24 inches on-center — a spacing that helps keep the forms straight — and push 1 1/2-inch nails through their center holes into the wet concrete to hold them in place.
Once the concrete feels firm enough, we strip the footings and break down and stack the form boards to use again for our next footing (form boards last for about 10 footings). [Story continues next month.]