
Darren Tracy
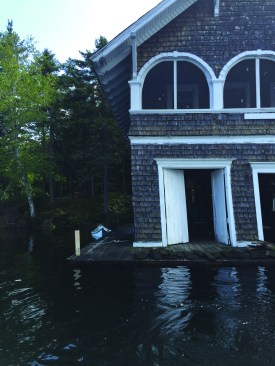
This Adirondack boathouse, built some hundred years ago, needed structural remediation to keep it from collapsing into the lake.

Darren Tracy
The boathouse was originally supported by rock piles surrounded by timber cribbings.
The Adirondack Park covers more than 6 million acres in upstate New York. Before the advent of air conditioning, its 10,000 lakes and cool mountain air offered affluent city dwellers relief from the summer heat. Many of the lakeside houses that those folks built around the turn of the last century are still in use.
A common sight at these “camps” (as they have also been called) are boathouses built out over the water, essentially boat garages. As you can imagine, a northern lake environment is not ideal for a wooden structure, especially for one that literally sits on top of the lake. The moisture is one obvious risk to the building. But also, the lakes in this region tend to freeze over most winters, and the forces associated with such an icy building site are extreme, to say the least.
The owners of one such boathouse hired our construction firm, West Branch Inc., to repair the structure, fearing that it wouldn’t survive another winter without falling into the lake. No strangers to unique projects, we accepted the job, which would be completed in two phases. The boathouse obviously would need a new foundation, but that phase would happen sometime in the coming year. The more immediate phase of the project would be the raising and stabilizing of the boathouse before the winter arrived along with the lake ice.
Darren Tracy
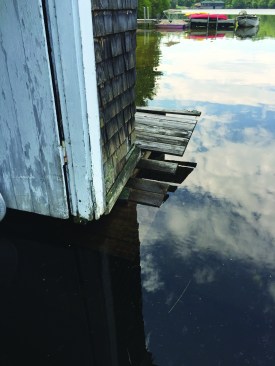
Though the east side had not dropped as much as the other side, its support was compromised as well.
Darren Tracy
The west side of the structure had dropped more than the east side.
Crumbling foundation
From above the water, the urgency for a repair was evident. After many years, support for the boathouse had given way, letting the building sink into the lake. The west side of the structure had dropped much further than the east, and the structure needed to be stabilized before going through another winter. Through our investigation, we determined that the deterioration of the support was due to a number of factors: fastener corrosion, rot, and the forces of lake ice.
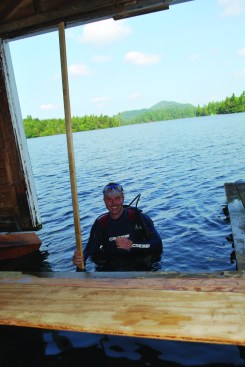
We donned scuba gear and examined the situation below the water. The original boathouse had been built on a “foundation” that consisted of timbers stacked log-cabin style around the boathouse perimeter to form cribbings. Large rocks inside the cribbings formed a base upon which the boathouse was built.
We found that some of the cribbing timbers were missing (because of rot or fastener failure). Foundation rocks had then fallen out through the resulting gaps, and the slow sinking process began. The timbers had been pinned together by long spikes, which over time had corroded to the extent that they could no longer resist the lateral forces of the rocks and ice, so they sheared off—or in some places, completely disintegrated.
When we were preparing to raise the boathouse, we needed to remove some of the cribbing timbers. Some were lightweight and full of knots, so they were most likely northern white cedar, a species local to the area. Other, much heavier timbers were probably white oak, again a locally available species. The natural rot-resistance of both species made them good choices for building cribbing that would spend its life submerged—a life that sadly was near its end.
The most damaging factor—besides the damp environment—was the lake ice. Ice movement can exert tremendous forces on structures that sit in water. The exact forces are difficult to calculate precisely because they are affected by variables such as wind, water currents, ice thickness, ice quality, snow cover, and the general severity of winters, but some experts conclude that forces exerted on a structure from lake ice can be as much as 400 psi (the compressive strength of ice). In this case, the ice had moved the boathouse, pushing the west wall of the boathouse to the east over the years. The racking that resulted could be seen clearly in the out-of-plumb walls and out-of-square door openings.

Tim Healey
Plan of attack
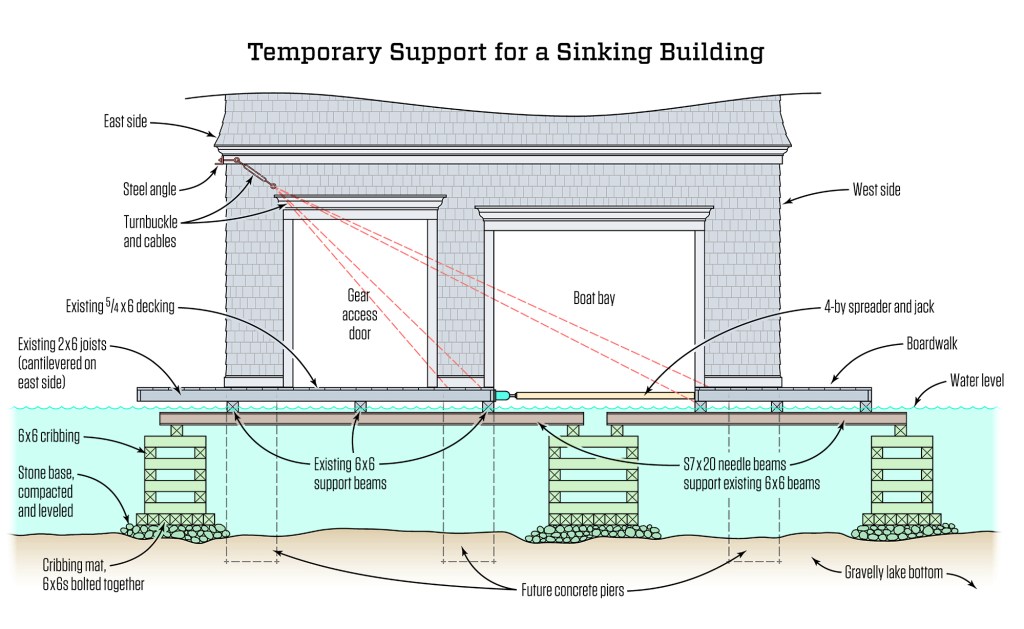
Our mission of stabilizing the boathouse was twofold: Raise the structure so that it was no longer sitting in the water, and reverse the racking caused by ice. One of the boathouse owners contacted local governing agencies and requested permission to undertake emergency stabilization of the structure. We submitted a simple, preliminary sketch including an elevation (see “Temporary Support for a Sinking Building,” facing page) and a plan view of the temporary cribbing and needle beams, and our proposal was approved by the various governing authorities.
In preparation for the project, the owners removed the boats and gear from the interior to give us a clear working space. The boathouse floor consisted of 5/4×6 decking attached to 2×6 joists that ran parallel to the shore. The joists sat on a series of 6×6 support beams. The flooring lumber was pressure treated and in good shape, having been under cover all those years.


Darren Tracy
The bottom layer of each new cribbing was a mat of 6x6s bolted t…
Cribbing for the raise
Our raising strategy was fairly simple. We would insert needle beams under the support beams of the boathouse floor and jack up the structure using cribbing for support. Our original plan called for two sets of cribbing in the boat bay along with cribbing on either side of the building. After carefully measuring, we decided that a single, 4-foot-square cribbing would work best in the boat bay. At the ends, the cribbing would be smaller (32 inches square) so we could use material we had on hand.
To minimize costs, we wanted to use stock I-beam steel for the needle beams. One of the beams would extend from the boat bay to the west side and clear the entire structure, including the deck on that side, but just barely. We weren’t as lucky with the beam on the other side, though. With one end of the beam on the bay cribbing, the other end fell under the 48-inch-wide deck along the east side. This meant that the east cribbing would need to be positioned under the deck floor. We removed some of the decking boards along that side to give us access to the cribbing.
The bottom layer of each cribbing was a mat of 6x6s bolted together with threaded rod. We built the cribbing mats on the nice, flat surface of the boathouse floor and then slid them into the water. We built the rest of the cribbing on top of the pads, log-cabin style. One of our crew members, Brett, toe-screwed timbers to the mat and then to one another so that the stacks of cribbing would stay together and could be moved as a unit in the water. Attaching cribbing timbers to one another is not necessary in a typical jacking operation on dry ground.
While working in the water added to the challenge of the project, it also offered the advantage of buoyancy to help us move the cribbing stacks into position. The water at the shallow end of the boat bay was only about 18 inches deep; from there, the gravelly lake bottom dropped off rather quickly to a depth of 5 to 6 feet at the outer wall of the boathouse. With the mat floating at the shallow end, Brett screwed together the first couple of cribbing layers. Then we floated the assemblies out to deeper water as their weight and height increased, saving us from having to lift and move the massive stacks into place.
To give the cribbing stacks a flat and stable base on the bottom of the lake, we gathered melon-size stones from the site and hand-placed them at each location where the cribbing was to be positioned. We compacted the stones, using a 6×6 beam in a pile-driver fashion to create a flat base, and a furring strip to check the depth.
We made the outboard cribbings out of green oak but didn’t have enough oak available for the 4-foot cribbing in the boat bay. Instead, we made that cribbing out of 6×6 pressure-treated southern yellow pine timbers, which were less dense and more buoyant than green oak. We used the heaviest timbers we could find to neutralize the buoyancy effect. Still, that cribbing wanted to float like a boat. We ended up piling concrete blocks and timbers on top of the cribbing to help sink it.
Jacking and straightening
Before we started jacking up the boathouse, we installed a cable and turnbuckle to keep the building from racking further as it was lifted. The turnbuckle would also let us plumb the walls after the lift. We used a ½-inch turnbuckle with a working limit load capacity of 2,200 pounds for this particular application.
To attach the end of the turnbuckle eyebolt, we installed a 3×3 by 1/4-inch-thick steel angle on the outside of the east wall at a height that would catch both the double top plate and the second-floor joists. The angle spread the load from the turnbuckle assembly over several joists and the plates. To start out, we attached the lower end of the cable to the east side of the boat bay.
With the cribbing in position and the walls stabilized, we were ready to begin the jacking process. We removed rock from the original underpinning and threaded the needle beams under the structure, resting the ends of the beams on the cribbing. We then set blocks on a lower tier of cribbing to support the jacks and started raising the needle beam until it made contact with the 6×6 support beams under the floor.
We used hydraulic bottle jacks and screw jacks to raise the needle beams. The bottle jacks did the lifting, and then we inserted screw jacks to hold the needle beams while we repositioned the bottle jacks. We were able to raise the floor to the proper height over the course of one day.
The existing 6×6 support beam on the west side of the boathouse developed a significant sag as we raised the needle beam. To overcome this sag, we added smaller, less elaborate supports at two other places along that side.
As we jacked, we also had to add more cables to help square the building because just one wasn’t doing it. When there seemed to be too much tension on the one cable, we added another cable. Then we torqued both of them taut enough to play a tune, so we needed to add a third cable. By that time, we had used up our turnbuckle hardware, and being in the middle of nowhere, we again made do with what we had on hand—in this case an extra come-along that we’d brought with us.
Even with three cables, we weren’t able to pull the walls plumb, so we reattached the cables to the west wall. This decreased the cable angle, allowing us to apply greater force. But then we ran the danger of pulling that wall in, so we added a couple of spreaders across the boat bay to stabilize the bottom of the wall.
We also disconnected several wood brackets that connected the wall to the second-floor joists. These brackets had been added over the years to help stabilize the structure. Even then the walls did not rack back completely plumb. We could have pulled them closer by adding more cables, but the owner decided that it was not worth the extra effort and cost. Like many things in life, it was a trade-off in a less-than-perfect world.
In hindsight, I wish that we had applied vegetable grease to the tops of the needle beams to reduce the coefficient of friction and help the walls slide over more easily.
Hunkered down for the winter
As we raised the needle beams, we blocked and shimmed until the sides of the boathouse were level. Then we replaced the shims with more permanent solid blocking to carry the load over the coming winter. We kept the cables in place along with the spreaders in the boat bay, and we left with the boathouse high and mostly dry. The owner also installed a bubbler system around the cribbing, which will keep ice from forming.
After the ice melts next year, we hope to return and install a stronger, more permanent foundation system that will extend the life of this old boathouse long into the coming century.