Rescuing a Block Foundation, continued
Securing the Brackets
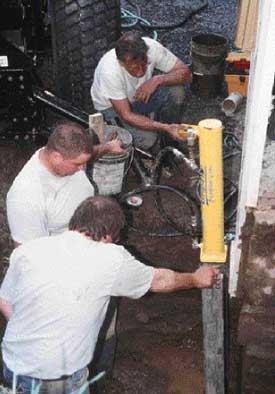
When all the posts are in the ground, we leave the hydraulic cylinder connected to the final post installed and attach smaller hydraulic cylinders to the posts installed earlier. This important step equalizes the loading on both piers. These smaller cylinders have just about 4 inches of travel, so we use them only for equalizing the bearing pressure between all the posts.
On larger jobs, we can connect up to 16 cylinders at a time, allowing us to work on foundation walls as long as 40 feet. On the job shown here, there were only two piers, so the process went quickly. With the pump connected to both cylinders, we again brought the pressure to 4,000 psi. With both piers under equal pressure, we bolted the caps that lock the piers in their final position. We then moved on to the second part of the job, the bulging foundation wall.
Installing Wall Ties
Grip-Tite’s wall ties consist of two 24-inch steel plates connected by a section of 3/4-inch galvanized rod. One wall plate is placed in the center of the bulge inside the building and the other goes in a hole outside, buried about 9 feet away from the foundation in virgin soil. Tightening the nut on the threaded rod draws the two plates together and straightens the wall. In this case, the outside earth anchor was located about 36 inches below grade in a 2-foot-diameter hole, which we dug with an auger, saving the sod so we could replant it later.
Wall ties go in pretty easily. The only difficulty is lining up the threaded rod so that it hits in the center of the hole outside. We look for pipes and wires running to the outside and use them as landmarks, but if there’s nothing close to the hole, we measure off a house corner. We drill through the block with a 7/8-inch bit on our rotary hammer. The proprietary rods are 9 feet long, and the manufacturer offers 4 1/2-foot extensions that connect with a coupling. The extensions are handy when we have to locate the holes outside around obstacles such as sidewalks, trees, and decks.
Grip-Tite recommends a pneumatic demolition hammer for driving the rods; we have one, but sometimes it’s easier just to use a sledgehammer, which is fine for most soils. A pair of hex nuts on the threaded rod prevents thread damage while driving it, and a hardened conical tip on the other end breaks through most obstructions without a problem. It’s usually just a matter of driving the rod until it appears in the hole outside. Having a second person steady the rod makes it easier to hit, and a spotter on the outside watching the hole prevents us from driving the rod too far — it’s tough pulling it back toward the house.
Before installing the washer and nut, we slip a plastic sleeve over the threaded rod. Once all of the ties are in position and hand-tightened, I use a torque wrench to tighten the bolts in 10-pound increments until the wall is back in place or we reach 80 foot-pounds.
We can often bring bulging block walls back in line without any excavation, but it’s obviously easier when there’s no soil pushing back. So when we have a hole already dug, as on this job, we tighten the wall ties before backfilling. In this case, we were able to almost eliminate the 3-inch bulge in the center of the wall.
Once all the wall ties are tight, we backfill the holes in 6-inch lifts, using a hand tamper to compact the soil.